Archive for the ‘Archive’ category

Mt. Shari (斜里岳)

August 21, 2008

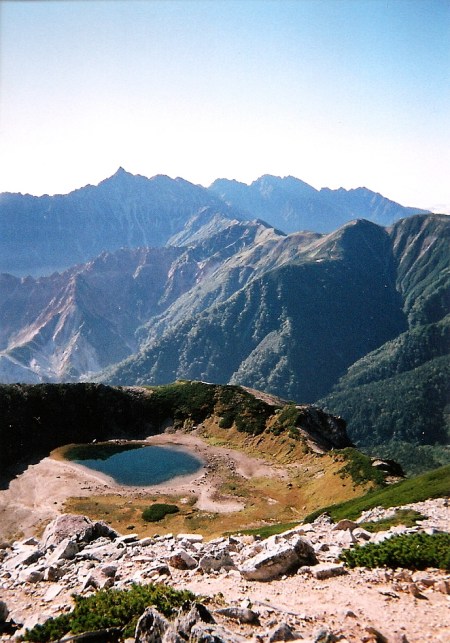
Mt. Shari is a pointy, rocky peak situated roughly halfway between the Akan lake volcanoes and the Shiretoko Peninsula. The views from the summit towards the Sea of Okhotsk and Pacific Ocean are awe-inspiring.

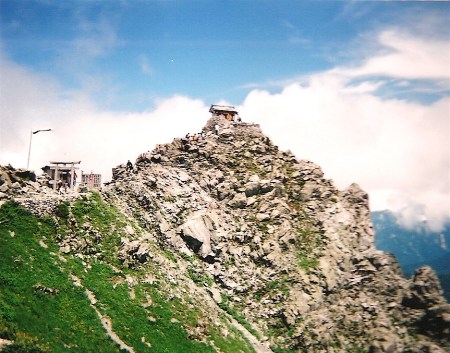
The hike: From the massive parking lot, take the trail that starts next to the hut. It cuts through a pine forest before quickly dropping to a gravel forest road! Turn left on the road and follow it for about a half a kilometer. The road hits a dead end, where the actual trail starts. This is where the original hut used to stand before the new one was built. Anyway, turn left into the forest. The path follows a beautiful stream for a short time and you’ll soon reach the first of 12 river crossings. There are rocks that you can step on to make your way across, so there’s no need for special shoes and for getting your feet soaked. However, if it’s been raining recently and the stream is swollen then you’ll definitely get wet on the crossings. Shortly after completing the last crossing you’ll reach a trail junction. You have two options, but I recommend doing this trail as a loop by climbing up the left path and descending via the right path. The path to the left is the Kyuudou (旧道 – old path) and the trail on the right is the Shindou (新道 – new path). The old path is also known as the waterfall route, as it basically climbs past countless waterfalls. Again, if the stream is swollen then you might want to consider avoiding this path. Take a left and you’ll soon reach your first waterfall. There are another half a dozen stream crossings along the way, and plenty of ropes and chains in the tricky sections. Overall it’s not too terribly difficult if you’ve got shoes with good traction. After about an hour of climbing the stream will start to peeter out and you’ll come across a junction. This is where the old and new paths meet to become one trail to the summit. It’s marked with a sign written as Kamifutamata (上二股). There’s a small flat space that has room for one tent and it’s probably the only place to pitch a tent on the entire mountain. Stay to the left for the steep climb up to Uma no sei (馬の背 – the horse’s back) where you’ll find your first view of the summit. Turn left again and climb up the steep peak just in front of you. It should take about 10 minutes to reach the top, where the path will flatten out and you’ll pass a small shrine. Drop down to a saddle just below the summit and climb steeply for another 20 minutes or so before reaching the top of Mt. Shari. The scenery on a clear day is fantastic, with a bird’s eye view of the town of Shari, the Sea of Okhotsk, Mt. Rausu, Kunashiri island, and even out to Mt. Meakan! Retrace your steps all the way back down to Kamifutamata and turn left. The trail is relatively flat at first, passing by a trail branching off to the right. You can either take the right trail that passes by a small pond or continue going straight. Both paths will meet up later on, so take your choice. This area definitely looks like bear country, so use your bear bell if you’ve got it. Shortly after passing the loop trail turnoff, the path will climb up to a mountain pass called Kumami-toge (熊見峠). The scenery is very reminiscent of the Japan Alps, as you pass through an area of brush pine with wonderful views over to the summit. After reaching the pass, the trail drops very steeply back down to the stream. On your way down take a look at the trees lining the path, as their branches have been stained with sweaty by countless hikers grabbing onto them. It’s kind of interesting to see how many hikers have grabbed the tree branch in exactly the same place! You’ll reach the original trail junction in about 30 minutes or so, and turn left again to go back to the forest road you started on. Overall, it’s a 9km round-trip hike that should take you anywhere from 4 to 6 hours, depending on your speed.

When to go: This hike can be done from late June to early October when most of the snow is gone. A winter ascent is also possible with the right equipment and experience. There’s a sign at the trailhead prohibiting hikers from starting after 12 noon, so it’s imperative that you arrive at the trailhead in the morning. It’s a stupid rule that the hut manager does his best to enforce. If you arrive in the afternoon, then you can stay at the concrete bunker known as the Kiyodake hut (清岳荘) for 2000 yen. There are no meals served nor is there any drinking water. You’ll either have to boil and filter the water coming out of the sink or buy expensive bottled water from the hut manager.

Access: From either Kushiro (釧路) or Abashiri (網走) stations, take the JR Senmo Line and get off at Kiyosatocho (清里町). From there, take a taxi to the Mt. Shari trailhead. The station is small and unmanned, so call the Kiyosato taxi company at 01522-5-2538 and they’ll pick you up. The taxi costs roughly 4000 yen. Hitching is pretty difficult because the road is gravel and used only by people climbing Mt. Shari, who usually arrive at the trailhead at unreasonable hours! Hitching from the trailhead, however, is relatively easy.

Live web cam: Click here

Map: Click here

Level of difficulty: 4 out of 5 (elevation change 857m).

Mt. Washiba (鷲羽岳)

July 27, 2008

Mt. Washiba, or ‘eagle feather’ mountain, is a glorious alpine peak lying on the Nagano-Toyama border in the Kita Alps. The granite peak is famous for its mysterious volcanic crater lake, situated just below the summit.

The hike: From the bus stop at Shin-hotaka, cross the bridge and follow the paved road toward the right. It’ll climb past the Hotel New Hotaka (ホテルニューホタカ) before turning into a dirt forest road. The road is really easy hiking, following a river. Follow the road for about 90 minutes, being careful not to take the trailhead to Mt. Kasa. You’ll pass by a campground and hut at Wasabi-daira (わさび平) before finding the trailhead another 20 minutes up the road. The trail starts climbing up a cirque, and after about 2-1/2 hours will reach a junction called the Kagami-daira bunki (鏡平分岐). Take the trail to the left if you’d like to climb directly up to the ridgeline towards Mt. Yumiori (弓折岳). Both trails eventually meet up on the Yumiori summit, so it might be better to stay to the right, so you can see the phenomenal reflections of Mt. Yari in the mirror lake at Kagami-daira. Kagami-daira hut (鏡平小屋) is open from July 10th to October 15th and has no campground. Click here for the website. Most people stay here for the night, but if you’ve brought a tent or it’s still relatively early in the day, you can continue on to Sugoroku (双六), which is another 2 hours away. Continue climbing on the same trail and you’ll reach Mt. Yumiori. From here to Sugoroku it’s a relatively easy ridge walk with wonderful views. Sugoroku hut (双六小屋) is run by the same people as Kagami-daira and offers exactly the same prices, but has the added advantage of a large campground. Use this as your base for exploring the surrounding peaks. The next day, follow the trail in front of the hut towards Mt. Sugoroku (双六岳). You’ve actually got 2 options. You can either climb up to the peak and stay on the ridge line to the summit of Mt. Mitsumata-renge (三俣蓮華岳) or you can opt for the easier shortcut trail that bypasses all of the peaks. Just take a right at the first trail junction you see after leaving the hut. Both trails meet up at the same place, so take your pick and head towards Mitsumata hut (三俣山荘). You’ll find another campground at this hut, as well as a water source. The hut sits at the foot of Mt. Washiba (鷲羽岳), and you’ll see it towering directly in front of you. It should take about an hour or so to reach the summit, where you’ll pass by a spur trail leading down to the volcanic crater lake. On a clear day, you can see all of the Kita Alps, including the peaks of Hakuba and Tateyama, as well as Mt. Yari, Hotaka, Kasa, Yake, Norikura, and out to Ondake. From here, you can either continue on the same ridge line over to Mt. Suisho (水晶岳), which is also one of the 100 famous mountains, or retrace your steps back to Sugoroku. The options for multi-day traverses are endless, and if you’ve made the effort to climb all the way up here, you might as well stay on the ridge line for a few days.

When to go: This hike can be done from late May to early November. Just like the neighboring peaks of the Kita Alps, Mt. Washiba is considered an expert climb in the winter, and challenging even during Golden Week because of all the remaining snow.

Access: From Takayama (高山駅) station, take a bus bound for Shin-Hotaka Hot Spring (新穂高温泉) and get off at the last stop. Click here for the bus schedule. There are also buses from Matsumoto station (松本駅) in Nagano, and there may even be direct night buses from Tokyo.

Level of difficulty: 5 out of 5 (elevation change ~1900m)

Mt. Iide (飯豊山)

July 23, 2008

Last updated: Feb 18, 2025

Mt. Iide is without a doubt the best multi-day hike in the Tohoku region. The stunning scenery and abundance of mountain huts attract a large number of hikers in the summer months.

The hike: From the bus stop, hike through the small town and onto a gravel forest road. If you’ve hired a taxi then it’ll take you directly to the trailhead, saving this 30-minute walk. At the end of the road there’s a campground and small hut with hiking information. The trail is clearly marked and starts off as an extension of the road you’ve been hiking on. Soon enough it’ll branch off to the right, and this is where the real hike starts. It’s one heck of a climb, with a 1200 vertical meter elevation gain before reaching the ridge line! The maps say it’ll take 5 hours to reach the first hut of the day (at Mikuni-dake), but if you’re in shape you can do it in about 2 hours or so. The trail is very well-trodden, with lots of tree roots to climb up and over. The forest is all virgin beech, and the greenery is stunning. You’ll reach a water source at a place called Nakajugori (中十五里), but it’s not a reliable source of water (it’s a 5 minute hike down a spur trail to the right, and the water was just barely trickling out in mid-July). It’s better to fill up your bottles at the trailhead. A bit further on, after passing Sasa-daira (笹平), you’ll see an unmarked trail branching off to the right. Ignore this trail, as it’s an alternative way up the mountain and continue climbing toward the left. In another 10 minutes or so, you’ll reach another trail junction. You can either head right to climb to the summit of Mt. Jizo (地蔵山), or take the easier spur trail to the left. I’d recommend taking the left trail, because it passes right by a nice water source gushing with refreshing water. You can also see the ridge line of Mt. Iide rising up on your left. Soon after passing by the spring, you’ll meet up with the trail coming from Mt. Jizo. Turn left and follow the rocky ridge line towards Mt. Mikuni (三国岳). This trail is easy to find in clear weather, but could be a bit tricky if the fog is in, as there are no paint marks on the rocks. My advice is to follow the rocks that have scuff marks on them. This is not a place that you want to fall, but if you keep climbing then you’ll eventually pop out on the summit ridge, and they’ll be a hut awaiting you! If you’re set on a 3-night, 4-day hike, then check into the hut and enjoy the scenery. None of the huts on Mt. Iide have food or blankets, so you’ve got to bring a sleeping bag, stove, and food. The only downside with staying at Mikuni is that there’s no reliable water source, so if you’ve got extra time or energy, it’s better to push on for another 90 minutes to Kiriai hut (切合小屋), which has plenty of water. The ridge line between Mikuni and Kiriai is tricky, with a few chains in places, but the closer you get to Kiriai the easier it gets. You should also see your first set of snow fields. Just before the hut you’ll see a trail coming in on the right. This is another alternative way up the mountain, and very popular with people because it’s the shortest route up. If you’re a sucker for punishment, then you can continue another 90 minutes or so to Honzan hut (本山小屋). The trail will climb through a long snow field, and then drop steeply on the other side to a saddle, where you’ll find a Jizo statue. Then it’s a long, endless slog up to the hut. Most people take 2 days to reach this hut, but I made it in only 5-1/2 hours from Kiriai to this point. The hut manager is very friendly, and a place on the floor costs 2000 yen. All of the huts on Mt. Iide charge similar prices, but all have places to pitch your tent as well. From Honzan hut, it’s a 20-minute hike to the top of Mt. Iide, which is far as most hikers go. However, part of the beauty of this mountain is to traverse the entire length. It’s only 34.5km from end to end, and can be done in 3 days without a problem. Anyway, continue past the top of Mt. Iide, towards Mt. Dainichi (大日岳), the highest peak in the entire range. If the weather has been good then you’ve probably been staring at it ever since arriving at Mikuni! It should take about an hour or so to reach the trail junction at Onishi hut (御西小屋). You can leave your pack outside of the hut for the up-and-back assault of Mt. Dainichi. The maps say to allow 2 hours to reach the summit, but you can easily make it up and back in that time if you’re fit. You’ll have to cross a small snow field along the way, so take extra care if the snow is icy. The scenery is outstanding, as the Fuji-esque silhouette of Mt. Bandai stretches out in front of you. You can also see the peaks of Nikko National Park on a clear day, as well as Mt. Asahi, Gassan, and Mt. Chokai. Mt. Sado and the Sea of Japan will also greet you to the west. Head back down to the hut, where it’s time to make a decision. The next hut is 3 hours away, on a relatively flat ridge line. Keep pushing on if it’s early or you aren’t too worn out. There are a lot of snow fields to cross in this next section, so if you’re not confident then consider bringing a pair of light crampons to help boost your confidence. Climbing is no problem. but descending can be a bit slippery depending on snow conditions. Also, the track is a little difficult to follow in foggy weather, but luckily it’s well worn, so when in doubt always look for the footprints in the snow. You’ll pass by a few magnificent alpine lakes before reaching the summit of Mt. Eboshi (烏帽子岳). From here it’s a big descent to Kairagi hut (海花皮小屋). There’s plenty of delicious fresh water here, so take a break and check into the clean, beautiful hut if you’ve chosen this as your place to spend the second (or third) night. There’s a trail leading straight down the valley directly in front of the hut, but this is for climbing only (it’s one of the famous cirque climbs in Japan, up a very long and steep snow field). The next big climb is to the summit of Mt. Kitamata (北股岳), where you’ll find a small shrine. This is the highest peak in the northern section of the Mt. Iide mountain range. From here, it’s a relatively easy traverse over to Mt. Monnai (門内岳). Here you’ll find the final hut on the traverse. Check-in here, or push along for the 4-hour knee knocking descent down to Iide hut (飯豊山荘), with it’s lovely hot spring bath! To get there, continue on the ridge for about 20 minutes and you’ll find a trail junction. Turn right and follow the trail, down 1400 vertical meters. It’s quite steep, but there are plenty of tree roots to grab onto. There’s a water source about halfway down the descent. Take the short spur trail on the left in order to reach it. Remember the bus schedule before you set off for Iide hut. If catching the afternoon bus, then head down early enough too enjoy a 500 yen bath. It’s also possible to stay at the hut for 1700 yen (including use of the hot spring) if you tell them you’ve got your own sleeping bag and food. It’s also possible to continue along the ridge line all the way to Mt. Eburisashi (朳差岳) one of the 200 famous mountains of Japan. As it’s a 10km traverse from Monnai, you’ll need an extra day to reach it. Also, there’s no bus service from Oku-tainai (奥胎内) at the end of the hike, so you’ll have to fork over 9000 yen for a taxi.

When to go: This hike can be done during July and August only, when the buses are running. If you’ve got your own transport then you can do it in June or September. This mountain gets a ton of snow in the winter, so it’s better to avoid unless you’re training for Mt. Everest or something.

Access: From Niitsu (新津) station, take a train on the Banetsu-sai (磐越西) line bound for Aizu-wakamatsu (会津若松) and get off at Yamato (山都) station. From there, take a bus bound for Kawairi (川入) and get off at the last stop. There are only 2 buses a day running from mid July to mid September , so it might be better to shell out 7000 yen for a taxi if you miss the 8:50am bus. Click here for the schedule and call 0241-38-2025 to double check the 2025 schedule.

At the end of the hike, take a bus from outside of Iide-sanso (飯豊山荘) bound for the hospital (病院前) and get off at Oguni (小国) station. Again, there are only 2 buses a day, so make sure you’re off the mountain by 9am to catch the morning bus, or you’ve got to wait around (at the hot spring) all day. Click here for the schedule.

Map: Click here

Level of difficulty: 4 out of 5 (elevation change ~1722m).

Mt. Zao (蔵王山)

July 16, 2008

Last updated: Feb 17, 2025

Mt. Zao is one of the most popular ski resorts in Japan, and home of the famous ‘snow monsters’. In summer, it’s an easy stroll via a picturesque volcanic lake, and the hot springs at the base of the mountain are an added bonus to help rejuvenate tired muscles.

The hike: There’s no doubt about it. The ease of access will bring huge swaths of crowds in the summer months, but with a little timing you can have some peace and solitude. My advice would be to arrive at Katta-toge in the early evening and stay at the stone emergency hut at the summit of Mt. Katta (刈田岳). The hut is unmanned and completely free to stay in. Bring your own water and be prepared for a 10 minute walk to use the toilets at the parking lot. This way, you can wake up at the break of dawn and enjoy a wonderful stroll without a soul in sight. From the huge parking lot, follow the well-marked trail towards Mt. Kumano (熊野岳). Along the way, you’ll pass by a stunning volcanic lake on your right, named Okama (御釜). The emerald green colors are breathtakingly beautiful (or so I’m told – I was unfortunate because the lake was completely hidden in thick fog!) Click here to get an idea of the scenery in good weather. Continue on the same trail for a gentle climb, taking a left at the only junction you’ll find. You’ll be on the summit of Mt. Kumano in about 20 minutes, where the views are stunning in nice weather. Yamagata city stretches out directly below you, framed in the distance by Mt. Iide, Mt. Asahi, and Gassan. From the summit, you can either retrace your steps back to Katta-toge, or descend down to Zao Onsen via the long ski resort. I recommend the latter option as the only bus from Katta-toge doesn’t leave until 1pm. The path through the ski resort is well-marked, and just before you take the final descent toward the very bottom of the lift, look for a bridge branching off to the right, which will take you to the ‘big bath’ (大露天風呂), a fantastic outdoor bath with milky white water. Unfortunately it’s not open in the winter, because there were problems with peeping Toms from the ski runs above. It’s definitely one of the highlights of Zao hot spring, so don’t miss this chance! Click here for more info.

When to go: This hike can be done year round if you’ve got some snowshoes. In fact, I’d recommend combining this hike with a weekend on the ski slopes. If the weather is good, then you can take the gondola up to JIzo-sancho (地蔵山頂) and hike for one hour via a route marked with huge poles to the summit of Mt. Kumano (熊野岳). Otherwise, you can opt for an easy stroll from the trailhead at Katta-toge.

Access: From Yamagata (山形) station, take a bus bound for Zao Onsen (蔵王温泉) and get off at the Zao Onsen bus terminal (蔵王温泉ターミナル). The bus takes about 30 minutes and leaves once an hour. Click here for the schedule. There’s only one bus a day going directly to the trailhead at Katta-toge (刈田峠) and it only runs in the summer. If you miss this bus, then just take a regular bus to Zao Onsen and either hitchhike from there or take a taxi. (or start your hike from there for the 1000m vertical ascent to the summit).

Digital Map in English (Avenza App): Click here

Level of difficulty: 1 out of 5 (elevation change ~200m).

Odai-ga-hara (大台ヶ原)

July 4, 2008

Last updated: Feb 21, 2025

Odai-ga-hara ranks up there with Utsukushi-ga-hara, Mt. Hachimantai and Kiri-ga-mine as the most accessible of the Hyakumeizan, as you can practically drive to the top. The views on a clear day are outstanding, but the entire place can be downright depressing when the cloud is in, which is more often than not.

The hike: This is a loop hike, so it can be done in either direction. From the enormous parking lot, follow the signs (and crowds) past the visitor’s center towards Hide-ga-take (日出ヶ岳), the true summit of Odai-ga-hara. It’s a mind-numbing 120m vertical ascent that can practically be done barefoot. The views are really nice on the rare occasion that it isn’t raining. From here, you could continue past the peak and descend into Osugi-dani (大杉谷), but I’m not sure if the trail has been re-opened yet (Editor’s note: It has been reopened). If the trail is open, then prepare yourself for one of the gnarliest, steepest drops in the Kansai area. If you’re just up for the day, then continue on the same trail for an easy 30-minute stroll over to Masaki-ga-hara (正木ヶ原). There are plenty of deer in this area, and the foliage and moss are wonderful. Soon after passing this area, a trail will come in from the right, but ignore it and follow the signs towards Daija-gura (大蛇嵓), an exposed rock formation with vertigo-inducing views of the valley below. This is the most famous (and popular) part of the hike, but only worth it on a clear day. Daija-gura is accessible via a dead-end spur trail branching off to the left. Retrace your steps back to the main trail and turn left for the 1 hour hike back to the parking lot. All together it’s a 9km hike, but because of the relative flatness of the mountain, it should only take about 2-1/2 hours to complete. Yet another peak where getting there will take much more time than the actual hike.

When to go: This hike can be done from late April to late November, when the bus to the summit is running. If you’re prepared for a long hike, then you can also do this during the winter, where you can avoid the crowds. Unfortunately you’ll need your own transport to get to the trailhead.

Access: From Abenobashi (阿倍野橋) station in Tennoji, take the Kintetsu Yoshino Line bound for Yoshino (吉野) and get off at Yamato-Kamiichi (大和上市) station. From there, change to a bus bound for Odai-ga-hara (大台ケ原) and get off at the last stop. The bus runs from late April to November 25th, and there are only 2 buses a day on weekends, and 1 bus a day on weekdays. Click here for the bus schedule. The bus to Odai-ga-hara now departs from bus stop #1 of the South Exit of Yamato-Yagi Station (Kintetsu Osaka Line/Kintetsu Kashihara Line) Click here for the bus schedule once it gets released for 2025 (they should have the schedule up by April)

Digital Map in English (Avenza App): Click here

Level of difficulty: 1 out of 5 (elevation change ~120m).

Mt. Oku-hotaka (奥穂高岳)

July 1, 2008

This blog post was written back in 2008. For the latest information about this hike (including color photos and maps), please consider purchasing my guidebook to the Japan Alps. 

Mt. Oku-hotaka is the 3rd highest peak in Japan and one of the most exhilarating climbs in the Kita Alps. The views are phenomenal on the rare occasions when the cloud isn’t in.

The hike: From the Kamikochi bus terminal, follow the paved path and signs towards the famous Kabba-bashi bridge. Cross over the bridge and head past all of the hotels. The path is well-marked, with plenty of wooden planks to keep people from trampling the flora. You’ll reach a trail junction in about 10 minutes, so head left for the long climb up dakesawa (岳沢). The path follows the beautiful gully for about 2-1/2 hours before reaching Dakesawa Hut (岳沢ヒュッテ). This hut was badly damaged in an avalanche in 2006 and is closed, but snacks and drinks are sold to hikers during the main hiking season (July to October). There are no plans to re-open this hut again. After leaving the hut, the path curves towards the right and gets quite steep, with lots and lots of switchbacks. It’s really tough going if you’ve got a heavy pack, so take your time and stay hydrated with lots of fluids. There are several places with chains and ladders along the way, so take extra care during wet weather. It should take about 3 hours or so to reach the trail junction just below the peak of Mae-hotaka. Drop your pack for the short climb to the summit. The views from Mae-hotaka are make the tough hike worth it, as you’ll have a bird’s eye view of the entire ridge line, all the way out to Mt. Yari. The summit of Oku-hotaka will also be staring right at you. Drop back down to the junction and follow the signs to Oku-hotaka. It should take about 90 minutes or so of relatively easy hiking (well, at least easier than what you’ve been through) to reach the top. Smile and congratulate yourself for scaling one of the toughest peaks in the Alps. Don’t break open that beer just yet though, as the most dangerous part awaits. There’s a trail branching off to the left towards Nishi-hotaka, but you’ll want to go right, following the paint marks to Hotaka-dake hut (穂高岳山荘). It’s a relatively short distance, but full of chains and ladders. The final descent is vertigo-inducing, as you’ve got a long set of ladders to climb down just above the hut roof. Once you reach the hut you can finally breathe a sigh of relief, and either find a place to pitch your tent or check into the hut. Be warned that the campground is very small and exposed. If you don’t have a tent built to withstand gale force winds then consider staying inside in comfort. The next day climb up past the hut to the top of Mt. Karasawa (涸沢岳), where the views all the way out to Mt. Fuji are stunning in nice weather. The ridge line between here and Kita-hotaka is very dangerous, with vertical drops . If you weren’t comfortable with the previous descent from Oku-hotaka to Hotaka-dake hut then do not attempt this route, as a fair number of people fall to their deaths every year. Retrace your steps to the hut and turn left to descend down into the Karasawa col. It should take about 90 minutes to reach Karasawa hut (唐沢小屋), where there’s a massive campground with room for hundreds of tents. This is one of the most popular hiking destinations in Japan, and rightfully so, as the views up towards the rocky Hotaka ridge line in the autumn are breathtakingly beautiful. From Karasawa, turn left at the next 2 junctions and follow the signs to Yokoo-sansou (横尾山荘). Most people reach the hut in about 2 hours and the path is wonderful, following a beautiful river tributary before crossing a bridge to the junction. Once you arrive at Yokoo hut, you can either turn left for the long climb to Mt. Yari, or head right towards Kamikochi. Either way, you’ve got a 13km hike awaiting you.

When to go: This hike can be done from early May to early November. The earlier you go, the more snow there will be, so bring an ice axe, ropes, and full crampons if climbing before the rainy season or anytime in late fall. A winter hike is also possible, but only for those with ice climbing experience.

Access: From either Takayama (高山) or Matusmoto (松本) stations, take a bus bound for Kamikochi (上高地). Click here for the Alpico Group bus schedule. There are also direct night buses from Tokyo and Osaka, depending on the season. Check your nearest travel agency for details.

Live web cam: Click here.

Level of difficulty: 5 out of 5 (elevation change 1685m).

Mt. Senjo (仙丈ヶ岳)

June 23, 2008

This blog post was written back in 2008. For the latest information about this hike (including color photos and maps), please consider purchasing my guidebook to the Japan Alps. 

Mt. Senjo, situated across the valley from Mt. Kai-komagatake in the Minami Alps, rounds out the top 10 for the tallest peaks in Japan. The views are awe-inspiring, with an excellent vantage point of the entire string of mountains in the Minami and Chuo Alps clearly visible on a nice day.

The hike: From Kitazawa-toge, you’ve got two options, but I’ll describe the more popular route that starts directly across from the Chouei-sou hut (長衛荘). The trail enters the forest and starts climbing almost immediately. You’ll pass by trail markers set up to divide the mountain into 10 stages (I’m not sure why the number 10 was chosen, but it’s consistent no matter what peak you climb in this country). It should take about 2 hours or so to reach the 5th stage (五合目), where you’ll find a trail junction. Both paths lead to the top, so consider doing a loop hike to minimize the environmental damage. I recommend taking the left fork towards Little Senjo-ga-take (小仙丈ヶ岳). You’ll break above the tree line pretty quickly after leaving the junction, so pray that the wind isn’t howling or that it’s not hailing. I had rainy weather but miraculously it wasn’t foggy at all, so visibility was phenomenal. I could even see Mt. Fuji! Anyway, when you reach the top of Little Senjo, you’ll see the huge col below the summit come into view. The ridge line is pretty rocky, and the path pretty much stays right on top of it, so follow the paint marks and you’ll be ok. It should take an hour or so to reach the top of Mt. Senjo, where you’ll have a birds-eye view of a fairly significant number of alpine peaks. Take a break and enjoy the vista! If you’ve got several days and would like an alternative trek bypassing Kita-dake, then you can take this ridge line all the way to Mt. Shiomi. Just take a left at the summit via Big Senjo-ga-take (大仙丈ヶ岳). Otherwise, continue towards the right and drop down to the Senjo hut (仙丈小屋). There’s a water source here and you can stay in the hut if you’d like to break the hike into 2 days (and try to catch the sunrise/sunset). Otherwise, keep going on the same path for about an hour until reaching Uma-no-se Bunki (馬ノ背分岐), which translates at “the horse’s back junction”. Take a right and soon you’ll reach the Uma-no-se hut. This is also a good place to stay, and if you continue past another trail junction you’ll find yet another hut. This one’s called Senjo-yabusawa (仙丈薮沢小屋) and it’s only open between mid July and mid August. There are no meals served here, but they have futon you can use. Just past this hut you may find a lingering snow field or two. They seem to stay around this part of the mountain even in the warm summer air. In around 20 minutes or so you’ll reach the trail junction at the 5th stage (where you started the climb above the tree line towards Little Senjo). Take a left and head back down to Kitazawa-toge. The entire hike should take anywhere from 5 to 8 hours depending on the weather and your speed.

When to go: As with Kai-koma, this hike can be done anytime the road to Kitazawa-toge is open. I’m not sure of the exact dates, but probably from Golden Week to early November. If you can make it to Kitazawa-toge, you can try a winter ascent just like these people did on New Year’s Eve!

Access: From Kofu station (甲府駅), take a bus bound for Hirogawara (広河原). From there, change to a bus bound for Kitazawa-toge (北沢峠) and get off at the last stop. Click here for the bus schedule (in Japanese).

Live web cam: Click here

Level of difficulty: 4 out of 5 (elevation change 1003m).

Mt. Asahi (旭岳)

June 16, 2008

Mt. Asahi is an active volcano and unofficial symbol of Daisetsuzan National Park. The stunning scenery and easy access make it popular with tourists throughout the year.

The hike: From the parking lot look for the trailhead on the right side of the road, easily recognizable with its huge yellow “Beware of Bears” sign. Most people use the gondola, which will probably make you the only one on the trail. Despite its lack of use, the trail is pretty well marked, with lots of wooden planks to keep hikers from trampling the vegetation. Be on the lookout for bears, and sing your favorite childhood songs if you’ve forgotten your bear bell. The path follows a stream most of the way before cutting toward the left for a somewhat strenuous climb to the top of the gondola. It should take about 90 minutes to reach the gondola trail junction, where you’ll meet the huge crowds of people who took the lazy way up. Turn right once you hit the junction, and you’ll find a stone emergency hut in about 20 minutes. This is here in case the volcano decides to burp while you’re climbing, and from the looks of the steam vents, the hut’s probably been used before. Continue climbing on the spine of the volcano. The maps say to allow 2-1/2 hours to reach the peak, but you can do it in half that time, as it’s only a 600m vertical ascent. The views from the summit on a clear day are fantastic, and you’ll see most of Daisetsuzan National Park rising up all around you. You can either head back down the way you came , or continue for an interesting loop hike. Descend down the other side of the mountain until you reach a small campsite. The descent is really steep, with a huge snow bank remaining most of the year. Continue up and over Mamiya-dake (間宮岳), turning left at the next junction to reach Naka-dake hot spring (中岳温泉), one of Japan’s hidden hot springs. It’s actually quite difficult to find hidden among all the boulders. Continue climbing past the hot spring to Susoai-daira (裾合平), where you’ll find a trail junction. Turn left to head back to the gondola, via the beautiful Fuufu lake (夫婦池). The entire loop should take between 6 and 8 hours, so plan accordingly.

When to go: The gondola runs all year round, so this hike can be done in the winter with an ice axe and crampons. If you don’t want to fork over the money for the gondola, then you should aim to go between Golden Week and mid September, when most of the snow is gone. The Youth Hostel near the trailhead is easily the best hostel in all of Japan, with a 24-hour outdoor bath and Canadian style log cabin. Click here for the website.

Access: From Sapporo station (札幌駅), take a JR Limited Express train bound for Asahikawa (旭川) and get off there. From the station, take a bus bound for Asahi-dake Onsen (旭岳温泉) and get off at the last stop. The bus runs throughout the year, but frequency varies based on the season. Click here to access the schedule.

Live web cam: Click here

Level of difficulty: 3 out of 5 (elevation change 1110m).

Mt. Tateyama (立山)

June 14, 2008

This blog post was written back in 2008. For the latest information about this hike (including color photos and maps), please consider purchasing my guidebook to the Japan Alps. 

Mt. Tateyama is the highest peak in Toyama Prefecture, and one of the 3 sacred mountains of Japan (after Mt. Fuji and Hakusan). Its easy access via the Tateyama-Kurobe Alpine Route ensures a healthy swath of tourists for most of the year.

The hike: From the bus terminal at Murodo, follow the paved path and signposts (and crowds) to Ichi-no-koshi Hut (一ノ越山荘), which sits on a saddle between the summit of Tateyama and Mt. Ryuou (龍王岳). It’s only a 200m vertical climb to the saddle, and it should take an hour or so. From here, turn left and start the real climb to the summit. The path is well-marked and there are lots of rocks to scramble over. It should take an hour or so to reach the rest house just below the summit of Oyama (雄山). There’s a spur trail leading to the shrine on the summit, but you’ve got to pay 500 yen to enter. After offering some coinage to the mountain deities, continue on the trail to the left of the shrine torii, following the rocky ridge line. You’ll reach the high point, Onanji (大汝山), in about 20 minutes. The views over the cliff edges down to Kurobe lake are unbelievable. If the weather is good then you’ll have a clear view over to Mt. Tsurugi, as well as the peaks of Hakuba across the valley. Either retrace your steps back to Murodo, or continue on the same trail, turning left at the next junction for an alternative loop trail back to the bus terminal via Raicho-daira (雷鳥平). Don’t forget to have a soak at Mikuri-ga-ike Hot Spring (みくりが池温泉). Click here for the website in Japanese.

When to go: This hike can be done from mid April to late November, when the Tateyama-Kurobe Alpine Route is open. Expect lots of snow if hiking before April and after mid-October. Click here to see the beautiful scenery during Golden Week. A winter hike is also possible if you’re prepared for meters of snow and a long, tough climb.

Access: From Dentetsu Toyama station (電鉄富山駅) take a local train bound for Tateyama (立山) and get off at the last stop. From there, change to the Tateyama-Kurobe Alpine Route, taking a cable car and then bus to Murodo (室堂). Click here for English information, including a detailed timetable.

Live web cam: Click here

Level of difficulty: 2 out of 5 (elevation change 615m).

Mt. Kirishima (霧島山)

June 2, 2008

Kirishima Nat’l Park is a glorious collection of picturesque volcanic peaks, majestic crater lakes, and soothing hot spring baths. The area around Ebino Kogen (えびの高原) is filled with lots of hiking options, including the ascent of Mt. Karakuni, the highest peak in the park.

kara2

Special note: The trail up through Iodake is now closed due to volcanic activity. The only trail open to the summit of Mt. Karakuni is via Onami crater (near Tsutsujigaoka bus stop).

The hike: When you get off the bus stop, you might want to take a little time to familiarize yourself with the layout of the facilities. There’s a useful billboard map just outside of the Eco Museum Center. Across the street from the museum, you’ll see a souvenir shop, as well as a foot bath in the new building next to the museum. There’s a great cafe inside this building that has amazing soft serve ice cream and good coffee. Just to the left of the museum, there is a trail that is marked as the Ikemeguri Nature Trail (Volcanic Lakes). This is a two-hour loop hike that leads past a couple of lakes before meeting up with the main road just opposite the trailhead to Mt. Karakuni (韓国岳). If you’ve got time, then it’s a nice stroll through a beautiful forest. Otherwise, just follow the signs marked for Mt. Karakuni. You could also walk along the road if you like, but the asphalt path that parallels the road is much nicer. After about twenty minutes you’ll finally reach the mountain path, which climbs some steps and juts around Mt. Ioyama (硫黄山), an active steam vent with some large sulfur deposits. There are a couple of trails that go through Mt. Ioyama, but ignore then and turn right, following the crowds if you’ve come on the weekends. You’ll soon come across a rusty metal box that hikers can use to register their climbing intentions, as well as a couple of benches you can relax on and enjoy the scenery. The trail cuts left here and after a short climb, enters a beautiful forest with lots of moss and perhaps a few wildflowers depending on the season. You’ll soon reach a signpost for the 1st station (一合目). The mountain is divided into 10 stages, so you can use these markers to help you establish a pace and decide when to take breaks. From here it’s only 1.7km to the summit, and it’s a relatively easy climb with lots of steps built to aid in the ascent. It’s a popular mountain with school trip and families, so don’t be surprised to see a fair number of kids marching up the volcano. The views start to open up as you climb higher, and the best place for your first break is the 5th station (五合目), which is a wide area with splendid views into the valley below. From here, the angle eases up a bit as you traverse towards the crater rim (at the 8th station), which can be reached in about 15 minutes. If the weather is good then you’ll can take one of the many side trails to the left up to the rim, which is roped off to prevent people from falling inside. Just before reaching the high point, you’ll see a trail shooting off on the right marked for Mt. Oonamiike (大浪池). Ignore this trail for the time being and turn left for the short climb to the summit, which is marked with a signpost and a village of large volcanic rocks. If the weather is good then you’ll have outstanding panoramic views of most of the mountains of southern Kyushu. Sakurajima is due south, and just to the left of that peak you can see Mt. Kaimon if you’re lucky. To the east, you’ll see the active lava dome of Mt. Shinmoe (currently closed to hikers), with Mt. Takachiho rising up behind. Unfortunately, Mt. Karakuni is a magnet for cloud, and clear weather is a rarity indeed. After you’ve had sufficient rest, drop down to the junction and take the trail for Mt. Oonamiike, which in clear weather you can see directly below you. It’s an incredible caldera lake formed during an ancient eruption. The path drops off the peak abruptly, through red scree reminiscent of the slopes of Mt. Fuji. You’ll soon reach an area of wooden steps that have been added to make the climb easier. The rest of the trail down to the lake is on these steps 80% of the time, so be careful in wet weather when these wooden stairs become as slick as ice. It should take about an hour or so to reach the base of the caldera lake, where you’ll reach a junction. There’s a small emergency hut on your left, as well as a trail that goes straight ahead. Take this trail if you want to do a loop around the caldera rim, which should take about an hour or so. Only do this when the weather is clear. Otherwise you won’t be able to see the caldera lake at all. A shorter option is to ignore this trail and turn right, where you’ll soon see a wooden platform that makes a great place to take a break. Continue on the trail and you’ll soon see a junction on your left marked for Lake Onami trailhead (大浪池登山口). This is where the loop trail comes down, so if you didn’t do the loop but still want a glimpse of the caldera lake then turn left here and climb up the steep trail for about 10 minutes until you see a spur trail on your left that leads to a lookout. After viewing the lake, retrace your steps back to the main trail and turn left, following the signs as the trail following the meandering contours of the mountain before finally dropping back down towards Ebino Kogen. The steep path will eventually level out and take you through an amazing forest of moss covered rocks and old trees. The trail ends at a paved road, so turn right and walk about 50 meters and you’ll see Tsutsujigaoka (つつじヶ丘) bus stop, which you can take to get back to Maru-o. You could also try your luck hitching from here as well. If you’ve got time before the last bus then you could have a hot spring bath at Ebino Kogen Sou (えびの高原荘), which is a short walk from the Eco Museum Center. To get there you can cut through the large grass-covered park directly across the street from the bus stop. Turn right on the trail just behind the toilets.

Special Note: If you’re attempting to do the entire Kirishima traverse (from Karakuni to Takachiho) please note that the trail up and over the summit of Mt. Shinmoe is currently closed due to volcanic activity.

When to go: This hike can be done year round, but expect some snow during the winter, when light crampons will come in handy. Click here to see the winter scenery. Avoid the peak in the middle of the summer, when the heat can be unbearable.

Access: There are numerous ways to get to Ebino Kogen, but perhaps the easiest is to take a train from Kagoshima station on the JR Nippo Line (JR日報線) and get off at Kirishima-Jingu (霧島神宮) station. From there, you can take a bus bound for Kirishima Iwawaki Hotel (霧島いわわきホテル) and get off at Maru-o (丸尾) bus stop, where you need to change to a bus bound for Takachigo Kawahara (高千穂河原), which will stop at Ebino Kogen. There are only 3 buses a day from Maru-o, so make sure you plan accordingly. The local train takes about 50 minutes from Kagoshima, and the Limited Express only saves you 3 minutes! Click here to download the bus schedule. Click on the second link that reads 各路線バス時刻表. If you want to hitchhike, the closest station seems to be Kirishima Onsen (霧島温泉), so get off there and walk to the main road.

Map: Click here

Live web cam: Click here

Level of difficulty: 2.5 out of 5 (elevation change 520m).]

This slideshow requires JavaScript.