Archive for the ‘Archive’ category

Gassan (月山)

May 30, 2008

Last updated: Feb 17, 2025

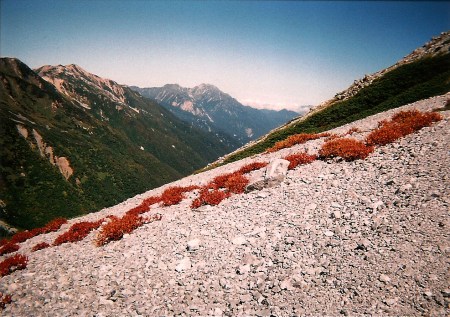
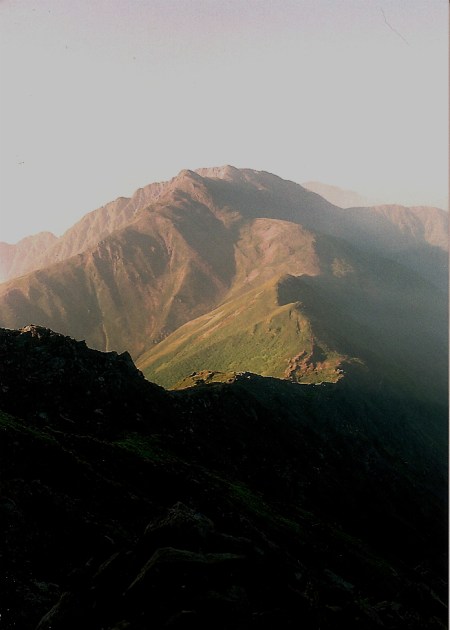
Gassan is highest peak in the Dewa Sanzan trio of religious mountains, nestled snugly between Mt. Chokai and Mt. Asahi in Yamagata Prefecture. Known for white clad pilgrims and summer skiing, the peak offers alpine vegetation and scenery without climbing to air thinning altitudes.

The hike: From the parking lot, follow the signs (and crowds) towards Gassan shrine (月山神社). The path is well trodden and easy to follow. You’ll reach a mountain hut in about 90 minutes or so, at the base of Mt. Omowashi. The trail starts to get a little steeper from this point, but overall it’s a relatively easy and enjoyable ascent. It should take another hour or so to reach the summit area, which is pretty overdeveloped. There’s a huge shrine on the summit, which you’ll have to pay to enter. The true high point, however, is on a group of unmarked rocks directly behind the summit, and it won’t cost you a thing to sidestep the shrine and enjoy your lunch away from the crowds. There’s a big hut a short descent from the shrine, appropriately named ‘Summit hut’ (山上小屋). The hut is only open from late June to late September, and doesn’t have any drinking water for non-staying guests. Continue past the hut, and turn right at the next two junctions, where you’ll drop to a huge saddle. This is where you’ll see summer skiers. At the saddle, you’ll find a two-way junction. You can either turn left to reach the top of the chairlift, or continue straight towards Mt. Yudono (湯殿山). I recommend heading straight, unless the weather has turned foul or it’s getting late. You’ll reach a junction in about 20 minutes, but ignore it and stay on the ridge line. Another half hour or so along the trail and you’ll be standing at the base of Mt. Yudono. There’s a water source and a free emergency hut here, as well as a 2-way junction. Turn right to drop to Yudono shrine, or take a right to descend to Shizu (志津) campground. Unfortunately, there’s no trail up to the summit of Mt. Yudono, so you’ll have to be content with staring at it from the hut. The drop to Yudono shrine is pretty big, but you’ll be rewarded with a foot bath on the shrine grounds. If you’re headed in the direction of Mt. Asahi, however, I recommend turning left and descending to Shizu. It should take about 90 minutes of enjoyable hiking to reach a nature museum and the campground. Be extremely careful crossing the numerous wooden bridges if it’s wet. I went sliding off one into a creek about a meter below the trail! The campground surrounds a scenic lake, and each site costs 500 yen (register at the hut). If you continue walking down route 112 for about 1/2 an hour, you’ll find Shizu hot spring. Another half hour or so beyond that, and you’ll be sitting in a huge auto campground. Whatever you do, don’t descend this far, because they’ll try to charge you 3500 yen for a place to pitch your tent! Luckily the staff gave me a ride all the way back up the road to the cheaper and more scenic Shizu campground. There are buses back to civilization from the campground, but unfortunately I couldn’t find any on-line information. Hitching is also a definite possibility.

When to go: The buses from the Mt. Haguro side only run from July 1st to August 24th, but you can definitely go earlier than this if you’ve got your own transport. The peak gets meters upon meters of snow in the winter, and stays around most of the summer. Click here to see the conditions during Golden Week.

Access: From Niigata (新潟) station, take the JR limited express ‘Inaho’ to Tsuruoka (鶴岡) station. From there, take a bus bound for Gassan-hachigome (月山八合目) and get off at the last stop. The bus makes a 8-minute ‘pit stop’ at the top of Mt. Haguro (羽黒山頂), allowing enough time to offer a quick prayer to the mountain deities. Double check with the driver to see how long the break is.  Click here for the bus schedule.

Digital Map in English (Avenza App): Click here

Level of difficulty: 2 out of 5 (elevation change 824m).

Mt. Goryu(五竜岳)

May 24, 2008

Mt. Goryu is a peak many have stared at from Goryu/Hakuba 47 ski resorts, but few have thought about climbing out of season. A venture beyond the slopes, however, will reveal a magical alpine world filled with flowers, alpine lakes, rocky peaks, and stunning views.

The hike: From Kamishiro station, walk out the front door and turn right on route 148 in front of you. Walk about 100m and turn right at the next stop light. This street will take you all the way to Escal Plaza, the start of the hike. You’ll pass by Hakuba Alps guesthouse, as well as countless other pensions and hotels. It should take about 20 minutes of road walking before reaching the ski resort. There is a gondola that will whisk you up to the top of the ski resort in only 7 minutes. The problem with the gondola is the start time. The first one isn’t until 8:15am on most days (and it doesn’t even run between May 15th and June 28th!). Click here for info. Anyway, it’s darn near impossible to do this as a day trip unless you camp in the ski resort. I recommend camping at the bottom of the Dai 2 & 4 (アルプス第2) ski lifts. Set up your tent on the wooden platform under the lifts and enjoy the awesome night view of Hakuba village. You can follow the forest road that cuts through the ski resort. The next day, just continue following the lifts up to the high point of the resort. From there, follow the signs towards Mt. Kotoomi (小遠見山), which should take about an hour to reach. The panoramic views of Mt. Kashimayari, Mt. Goryu, and Mt. Shirouma are fantastic. From here, the signpost says it’ll take 6 hours to reach the summit, but you can do it in less time if you’re fit. Follow the ridge line for several hours. If the weather is good then you can see exactly where you need to go. There’s a lot of up & down, and be careful of crevices if there’s any remaining snow. Just before you reach Mt. Nishitoomi (西遠見山), you’ll find a small lake with a beautiful reflection of Mt. Goryu. The path between NIshitoomi and Mt. Shiro (白岳) is steep, exposed, and covered in snow most of the year. During the month of May, you can easily bypass Mt. Shiro and go directly to the hut by traversing through the deep snow, but be careful of snow slides. Once you reach the top of Mt. Shiro, you’ll meet up with the main Shirouma-Oomachi trekking route. Turn left and descend steeply to Goryu hut (五竜山荘). You can buy water here and stay the night if you’d like. Take a break, because the biggest climb awaits you. The map says to allow one hour to reach the summit, but if there’s remaining snow it can take twice the time. You’ll basically be rock climbing most of the way, but it’s not too bad compared to some other peaks out there. The views from the summit are incredible, and you’ll see all the way out to Mt. Fuji on a clear day. You can continue trekking over to Mt. Kashimayari, or head back to the hut. If you’ve got a few days, then you can head the other direction over to Mt. Karamatsu towards Mt. Shirouma. If you’re a sucker for punishment like I was, then you can head back down the mountain the same day. I descended from the hut to the ski resort in less than 2 hours, thanks to the massive amounts of snow remaining.

When to go: This hike can be done from Golden Week to mid-October, when Goryu hut is open (五竜山荘). There will be a lot of snow if you go before July, so bring crampons and an ice axe and do not attempt in bad weather. A winter ascent is also possible, but be careful of avalanches in the col below Mt. Shiro (白岳)

Access: From Matsumoto (松本) station, take a local train bound for Shinano-omachi (信濃大町). From there, change to another local train bound for Minami-otari (南小谷). The trains are not very frequent, so take care when planning. Another option would be to take a Limited Express train to Hakuba (白馬), and either backtrack on a local train or take a taxi to the ski resort.

Live web cam: Click here

Level of difficulty: 5 out of 5 (elevation change ~2100m).

Mt. Utsugi (空木岳)

May 20, 2008

This blog post was written back in 2008. For the latest information about this hike (including color photos and maps), please consider purchasing my guidebook to the Japan Alps. 

Mt. Utsugi is the highest peak in the southern half of the Central Alps. The exposed crags offer outstanding panoramic views of both the Kita and Minami Alps.

The hike: From the top of the gondola, take the trail to the left towards Gokuraku-daira (極楽平). It should take about 20 minutes to reach the ridge line, where you’ll be all day. Turn left once you reach this point, and make your way to the top of Mt. Hinokio (檜尾岳). The path is well-worn and easy to follow and you should be sitting on the rocky summit in about 2 hours. If the weather is clear then you should see the top of Mt. Fuji peeking out over the Minami Alps, as well as a stellar view of Ondake. Your next target is Mt. Kumasawa (熊沢岳), reachable in about an hour. Another hour after that, and you’ll be on top of Mt. Higashi-kawa (東川岳), which has a great view of Mt. Utsugi right in front of you. Unfortunately you’ve got a big drop and climb between here and there. Drop down to the saddle, where you’ll find Kisodono hut (木曽殿山荘), which is a pretty nice place to stay. Unfortunately there’s no room to camp here, and the water source is a 15-minute walk down a spur trail. The hut is only open from July 1st to October 10th, so if you’re going outside of these dates it’s better to push on and stay at the emergency hut on the other side of the summit. Click here for the hut website. From the hut, it’s a 90 minute climb with a 450m elevation gain to the top. The hard work is worth it when the weather is cooperative. Otherwise, it’ll be another rocky peak in a blanket of cloud. From the top you’ve got several options. You can either retrace your steps back to Kisodono hut, and take the trail to the left for a 7 hour descent to Kuramoto (倉本) station, on the JR Chuo line that runs between Nagano and Nagoya. Another option would be to continue on the ridge line towards Minami Koma-ga-take (南駒ヶ岳) and then descent about 3-1/2 hours to a forest road in the middle of nowhere. The final (and probably most feasible) option would be to turn left once you hit the top of Mt. Utsugi and descend to the Mt. Utsugi emergency hut (空木避難小屋). From the hut, it’s a grueling 4 hour descent, where you lose close to 2000 vertical meters of altitude! You could also do this hike in reverse, but you’re faced with a daunting climb if you do. Eventually the trail will spit you out in Komagane Kogen (駒ヶ根高原), where you can take a bus back to Komagane station.

When to go: This hike can be done from early June to mid October without too much trouble. The gondola is operational year-round, so you could attempt this in the winter if you’ve got the proper equipment and training, but be warned that the ridge line is very rugged. Click here to see some brave climbers during Golden Week!

Access: From Okaya station (岡谷駅) in Nagano Pref. take the JR Iida line (JR飯田線) and get off at Komagane Station (駒ヶ根駅). The local train takes about an hour. From there, take a bus bound for Shirabi-daira (しらび平) and get off at the last stop. If you don’t want to take the gondola, then you can bypass this area by taking a trail from Hinokiobashi (檜尾橋) bus stop. From there, it’s a grueling 6-hour climb to the ridge line just below the top of Mt. Hinokio (檜尾岳). There’s a free emergency hut you can stay in just below the summit. Click here for the bus schedule.

Level of difficulty: 4 out of 5 if using the Gondola (elevation change ~200m).

Mt. Tokachi (十勝岳)

May 18, 2008

Mt. Tokachi is an active volcano, and one of the great symbols of Daisetsu-zan National Park. The image of the peak hovering above the clouds from Mt. Biei is a memory I’ll cherish forever.

The hike: From the bus stop, take the gravel road that starts next to the hotel. The initial trail is pretty easy going, but soon you’ll reach a trail junction, where the real climb begins. Take the trail going to the right, towards Kamihoro Bunki (上ホロ分岐). It should take about an hour before reaching the junction. Turn left here and climb up the wooden steps. There must be at least 5 or 6oo steps built into the volcanic landscape, but eventually (with enough perseverance) you’ll reach the rocky ridge line. Turn left once you do reach it and make your way to the summit of Tokachi. It’ll take about an hour or so to reach the top, where you’ll have outstanding views of the rest of Daisetsu-zan Nat’l Park. Tokachi is a very shy mountain, so consider yourself lucky if the cloud isn’t in. From the peak you’ve got several options. You can either take the trail to the left, which will take you to Bougakudai (望岳台) in about 3 hours. This is in fact the most popular trail to the summit, but there’s no public transport, so you’ll have to either hitch or take a taxi if you go this route. The trail to the right makes its way through a massive scree field before leading up to Mt. Biei (美瑛岳) and the main trekking route to Asahidake. You could also retrace your steps all the way back to the hot spring and reward yourself with a bath. Whichever route you choose to take, you should definitely consider stopping by Fukiagerotenburo (吹上露天風呂), an wonderful, free, mixed, outdoor bath located in the Tokachi vicinity. Click here for some English information. It’s by far one of the best hot springs in Japan.

When to go: This hike can be done from late May to late September without too much trouble. The winter starts early in Hokkaido, and a winter ascent is also possible, but only with the proper avalanche training. 4 people were killed in an avalanche on November 23, 2007, so please heed the warnings.

Access: From Sapporo (札幌) station, take the JR limited express ‘Super Kamui’ to Asahikawa (旭川) station. From there, change to the JR Furano line (富良野線) and get off at Kami-Furano (上富良野) station. At Kami-Furano, take a bus bound for Tokachi-dake Onsen (十勝岳温泉) and get off at the last stop. Click here for the bus schedule. As of 2009, it appears that the bus departs from the town hospital (町立病院) instead of in front of the station. It’s best to ask the tourist information center at Kamifurano station. They definitely speak English there and will be able to get you sorted.

Level of difficulty: 3 out of 5 (elevation change ~1100m).

Mt. Aso (阿蘇山)

May 15, 2008

On October 20, 2021 Mt Aso has once again erupted, so the mountain is currently off limits. Please avoid climbing it until the volcanic alert level is lowered. 

Last updated: September 21, 2020

Mt. Aso is an active volcano located about an hour outside of Kumamoto city in central Kyūshū. The peak is popular with hikers on the rare occasion that the mountain is actually open. Recent eruptions of the Nakadake crater have forced the closure of the hiking trails, but as of September 2020 the main trails have now reopened.

The hike: At Suisenkyo parking lot, you’ll find the abandoned ropeway station, a small visitor’s center and a restroom. You might be tempted to take the trail just to the left of the restrooms but that is the descent trail. Instead, head over to the other side of the parking lot (perpendicular to that trail) to find the Sensuikyo-one route (仙酔峡尾根ルート登山口). The trailhead is marked by a small wooden bridge spanning a ravine, so cross over the bridge and follow the remnants of the old concrete path up towards the spur. After passing by a rest bench, look for the kanji for Takadake (高岳) hand-painted on a rock and follow the trail through a short area of bush to reach the start of the long ridge. The volcanic rock looks as if it’s been cemented to the mountainside but in fact it’s a natural process that allows for good traction for your hiking shoes. The route is well-marked and easy to follow: just look for the generous amount of yellow arrows and circles painted on the rocks. As you climb higher, be sure to look back for the excellent views of the Kujū mountain range rising up across the valley. It will take anywhere from 90 minutes to 2 hours to reach the summit plateau, so take your time and enjoy the excellent scenery. There’s also a fair bit of scrambling in the initial part of the climb, but as the spur steepens you’ll reach an exposed area with a fixed rope. Take care with your footing here. Above this section is a series of switchbacks until you pop out onto the ridge just to the left of the high point of Takadake. In clear weather you can see that you’re standing on the edge of an ancient volcanic crater covered with lush greenery. There used to be a trail that completely circumnavigated this crater but it’s since fallen into disuse and is incredibly overgrown. Look down into the crater and you will see a small stone shelter (called Tsukimi hut). Some hikers head left here on the ridge for the east peak called Takadake Tōhō (高岳東峰). The route to the summit has fallen into disrepair and it’s not recommended unless you want a close-up view of the spires of Mt Neko. Instead, turn right on the crater rim for the short 10-minute climb to the summit of Takadake, the highest point in the Aso mountain range. This is a great place to enjoy lunch before continuing along the ridge. Drop west towards the active crater down a well-used trail for Nakadake. Watch your footing on the loose rocks as you drop for 5 minutes to a junction. Ignore the trail left to Tsukimi shelter and stay on the main ridge. The gradient eases and it’s a fun ridge walk for 15 minutes to the summit of Nakadake (中岳). Just before the summit you will reach a junction. If you came by bus then you probably climbed up here from the touristy side of the mountain. This trail leading left from here follows the crater rim before dropping steeply down into the crater floor and the martian landscape of Sunasenri-ga-hama (砂千里ヶ浜). From there it’s an easy walk out to the bus stop (but watch out for toxic gases blowing over from the active crater). However, ignore this path and head straight to the summit of Nakadake. Continue on the ridge past the summit, taking care to watch your footing on the slope just below the summit, as loose rock makes for poor traction. The terrain abruptly changes, as you traverse through ash deposited in the 2014 eruption. Signposts warn of volcanic gas and you won’t believe your eyes as the trail heads towards the active crater, an area called Kakōhigashi Observatory (火口東展望所). You’ll soon traverse directly below a crumbly headwall on your left – take care of falling rocks on the narrow traverse. Stay on the ridge, following the yellow paint marks in times of poor visibility. The trail drops to a small saddle before climbing up to the remnants of the observatory, which affords spectacular views of the active crater. Just before the top of the viewpoint, a trail heads right towards the ruins of the concrete ropeway building. Ignore this and head to the observatory before retracing your steps to this junction and descending on the east trail past the emergency bunkers to the top of the old ropeway. DO NOT attempt to enter the ruins, as the building is incredibly unstable and was heavily damaged in the eruption. Instead, take the path to the right of the structure along the crumbly asphalt of the disused trail. Despite the poor condition of the trail, it’s an easy descent that will lead you back to the parking lot in about 40 minutes.

When to go: This hike can be done year round, but be prepared for snow during January and February. Click here to see the wonderful snow scenery. The peak is frequently closed due to volcanic activity, so please check here for the latest information (in Japanese).

Access: From Kumamoto (熊本) station, take a train on the JR Hohi Line (包皮線) to Miyaji (宮地) station. From there, either take a taxi (costing around 1500 yen) to Sensuikyo (仙酔峡) or try your luck hitchhiking. If you just want to see the active caldera or approach the peak via Sunasenri-ga-hama, then you can take a bus in front of Aso station (阿蘇駅前) to Asosan Nishi Eki (阿蘇山西駅). The bus takes about 35 minutes and there are 4 buses daily (no booking required). Click here for the schedule.

Live web cam: Click here

Level of difficulty: 3.5 out of 5 (elevation change 692m)

Total Round-trip Distance: 7km (4 to 6 hours)

Mt. Yakushi (薬師岳)

May 13, 2008

This blog post was written back in 2008. For the latest information about this hike (including color photos and maps), please consider purchasing my guidebook to the Japan Alps. 

Mt. Yakushi is situated roughly halfway between Kamikochi and Tateyama on the main trekking route. Its remote location and access makes it nearly impossible to do as a day trip, but the splendid scenery is well worth the effort it takes to get there.

The hike: From the bus stop, take the trail that leads to Tarobei-goya (太郎平小屋). You’ve got a 1000m elevation gain before reaching the hut, so take your time and bring plenty of water, because there’s no place to fill up between here and the hut! The first 2 hours are pretty steep, but the trail is well-marked and easy to follow. The views will start to open up once you hit the spine of the mountain, and you’ll be staring down at lake Arimine (有峰湖) in no time. The map says to allow 5 hours to reach the hut, but if you’re in good shape and carrying a light pack then you can do it in about 3 or so. Once you finally reach the ridge line, you’ve got 2 options. Turn right for about 100m to check into Tarobei hut, or turn left and descend toward the mountain pass, where you’ll find Yakushitoge (薬師峠) campground. There’s a water source at both the campground and hut, so take your pick depending on your budget (500 yen to camp vs. 8500 yen to stay in the hut!). During the climbing season of July and August, there’s also a medical facility in the hut, which is good for those on the long Kamikochi-Tateyama trek. The next day, wake up early and try to catch the sunrise somewhere along the trail. It’ll take anywhere from 2 to 3 hours to reach the summit of Mt. Yakushi, where you’ll have outstanding views toward both Tateyama and Mt. Yari. Unfortunately it was completely foggy and I had no view when I went, but I’ve vowed to get revenge on this monster of a peak. From the summit, you can either retrace your steps all the way back to Oritate, or continue on towards Tateyama, which should take another 2 to 3 days to reach. You could also consider trekking south to Mt. Yari, which will also take another 2 to 3 days.

When to go: This hike can be done from mid-July to early October if you’re relying on the bus, or from Golden Week to early November if you’ve got your own transport. Be prepared for a ton of snow if you’re going before the rainy season. Click here to see the scenery in mid-June!

Access: From Toyama (富山) station, take a bus bound for Oritate (折立) and get off at the last stop. The bus runs every day from July 13th to the end of August, and then on weekends only during September and early October. Click here for the bus schedule.

Level of difficulty: 4 out of 5 (elevation change 1576m).

Mt. Akaishi (赤石岳)

May 12, 2008

This blog post was written back in 2008. For the latest information about this hike (including color photos and maps), please consider purchasing my guidebook to the Japan Alps. 

Mt. Akaishi, or ‘red stone peak’, is one of the most sought-after peaks of the southern half of the Minami Alps, and the red glow of the summit around sunrise/sunset makes the long, long slog worth it.

The hike: From the bus stop, hike a short way up the paved forest road (near the camp site) and you’ll find the trailhead. Make sure you take a left and follow the signs towards Akaishi hut (赤石小屋) and not towards Mt. Arakawa (荒川岳). The trails follows an old logging road for the first 2-1/2 hours or so, and then makes its way up the spine of the mountain. It should take about 5 hours or so to reach Akaishi hut, where you can either pitch a tent or stay in the hut. The hut costs 8000 yen with 2 meals or 5000 yen for a futon only, and is open from July 16th to October 13th. If you’ve gotten a super early start and want to make it to the summit, then you’re only 3-1/2 hours away! The hut has a water source, and there’s no water between the start of the hike and here, so bring plenty from the trailhead. If the weather is good, then wake up really early the next morning and time your hike so you can see the sunrise from Fujimidaira (富士見平). It’s on the trail to the summit, so you’ve got to pass by here anyway. It should take about 40 minutes from the hut, and it’s a good place to see the red glow of the signature peak. From Fujimidaira, you’ve got about 2-1/2 hours before reaching the proper ridge line just below the summit. It’s rocky and exposed, so watch your step in wet weather. Shortly after leaving Fujimidaira, you’ll see a signpost on your right marking the winter climbing route (冬山ルート), but ignore this and follow the paint marks on the rocks. Eventually you will reach the ridge and a trail junction, so turn left for the 20-minute climb to the summit. If the weather is good then you’ll have outstanding views of Mt. Fuji and the other huge peaks of the Minami Alps. About 5 meters below the summit there lies a manned emergency hut, which will cost 5000 yen to stay in, despite the fact that there’s no water! The man who runs the hut, however, is incredibly friendly and plied me with free warm tea after climbing during the middle of a typhoon! From the summit, you’ve got 3 options. Option 1 is a traverse over to Mt. Hijiri (聖岳), breaking up the trek by staying at Hyakkanbora Yama-no-ie (百間洞山ノ家) – a glorious hut famous for their tonkatsu. Option 2 is to head in the opposite direction and climb Mt. Arakawa (荒川岳), breaking up the trek at Arakawa hut (荒川小屋), another fantastic hut with great people and awesome views out to Mt. Fuji. The third, less desirable option would be to head all the way back the way you came down to Sawara-jima. Not only would you contribute to trail erosion, but your 2000 vertical meter climb will have gone to waste. When you’ve put in so much time and energy to reach the ridge line, you might as well stay on it for a few more days!

When to go: I used to recommend doing this hike year round, but because of the new bus limitations (see below), those without private transport will be forced to do this hike between mid-July and August. Hitchhiking will be difficult from Shizuoka, because it’s a walloping 3-1/2 bus ride to the dam! Hitching from the dam, however, should be relatively easy on the weekends. If you do this hike in winter, be prepared for lots of snow, so bring winter climbing gear. Click here to see someone who climbed around New Year’s.

Access: From Shizuoka station (静岡駅), take a bus bound for Hatanagi-daiichi Dam (畑薙第一ダム) and get off at the dam. Change to a shuttle bus bound for Sawara-jima Lodge (椹島ロッジ). Please note that the bus to Hatanagi-daiichi has been discontinued as of May 31st, 2008, and has been replaced by a seasonal bus running only from July 19th to August 31st. Click here for the bus schedule. These kind of antics really tick me off, because it is encouraging people to use their own transport to get to the dam and punishing those of us who don’t have cars! Click here for the shuttle bus schedule from the dam to the lodge.

Level of difficulty: 5 out of 5 (elevation change ~2000m).

Mt. Hiuchi (燧ヶ岳)

May 11, 2008

Last updated: Feb 18, 2025

Mt. Hiuchi is officially the tallest peak in the Tohoku region (although it’s just barely in Tohoku) and the crown jewel of Oze National Park. The reflections in Oze numa are mesmerizing and the views from the rocky summit spectacular.

mthiuchi1

The hike: From the parking lot at Numayamatoge (沼山峠), head into the forest across from the big hut and follow the red paint marks on the trees to the summit of Numayamatoge, which should take about 20 minutes or so. From the top of the mountain pass, you’ll see the big lake stretching out in front of you, and Mt. Hiuchi towering above to the right. Descend into the marshlands, where the trail will eventually take you to a small village with lots of huts. Check into Chozogoya (長蔵小屋), the oldest mountain hut in Japan. It makes for a wonderful place to stay, and you’ll enjoy the hot spring bath after the climb to the summit. From the hut, head back towards the way you just came from, but instead of going to Numayama, turn left and follow the forest trail that winds its way around the lake. After about 20 minutes you’ll reach a trail junction. Turn right to head up to Mt. Hiuchi. The trail starts off relatively flat, making its way through a dense forest before climbing up the spine of the volcano. The trail becomes steeper and steeper, and the views will start to open up. After about 90 minutes or so, you’ll start to see wonderful views over the lake out to Mt. Okushirane on your left, and nice vistas out to Aizu-komagatake to your right. You should also see the summit towering above you. Keep climbing up until you reach a rather large saddle just below the peak of Mt. Minobuchi (ミノブチ岳). This is the first of the 5 peaks of Mt. Hiuchi, so turn right and continue climbing up the steep, rocky spine to the second summit, named Manaitagura (俎嵓). Take a break and admire the incredible views out to Mt. Fuji on a clear day. The true summit is a rocky peak by the name of Shibayasugura (柴安嵓). Drop to the saddle between the peaks and up to the high point. It’s an easy enough climb in the summer, but absolutely terrifying during April and May when it’s a near vertical climb up a snow bank, so bring an ice axe and crampons if climbing in early summer. Pat yourself on the back for a job well done. You can traverse down to Jujiro (十字路) from here and turn left to head back to Chozo hut, or retrace your steps back to Manaitagura. If you’re only up for the day, then you can descend down to Mi-ike (or start/finish your hike there). I recommend heading back to Chozo hut so you can enjoy the mirror-like reflections in the lake and the wonderful food and bath.

When to go: This hike can be done from early June to late October, when the buses to Numayamatoge are running. If you climb Hiuchi via the Mi-ike (御池) trail, then you can climb from mid-April to late November, when the buses to Mi-ike are running. The paved forest road from Mi-ike to Numayamatoge is closed to private cars, and the road doesn’t open until May 15th. If you’re climbing during Golden Week, then you can either hike up the road for 10km to Numayama (which is what I did), or plan your climb from Mi-ike.

Access: From Tokyo, there are direct buses to Numayama-tōge (沼山峠), the shortest and easiest access route to Oze numa. Click here for the schedule and prices (in Japanese). The 2025 bus schedule hasn’t been released yet. You can also get into Oze via Oshimizu (大清水) or Hatomachitoge (鳩待峠), but it’ll take a lot longer and a lot more effort to reach Mt. Hiuchi. Alternatively, from Mi-ike (御池) there are regular shuttle buses to Numayama-tōge during the hiking season. Click here for information in English. Mi-ike is accessible by local bus from Aizu-Tajima (会津田島) station on the Tobu Line. There are direct limited express trains from Asakusa station. 

Live web cam: Click here

Level of difficulty: 4 out of 5 (elevation change ~700m).

Mt. Kumotori (雲取山)

May 8, 2008

Last updated: Feb 21, 2025

Mt. Kumotori is the highest peak in the Tokyo Metropolitan area, and part of Chichibu-Tama-Kai National Park. The views out to Mt. Fuji aren’t half bad either.

The hike: Mitsumine shrine is one of the most beautiful mountain shrines in Japan, and it also happens to have its own hot spring bath (did anyone mention doing this hike in reverse?!). The trail towards Mt. Kumotori starts from the parking lot, and it’s very clearly marked. You’ll be on the ridge the entire day, so just keep following the signs. Your first target will be Kirimo-ga-mine (霧藻ケ峰), which has fine views out to Mt. Asama. Continue on the ridge, passing up and over Mt. Shiraiwa (白岩山). You’ll pass by Shiraiwa hut (白岩小屋), which makes for a good place to stay if you’ve gotten a late start or if the weather is bad. It should take another 90 minutes or so to reach Mt. Kumotori, passing by the old, rotting Kumotori hut before reaching the newer, luxurious one. If you’re hiking in the winter you’ll appreciate the kotatsu tables in the tatami rooms. It costs 7500 yen with 2 meals or 5000 yen without meals. Click here for the hut web site. If you’re short of money and would like a free place to stay, continue another 10 minutes and stay at the emergency hut on the summit. It’s in good shape, but you’ll need a sleeping bag and food. There’s a water source at Kumotori hut, but nothing between Mitsumine shrine and the hut, so bring plenty of water for the first day. If the weather is good, then you’ll have a stunning view out to Mt. Fuji for most of the hike to Okutama. You’ve actually got 2 options from the summit. You can descend via Mt. Nanatsuishi (七ツ石山) by taking a left at the emergency hut, or take the trail behind the hut to descend to Sanjo-no-yu (三条の湯), a hut with its own hot spring. If you take this alternative route, then you’ll have to walk on a forest road for about 2-1/2 hours before reaching route 411. Either way, you’re in for a 4 to 6 hour hike before making it back to civilization. Okutama has a great hot spring bath called Moeginoyu (もえぎの湯). Click here for the website.

When to go: Because Kumotori Hut (雲取山荘) is open year round, this hike can be done any time of the year. Bring crampons if hiking before April. I did this hike in March and there was about 1 meter of snow on the summit.

Access: From Ikebukuro (池袋) station in Tokyo, take a train on the Seibu line to Seibu-Chichibu station (西武秩父駅). From there, take a bus bound for Mitsumine Shrine (三峯神社) and get off at the terminus. Click here for the bus schedule. Please note that the Mitsumine Ropeway has ceased operation, so you can either get off at the Owa (大輪) bus stop and hike on the seldom-used trail next to the gondola, or start your hike from the shrine. The hike ends at Okutama (奥多摩), where you can easily take a train back to Tokyo.

Level of difficulty: 2 out of 5 (elevation change ~500m). It’s a 4 out of 5 if you do this hike in reverse, as you’ve got a 1400m vertical climb.

Mt. Iwaki (岩木山)

May 8, 2008

Last updated: Feb. 4, 2025

Mt. Iwaki is a pointy peak towering over Hirosaki city in Aomori Prefecture. The summit affords outstanding panoramic views, and sports two free mountain huts.

The hike: From the parking lot, head up the trail to the left of the chairlift station (yes, you can take a ski lift practically to the top!). You should reach the summit ridge in about 40 minutes or so. Turn left and descend through a rocky area to an emergency hut. You can stay here for free, but the hut on the top is more spacious and offers much better views. You’ll see a small lake just below you, as well as a trail descending down off the mountain towards Iwaki shrine (岩木山神社). If you’re staying on the mountain, you’ll need to descend about 20 minutes in order to fill up your water bottles, since there’s no water on the mountain (you could also just bring 3 or 4 liters from the parking lot and save yourself some time/energy). Anyway, it should take about a half an hour to reach the true summit of Mt. Iwaki. There’s an awful lot of boulder scrambling, which feel a bit like climbing in the Alps. If the weather is good, then you’ll have one of the best panoramic views in the Tohoku region. I climbed in August and had the entire summit to myself, so I decided to stay in the hut on top. If the weather is clear then you can see all the way to Hokkaido in the north, the sea of Japan to the west, Hirosaki and Aomori cities to the east, and the endless layering of the Shirakami mountains to the south and southwest. If you’re not staying the night, then head back to the first emergency hut, and consider descending 1500 vertical meters to Iwaki shrine or just head back to the parking lot.

When to go: This hike can be done from Golden Week to early November. A winter ascent is risky due to the avalanche danger near the summit. Be prepared for a lot of snow if you go before the rainy season.

Access: From Hirosaki station (弘前駅), take a bus bound for Iwakisan-hachigome (岩木山八合目) and get off at the last stop. The bus departs from bus stop #6, but I’m not sure of the frequency of the direct buses, so it might be faster to take a bus to Dake-onsen (岳温泉) and change to a shuttle bus. The tourist information center just inside Hirosaki station is excellent, so they’ll be able to give you the exact schedule in English. Click here for the shuttle bus schedule. You can also try your luck at hitching from Dake Onsen. Click here for the bus from Hirosaki station to Dake-Onsen.

Live web cam: Click here

Alternative approach: If you don’t want to take the bus all the way to the top, then there are 4 other routes to choose from to climb the mountain from the bottom. The two most popular are the routes from Dake Onsen and from Iwakisan Jinja. It’s a challenging full-day hike if you start from the bottom so be prepared.  Click here for more information about each route in Japanese.

Level of difficulty: 2 out of 5 (elevation change ~400m)