Archive for the ‘Archive’ category

Aizu-komagatake (会津駒ヶ岳)

May 7, 2008

Last updated: Feb 18, 2025

Aizu-komagatake is a splendid series of rolling green hills and tranquil marshlands, with magnificent panoramic views and an abundance of wildflowers.

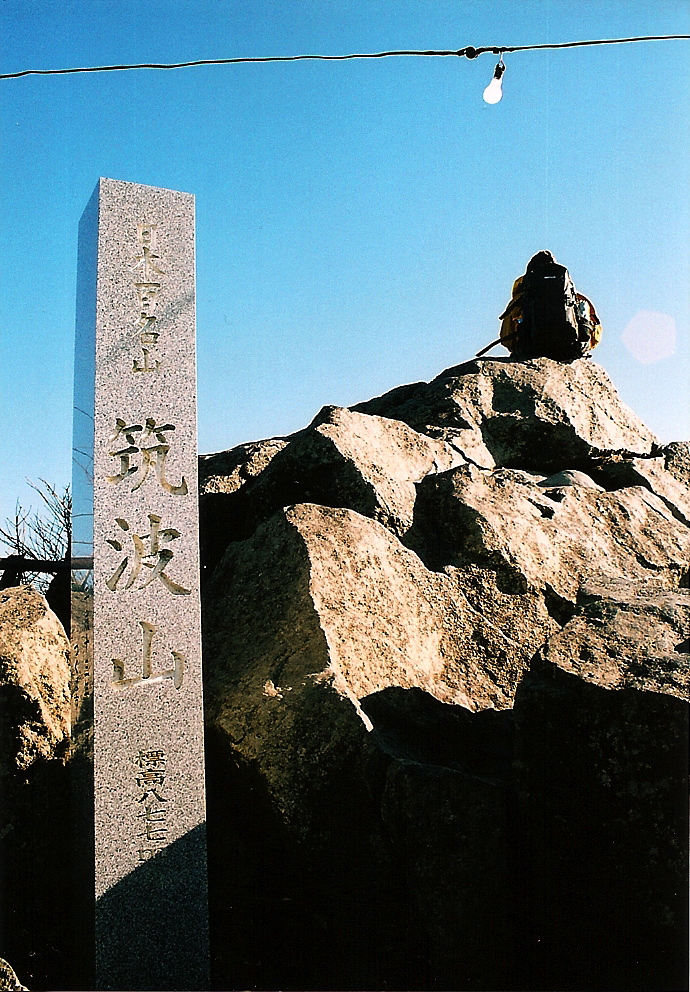
The hike: From the bus stop, head up the paved forest road across the street. There’ll be a large white sign indicating 会津駒登山口, as well as a toilet. Hike up the paved road for about 20 minutes until reaching the trailhead proper (you can’t miss the wooden staircase leading into the forest). The trail wastes no time in gaining altitude, and if you’re hiking in April or May then the entire trail will be covered in snow. Even in the snow, the trail is very clearly marked with red ribbons tied to the trees. After about 90 minutes of climbing, you’ll reach a natural mineral spring, which apparently has really great water. It’ll be buried and impossible to find if you’re hiking before the rainy season. Fill up your bottles here, because the hut at the top doesn’t have any water. Keep climbing up and up through the dense forest until it starts to thin out. The summit ridge should start to come into view on your right, as well as nice views out to Mt. Hiuchi toward the left. Eventually you’ll reach the ridgeline, where you’ll find Komanogoya (駒ノ小屋) a small but nice hut. It costs 3000 yen to stay here and it’s run by a lovely husband and wife team who used to work at the Yari-ga-take hut in the Kita Alps. There are no meals served, but they do have futon, so bring your stove and food. There’s no water, but you can melt snow if you’re hiking before July. From the hut, turn right and continue up the path to the true summit, marked by a very tall signpost. It’s hard to believe, but this signpost gets completely buried under snow in the winter! After taking in the views, consider a side trip out to Chūmon-dake (中門岳), where you’ll find a scenic lake and loads of wildflowers. Retrace your steps back to the hut, and either return down the same way you came, or traverse the entire ridge down to Mi-ike (御池), the starting point of the Mt. Hiuchi (燧岳) climb. This traverse should not be attempted before the rainy season due to the snow cornices and the fact that there are no markings to help guide you through the snow.

When to go: This hike can be done from Golden Week to early November. A winter hike is also possible if you’re prepared for the massive amount of snow. I hiked in Golden Week and there was still over 2 meters of snow remaining. There are a few minshuku just a short distance from the trailhead,  so you can get a fresh, early start and can also try out the local delicacy: deep-fried salamander.

Access: From Asakusa station in Tokyo, take the limited express ‘Revaty Aizu’ train on the Tobu Line (東武) bound for Aizu-Tajima  (会津田島) and get off at the final stop. From Aizu-Tajima station, take an Aizu bus bound for either Hinoemata (檜枝岐) or Miike (御池)  and get off at Komagatake-tozanguchi (駒ヶ岳登山口). There are just 2 buses per day, with more during the summer hiking season. The bus takes about an hour and 30 minutes to reach the trailhead and costs around 2200 yen. Click here for the bus schedule.

Level of difficulty: 3 out of 5 (elevation change 1203m).

Mt. Hakkoda (八甲田山)

April 28, 2008

Last updated: Feb. 3, 2025

Mt. Hakkoda is one of the premiere ski resorts in the Tohoku region, with meters upon meters of fresh powder and an endless army of ‘ice monsters’. The rest of the year it’s a hikers dream, with wonderful fertile volcanic cones, spectacular marshlands, and breathtaking panoramic views.

The hike: From the Sukayu onsen bus stop, take the trail at the end of the parking lot (closer to the toilets) towards Sennin-tai (仙人岱). The path initally climbs through a dense forest, and then opens up and turns into a wonderful volcanic valley, with lots of colorful rock formations and pungent sulfur fumes. It should take about 45 minutes to reach the top of the volcanic plateau, where the trail will flatten out significantly. At Sennin-tai, you’ll find an emergency hut and water source, so fill up your bottles. Take the trail to the left towards Odake (大岳). There may still be some remaining snow in this area and lots of wildflowers. You should reach the top of Odake in about an hour, and the views are wonderful. Mt. Iwaki will be staring at you across the valley, and on a clear day you’ll see Aomori city to the north, and the Pacific Ocean to the northeast. Continue on the same trail down to a saddle and emergency hut. From here, you can either climb up to Mt. Akakura (赤倉岳) or turn left to descend back to Sukayu Onsen. I was keen for a bath, so I skipped Akakura and flew down to the hot spring. The path to Sukayu is well-marked, with lots of wooden planks to protect the wild flowers. The marshlands definitely warrant a leisurely stroll, so take your time and enjoy the serenity.

When to go: This hike can be done from Golden Week to early November. A winter ascent is also possible whenever avalanche danger is low and the weather is favorable. In the winter of 2007, 2 people were killed and a dozen injured in an avalanche on Mt. Hakkoda, so please don’t climb without a beacon and proper avalanche training.

Access: From Aomori station (青森駅), take a JR bus bound for Lake Towada (十和田湖) and get off at Sukayu Hot Spring (酸ケ湯温泉). As of 2024, the bus leaves from bus stop #11 at the East Exit of Aomori Station and it runs from August 1 to November 11 with just 3 buses in the morning. The bus takes around an hour. Click here for the bus schedule.

Level of difficulty: 3 out of 5 (elevation change ~694m).

Mt. Kuju (九重山)

April 27, 2008

Mt. Kuju is not only a majestic volcanic wonderland filled with luscious greenery, steaming gas vents, and serene lakes – it’s also the highest peak on the island of Kyushu.

The hike: From the parking lot, take the trail that starts to the left of the souvenir shop. It should take about 20 minutes to reach the Kuju ridge line up the concrete-lined path. If you’ve come in early summer, then you should find a sea of beautiful azalea in bloom and literally hundreds of people. The next 40 minutes to Ogigahana (扇ヶ鼻) is relatively easy going, where you’ll find a 4-way junction. You can either climb to the top of Ogigahana, head left to the summit of Mt. Hosho (星生山) or continue straight towards Mt. Kuju. The steam vents just behind Mt. Hosho are wonderful, and a reminder that you’re on an active volcano! After another half hour or so, you’ll reach the saddle just below the peak of Kuju, where you’ll find a small emergency hut. There are lots of different trails that branch off in all directions, so I recommend climbing over to Naka-dake first (中岳) first, and hitting Mt. Kuju on your way back to Mi-no-koshi. Naka-dake is the tallest peak in Kyushu, and reachable in about 40 minutes. You’ll pass by some fabulous volcanic lakes, which make for a great place to relax and enjoy your lunch (if the weather is nice). After reaching the summit of Naka-dake, you can loop back to the saddle below Kuju. Head up to the peak and then all the way back to the parking lot or continue traversing the ridgeline of Mt. Kuju via Hokke-in hot spring (法華院温泉), which has a nice campground.

When to go: This hike can be done year round if you’ve got some crampons. The peak does get its fair share of winter snow, so make sure the road to the mountain pass is plowed and open before venturing out. The azaleas bloom in early to late May, which brings huge crowds. Autumn is also a great time to visit and winter is seeing increasing crowds as of late, due to the winter hiking boom in Japan. Click here to see the winter scenery and be careful of white-out conditions.

Access: From Hakata station (博多), take a JR “Yufuin no mori” limited express train and get off at Bungonakamura station (豊後中村駅). The train takes about 2 hours and costs 4290 yen. A local train is half the price but takes a whopping 4-1/2 hours. From Nakamura station, take a bus bound for Makinoto-toge (牧ノ戸峠). Buses only run on weekends from late May to late October. Click here to access the schedule. Click on “時刻表”, “ローカル時刻表”, and then “森町〜牧ノ戸線” to download the .pdf file. Another more convenient option might be to take the bus that runs from Beppu to Kumamoto, which stops along the way at Makinoto-toge. For example, if you take the overnight Osaka to Beppu ferry, there’s a direct bus leaving directly from the ferry terminal at 7:07am, arriving at Makinoto at 9:26am. This bus does not run in the winter however, which means between December and March you’ll need to take a bus from Beppu Bus Center (別交通センター) at 8am. Click here for that bus schedule. If coming from Kumamoto, the bus stops at Mt. Aso first before completing the 3-1/2 hour ride to the trailhead. Click here for the bus from the ferry terminal to Makinoto-toge. Sorry if it’s confusing but there are 2 different bus companies that provide bus services.

Level of difficulty: 2 out of 5 (elevation change ~500m).

Distance: 9.6km (3 to 4 hours)

Mt. Amagi (天城山)

April 24, 2008

Mt. Amagi is the highest point on the Izu Peninsula, offering beautiful virgin forests and a great view of Mt. Fuji.

The hike: From the bus stop, walk down the road a short way, and enter the forest on your left. They’ll be signs marking the trail. The actual mountain isn’t called Amagi, so you have to follow the signposts to Mt. Banzaburo (万三郎岳). The path is flat for the first 10 minutes or so, and then you’ll descend to a small creek and start climbing up the other side. There’s a trail branching off to the right that also leads up to Mt. Banzaburo, but it was closed at the time of writing. I hiked in the fall and I think it was closed because of hunters, but it would make for an interesting loop if the trail is open in other seasons. Anyway, your first target for the day is Mt. Banjiro (万二郎岳). It should take about an hour from the parking lot to the summit. Along the way, you’ll pass by the golf course, so be on the lookout for stray golf balls. From the top of Mt. Banjiro, the trail descends to a saddle, where you should have a wonderful view of Mt. Fuji. On the descent, you’ll pass through a tunnel of Japanese andromeda shrubs, which is one of the highlights of this hike. I think they bloom in early summer, which would be a great time to come. Anyway, the climb up to Mt. Banzaburo should take 40 minutes or so from the saddle. You have a few options from here. You could continue on the trail and do a traverse of the entire mountain range. It should take about 3 or 3-1/2 hours to reach Amagi-toge (天城峠), where you can catch a bus to Shuzenji station (修善時駅). Or you could retrace your steps back to the parking lot. Better yet, you can take the trail leading off to the right for the aforementioned loop (if it’s open). Click here to see a report of a Japanese hiker who did the loop just mentioned.

When to go: This hike can be done year round, but be prepared for snow in the winter. Avoid weekends if you want to dodge the crowds.

Access: From Tokyo station, take the JR Limited Express ‘Odoriko’ train to Ito station (伊東駅). The train takes about 90 minutes, but will cost you around 4000 yen. A local train is half the price, but takes 2 hours and 15 minutes. From Ito station, take a bus bound for Amagi-kogen Golf Course (天城高原ゴルフ場). There are different bus times depending on the season, so make sure you check the schedule before departing Tokyo. Click here for the bus schedule.

Level of difficulty: 1 out of 5 (elevation change ~400m)

Mt. Hakkyō (八経ヶ岳)

April 23, 2008

Last updated: March 12 , 2025

Mt. Hakkyō (aka Mt. Hakken) is the highest point of the Omine mountain range, and the tallest peak in the Kansai area. It’s also situated along an ancient Okugakemichi pilgrimage route, offering some of the most unspoiled scenery in western Japan.

The hike:

From the trailhead, take the well-marked path on your right just before the route 309 tunnel. The route follows the left bank of the stream before crossing a cute wooden bridge, where the steep climb up the spur to the ridge commences. It’ll take an hour along an easy-to-follow path to reach the Deai (出会) junction on the main pilgrimage route. There’s a stone marker here indicating that it is a World Heritage site, and the flat area makes for a good place to rest and catch your breath. Turn right and follow the gentle slope up a short climb and descent, followed by another climb through an area of trees toppled from the Sept. 2018 typhoon. The track has recently been cleared of debris and at the top of the next rise you’ll reach Benten-no-mori (弁天の森) at an elevation of 1600m. There used to be a lodging here but now there’s nothing more than a flat place to take a break. Follow the signs to Misen (弥山) and lose altitude quickly down a broad track for 30 minutes to a pass placated with a large statue of En-no-gyōja. Rest here if necessary before the long, steep climb up to Misen. The path starts off on a gentle ascent before reaching a series of wooden stairs. It should take about 30 minutes of tough climbing to regain the ridge line, where it’s another 20 minutes on a narrow path and over a metal stair/ladder to arrive at Misen hut (弥山小屋). Most people overnight here by either staying at the large hut or camping in a broad meadow on an unmarked trail just before the hut. A path continues past the hut to a fork. Head straight to Tengawa or turn right for the short climb to the summit of Mt. Misen, which houses the mountain deity and affords stunning views across a col to the summit of Mt. Hakkyō. To get to the high point, retrace your steps back to the hut and veer right on the path at a stone marker reading 八剣山•前鬼 (Hakkenzan, Zenki). Drop steeply on a heavily eroded path to a col and then climb through two deer-proof gates erected to protect the Siebold’s magnolia flowers. It should take about 15 minutes to reach the summit, punctuated by a huge weathered-signpost in Japanese for 八経ヶ岳. Enjoy the splendid panoramic views on the rare occasion the peak isn’t enshrouded in cloud/mist. Retrace your steps back to the trailhead or turn left at Misen hut for an alternative finish at Tenkawa (a 5-hour descent along a steep trail).

When to go: This hike can be done all year round, but be prepared for lots of snow in the winter. Click here to see what you can expect in January. Please note that route 309 closes from mid-December to mid-April because of snow, so winter hikers will need to take the longer trail from Tenkawa village.

Access: From Abenobashi station (阿倍野橋駅)in Tennoji (天王時), take a Kintetsu train bound for Yoshino (吉野) and get off at Shimoichikuchi station (下市口). From there, take a bus bound for Dorogawa Onsen (泥川温泉) and get off at the Tenkawa-kawai (天川川合) bus stop. You have three options. Take a taxi for 30 minutes to the trailhead, hitch there, or start your hike from here. If you want to hitch, make sure you’re on route 309 and ask your ride to let you off just before you enter the tunnel. Click here for the bus schedule. The lack of buses from Shimoichiguchi make this almost  impossible to do as a day trip, but it definitely can be done if you are up to the challenge. If coming by car please note that there is now a 1000-yen parking fee at the western tunnel entrance parking lot.

Digital Map in English (Avenza App): Click here

Level of difficulty: 3.5 out of 5 (elevation change ~900m)

Kisen Alps (紀泉アルプス)

April 21, 2008

The Kisen Alps are a series of rolling peaks located on the Osaka-Wakayama prefectural border. Despite their close proximity to the big city, the mountains are relatively unspoiled and completely natural, without a single cedar tree in sight.

The hike: Go through the unmanned ticket gates, and turn right on the small paved road in front of the station. Turn right at the next street, where you’ll cross a small river and the railroad tracks. Follow the signs to Kisen Alps (記泉アルプス), turning left at the sign, and then right up a small dirt road. This road eventually becomes the trailhead, as you pass through a very funky entrance gate. The path climbs rather steeply at first, paralleling a large expressway. The traffic noise is pretty loud, but you’ll soon leave that all behind and enter a magical wonderland of beautiful flora. I have no idea why this area was spared of the post-war deforestation, but I’m so happy it was. As you hike, imagine how beautiful this country must’ve been hundreds of years ago, when every single forest looked just like this! Keep your eyes out for snakes and wild boar, as there are quite a few in this area. After about 30 minutes of climbing, you’ll reach the ridgeline and a trail junction. Head to the right for about 20 meters to reach a wonderful clearing with excellent views of Kansai airport and Osaka bay. Take some photos and head back to the junction. The trail follows the entire mountain ridge, and your target is the high point called Unzenbou (雲仙峰). There’s a considerable amount of up and down between here and the top, but it’s not too difficult. There are lots of places to take breaks and enjoy the outstanding scenery. You should reach the peak in about 2 hours or so. Just below the top, you’ll come across a 3-way junction with beautiful bilingual signposts. Yep, you’ve officially entered Wakayama prefecture, where they seem to have more money in their budget for trail maintenance. Continue on to the top of Unzenbou. There’s not much of a view from here, so after taking a break continue down the other side. In about 10 minutes, you’ll come across yet another trail junction, with magnificent views of Wakayama city and the Pacific Ocean. Turn left at the junction and you’ll reach a well-maintained public park with lots of benches and a gazebo. This is a great place for a picnic or a nap on a pleasant day. From here, trails split off in all directions, and you’ve got lots of options. I’d recommend following the signs to Kii station (紀伊駅). It should take about 90 minutes or so from the park to the station, and there are lots of different trails you have to take, so follow the signs carefully. Just before the trail dumps you out on a road, you’ll pass through a bamboo forest that is downright spooky at dusk. From Kii station, you can catch a JR train back to Tennoji.

When to go: This hike can be done year round, but I’ve been told that autumn is the best time to see the virgin forests in all their glory. The mountains do get some snow in the winter, but it usually melts relatively quickly.

Access: From Tennoji station (天王時駅) take a train on the JR Wakayama line and get off at Yamanakadani (山中渓駅). An express train should take about 45 minutes or so. Please note that this is an unmanned station (hint, hint).

Level of difficulty: 2 out of 5 (elevation change ~200m)

Kita-dake (北岳)

April 20, 2008

This blog post was written back in 2008. For the latest information about this hike (including color photos and maps), please consider purchasing my guidebook to the Japan Alps. 

Kita-dake is the 2nd highest peak in Japan and has one of the best vantage points for viewing Mt. Fuji anywhere around.

The hike: From the huge parking lot at Hirogawara, walk a little back towards the main road and then turn left. You’ll see a pedestrian suspension bridge crossing the river, and this is where the trail starts. Cross the bridge and follow the path for about 20 minutes. You’ll come to a junction and you have 2 choices. Both trails lead to Kita-dake, but I recommend taking the one on the right towards Shiraneoike hut (白根御池小屋). It’ll take about 2-1/2 hours or moderate climbing to reach this hut. There’s a campground here, as well as a water source. Take a break here, because the real climb is about to start. Take the trail that goes past the campground, and begin your steep climb up to the ridge line. Most maps allocate 3 hours for reaching the ridge, but if you’re traveling light or in good shape then you can do it in half the time. Once you hit the ridge, turn left and hike for another half hour until reaching Kita-dake kata-no-koya (北岳肩ノ小屋). This hut is perched on a saddle just below the summit, and there’s a campground and water source here. You’re over 3000m now, so make sure you bring plenty of warm clothing even in the summer. I camped here in August and it definitely hovered around the freezing mark at night. The next day, rise early to watch the sunrise from the second highest peak in Japan. It should take about 45 minutes or so to reach the top. The views pretty much speak for themselves, and you can easily see why this mountain has become so popular for Japanese hikers. Continue down the other side of the rocky peak until reaching a junction. You can continue on to Ai-no-dake if you’d like, or you can take a left at the junction for an alternative route back to Hirogawara. Hike about 45 minutes and then take another left at the next junction. It should take about 2-1/2 hours to descend back to Hirogawara. I must admit that I’ve never done this trail, so I can’t attest to the condition/difficulty, but the maps say that snow remains until early August and that it’s quite rocky.

When to go: This hike can be done from around Golden Week to early November. The road to Hirogawara is closed in the winter, so it’ll be pretty difficult to get here unless you hike a long way to the trailhead. That being said, there are exceptions!

Access: From Kofu station (甲府駅), take a bus bound for Hirogawara (広河原). Click here for the bus schedule in Japanese.

Level of difficulty: 5 out of 5 (elevation change 1673m)

Mt. Tsukuba (筑波山)

April 19, 2008

Mt. Tsukuba is one of the easiest of the venerable Hyakumeizan to climb, and surprisingly close to Tokyo. The mountain is extremely over-developed, so consider giving it a miss unless you’re really intent on climbing all of the 100 famous peaks.

The hike: From the bus stop, walk up the hill towards the cable car station. The trail starts just before the station and parallels the tracks for most of the way. Despite the low elevation change, the trail is actually surprisingly steep and a nice little workout. It should take around 2 hours of moderate climbing to reach the top of the cable car station and ugly buildings/towers on the saddle. From here, you’ve got two options. You can climb to the top of Mt. Nantai (男体山) in about 10 minutes. The view towards the peaks of Nikko is excellent, and if the weather is good you should also be staring at Mt. Fuji in the distance. If you don’t fancy this detour, then head up to the high point of Tsukuba, called Mt. Nyotai (女体山). The path is very, very easy and there’s a concrete shrine on top (as well as some rock formations). Head down the other side of the summit, and you’ll see the top of the gondola station soon (why oh why did they have to build both a gondola and cable car – are Japanese people really that lazy?). Continue down the spine of the mountain, past some nice rock formations, and you’ll come to a trail junction. You have 2 options. You can keep going on the same path down to the parking lot at the bottom of the gondola, or turn right for a nice loop trail that’ll take you back to the start of the hike.

When to go: This hike can be easily done year round. Avoid weekends if you want to skip the crowds.

Access: From Akihabara station (秋葉原駅), take a train on the Tsukuba express line and get off at the terminus, Tsukuba station (筑波駅). An express train takes only 45 minutes and costs 1150 yen. Click here for information in English. From there, take a shuttle bus bound for Tsukuba shrine (筑波神社入口). The bus costs 700 yen. There are 2 buses each hour, each leaving at the top of the hour and half past the hour. Click here for the complete schedule in Japanese.

Map: Click here

Level of difficulty: 2 out of 5 (elevation change 636m)

Mt. Nantai (男体山)

April 19, 2008

Mt. Nantai is the Mt. Fuji of the Nikko area. Its easy access makes it one of the most popular hikes in the Kanto area, so be prepared for crowds during weekends and national holidays.

The hike: From the bus stop, head up the stairs to the shrine. The trail starts directly behind the shrine, and you’re supposed to pay 300 yen for the privilege of climbing to the summit, but I just hiked without paying and no one stopped me (but the deities got revenge by dumping freezing rain on me!) The path is very well-trodden and oh so steep. It’s less than 5km from the shrine to the summit, but you’re climbing over 1200 vertical meters! During the first hour or so, you’ll cross over a forest road several times, and part of the path actually follows the road for a short while. Once you leave the road, it’s no turning back and there are very few places to rest. You’ll come across 2 different emergency huts, neither of which are in very good condition. The course is very rocky, so use care on the descent, especially if the rocks are wet. Every year, people have to be airlifted out due to nasty falls. Anyway, after what seems like an eternity, you’ll finally reach the summit ridge above the tree line. The last 20 minutes of hiking is through reddish-brown volcanic strata, bringing images of Mt. Fuji to mind. There’s a shrine and emergency hut on the summit itself, but no water source, so unless you fancy lugging up a ton of water, you should accept this as a day trip. The hut has definitely seen better days, and can fit about 2 or 3 people comfortably. If the weather is good, then you’ll have an excellent birds-eye view of Lake Chuzenji. Either head back the same way you came, or traverse down the other side of the mountain. I’m told the trail on the back side isn’t used very much and is much, much longer (you’ll have to hike on a forest road for about 8 or 9km in order to get back to civilization).

When to go: This hike can be done between late April and early December. A winter hike is also possible, depending on the year. The peak is prone to avalanches during periods of heavy snowfall, so use caution and common sense if climbing in the winter.

Access: From Nikko station (日光駅), take a bus bound for Yumoto Hot Spring (湯元温泉) and get off at the Futarasan Jinjamae (二荒山神社前) bus stop. Click here for the bus schedule.

Live web cam: Click here

Level of difficulty: 4 out of 5 (elevation change 1212m)

Mt. Miyanoura (宮之浦岳)

April 11, 2008

Mt. Miyanoura is the highest peak on Yakushima, a World Heritage island located a boat ride away from Kagoshima city. Known for its remote access, gigantic cedar trees and wet weather, the mountain challenges even the most experienced of hikers.

The hike: From Yodogawa trailhead, it’s an easy 40-minute walk to Yodogawa hut (淀川小屋). If you’ve gotten a late start then this is an ideal place to stay, as the hut is free, unmanned, and has a water source. You can also camp in front of the hut, but if you arrive late in the afternoon then all of the good sites will be taken. When I went, everyone was camping and we had the hut to ourselves! From the hut, you’ve only got 600m of vertical climbing but it seems like a lot higher! The first 2 hours or so are pretty straightforward on a well trodden path, passing through a wonderful marshland with lots of wooden planks to walk on. You’ll hit a 4-way junction, but just follow the signs to Mt. Miyanoura (宮之浦岳). In about 20 minutes you’ll reach a water source, so take a break and fill up your water bottles. There’s also a spur trail to the top of Mt. Kuromi (黒味岳). This makes for an interesting detour when the weather is fine, but if the cloud is in then just continue onward toward the summit. The trail becomes quite rocky and you can have loads of fun trying to determine if the rocks look like tofu, rabbits, turtles, or other imaginative shapes. Over the next hour or so, you’ll pass by numerous peaks, including Mt. Anbo (安房岳) before reaching yet another water source. From here it’s a 30-minute slog to the summit, where the panoramic views are stunning in clear weather. Remember that Mt. Miyanoura is a rain magnet, and while it can be sunny along the coast of the island, it’ll probably be foggy or raining on the peaks, but that doesn’t take away from the scenery. It only makes taking breaks a bit inconvenient. Anyway, traverse up and over the narrow summit and down towards Shin-takatsuga hut (新高塚小屋). It should take around 2-1/2 hours from the summit to the hut. If you arrive late in the day then all of the good camp sites will be taken, and you’ll be forced to stay in the hut (for free of course!). Most people camp on the wooden planks outside of the hut, but it’s also possible to find some nice flat areas just off the main trail. There’s a water source here, but I’m dubious of the quality, so it’s better to be safe and use your water filter. After leaving the hut the next morning, you’ll come to the old Takatsuga hut in about an hour. It’s a dump compared to the hut you just left, so don’t stay here unless it really is an emergency. The area is suffering quite a bit from overuse, so try not to contribute to the erosion. In about 10 minutes from the hut you’ll reach Jomon-sugi, the most famous tree on Yakushima. This is also where you’ll run into all of the tourists. You might be a bit disappointed after 2 days of solitude! The path is basically one giant wooden plank, and there will be human traffic jams if you’ve come during any holiday period, so be prepared. You’ll reach Wilson stump in about an hour, and this is a much better place to take a break than Jomon-sugi. You should reach the ‘trailhead’ in another 30 minutes. This is not the official trailhead, but the start of the train tracks! (no kidding). Although you’ll see no actual trains, you might run across a rail car that’s been designed to carry timber from the forest (and you thought this was a World Heritage site, didn’t you?). The trail basically follows the railroad tracks for what seems like an eternity. It’s flat and relatively mundane, so make sure you don’t fall through the gaps in the bridges! In about an hour you’ll reach a trail coming in on your left. Take this trail if you’d like to go through the Mononoke forest and an alternative finishing point. Otherwise, continue descending the mountain for another hour until reaching the real trailhead at Arakawa. (荒川登山口). You can take a bus or taxi from here back into town (or try your luck hitching).

When to go: This hike can be done from March to late November. Despite its southern location, this peak gets a lot of snow in the winter and should not be attempted without an experienced mountain guide or a GPS device and climbing equipment.

Access: From Miyanoura port, take a bus to Anbo (安房) and get off at the Anbo bus stop. From there, change to a bus bound for Yakusugi Land (ヤクスギランド) and get off at the last stop, called Kigen Sugi (紀元杉). From this tree, it’s a 20-minute walk to the trailhead at Yodogawa (淀川登山口). Alternatively, you can take a taxi from Anbo directly to the trailhead. The taxi drivers on Yakushima are accustomed to bargaining for rates, and they’ll definitely give you a discount in the off season!

Level of difficulty: 3 out of 5 (elevation change 1336m)