Posted tagged ‘japan’

Mt. Miyanoura (宮之浦岳)

April 11, 2008

Mt. Miyanoura is the highest peak on Yakushima, a World Heritage island located a boat ride away from Kagoshima city. Known for its remote access, gigantic cedar trees and wet weather, the mountain challenges even the most experienced of hikers.

The hike: From Yodogawa trailhead, it’s an easy 40-minute walk to Yodogawa hut (淀川小屋). If you’ve gotten a late start then this is an ideal place to stay, as the hut is free, unmanned, and has a water source. You can also camp in front of the hut, but if you arrive late in the afternoon then all of the good sites will be taken. When I went, everyone was camping and we had the hut to ourselves! From the hut, you’ve only got 600m of vertical climbing but it seems like a lot higher! The first 2 hours or so are pretty straightforward on a well trodden path, passing through a wonderful marshland with lots of wooden planks to walk on. You’ll hit a 4-way junction, but just follow the signs to Mt. Miyanoura (宮之浦岳). In about 20 minutes you’ll reach a water source, so take a break and fill up your water bottles. There’s also a spur trail to the top of Mt. Kuromi (黒味岳). This makes for an interesting detour when the weather is fine, but if the cloud is in then just continue onward toward the summit. The trail becomes quite rocky and you can have loads of fun trying to determine if the rocks look like tofu, rabbits, turtles, or other imaginative shapes. Over the next hour or so, you’ll pass by numerous peaks, including Mt. Anbo (安房岳) before reaching yet another water source. From here it’s a 30-minute slog to the summit, where the panoramic views are stunning in clear weather. Remember that Mt. Miyanoura is a rain magnet, and while it can be sunny along the coast of the island, it’ll probably be foggy or raining on the peaks, but that doesn’t take away from the scenery. It only makes taking breaks a bit inconvenient. Anyway, traverse up and over the narrow summit and down towards Shin-takatsuga hut (新高塚小屋). It should take around 2-1/2 hours from the summit to the hut. If you arrive late in the day then all of the good camp sites will be taken, and you’ll be forced to stay in the hut (for free of course!). Most people camp on the wooden planks outside of the hut, but it’s also possible to find some nice flat areas just off the main trail. There’s a water source here, but I’m dubious of the quality, so it’s better to be safe and use your water filter. After leaving the hut the next morning, you’ll come to the old Takatsuga hut in about an hour. It’s a dump compared to the hut you just left, so don’t stay here unless it really is an emergency. The area is suffering quite a bit from overuse, so try not to contribute to the erosion. In about 10 minutes from the hut you’ll reach Jomon-sugi, the most famous tree on Yakushima. This is also where you’ll run into all of the tourists. You might be a bit disappointed after 2 days of solitude! The path is basically one giant wooden plank, and there will be human traffic jams if you’ve come during any holiday period, so be prepared. You’ll reach Wilson stump in about an hour, and this is a much better place to take a break than Jomon-sugi. You should reach the ‘trailhead’ in another 30 minutes. This is not the official trailhead, but the start of the train tracks! (no kidding). Although you’ll see no actual trains, you might run across a rail car that’s been designed to carry timber from the forest (and you thought this was a World Heritage site, didn’t you?). The trail basically follows the railroad tracks for what seems like an eternity. It’s flat and relatively mundane, so make sure you don’t fall through the gaps in the bridges! In about an hour you’ll reach a trail coming in on your left. Take this trail if you’d like to go through the Mononoke forest and an alternative finishing point. Otherwise, continue descending the mountain for another hour until reaching the real trailhead at Arakawa. (荒川登山口). You can take a bus or taxi from here back into town (or try your luck hitching).

When to go: This hike can be done from March to late November. Despite its southern location, this peak gets a lot of snow in the winter and should not be attempted without an experienced mountain guide or a GPS device and climbing equipment.

Access: From Miyanoura port, take a bus to Anbo (安房) and get off at the Anbo bus stop. From there, change to a bus bound for Yakusugi Land (ヤクスギランド) and get off at the last stop, called Kigen Sugi (紀元杉). From this tree, it’s a 20-minute walk to the trailhead at Yodogawa (淀川登山口). Alternatively, you can take a taxi from Anbo directly to the trailhead. The taxi drivers on Yakushima are accustomed to bargaining for rates, and they’ll definitely give you a discount in the off season!

Level of difficulty: 3 out of 5 (elevation change 1336m)

Mt. Tanigawa (谷川岳)

April 9, 2008

Mt. Tanigawa is a rocky peak sitting complacently on the border of Gunma and Niigata Prefectures. Notorious for its nasty weather and head deep snow, the mountain affords wonderful panoramic views and an abundance of plant life.

The hike: From Doai station, head out the front door and turn right on the paved road. Walk uphill about 20 minutes and you’ll come to the Mt. Tanigawa gondola. Take the gondola if you’d like to save 600m of vertical climbing. Otherwise, take the gravel service road that runs to the left of the gondola. This road will take you all the way to the top of the gondola, and it should take around an hour or so. The trail actually branches off this road about halfway up, but you can ignore the actual trail and follow the road toward the left to get to the ski resort. It’s much better to go directly to the ski resort so you can fill up on water in the rest house, as there’s no other water source on the hike. The trail runs in front of the rest house, and then away from the ski lifts toward the rocky peaks of Mt. Tanigawa. It should take about 45 minutes to reach the emergency hut at Kuma-ana sawa (熊穴沢避難小屋). From the hut, turn right and start the real climb toward the summit. There are a few areas with chains to help you on the narrow ridge line, but all in all it’s not too treacherous. You’ll reach the hut just below the summit in about 90 minutes. If the weather is good then the views will be stunning. If not, then take extra care on the knife-edge traverse over to the high point. The summit has 2 twin peaks. The first one you’ll come to is called Tomanomimi (トマノ耳), while the higher peak is called Okinomimi (オキノ耳). After scaling the two peaks, you could continue traversing along the ridge or go back the same way you came. There are also 2 other alternative ways off the mountain. The first one is to take the trail leading away from the hut. This trail is very rocky, with lots of chains and ladders, which probably makes for a safer ascent than descent. The other alternative is to retrace your steps back to the Kuma-ana hut, and take a right. This trail will eventually dump you out at Minakami station (水上駅). I ended up flying back down to the base of the gondola to escape an incoming rainstorm. Grab a map and explore the vast network of trails that this legendary peak has to offer.

When to go: This hike can be done year round if you’ve got an ice axe and crampons. Be especially careful of avalanches in the middle of winter, and be prepared for tons of snow until at least the rainy season.

Access: From Echigo-yuzawa station (越後湯沢駅), take a local JR train bound for Minakami (水上) and get off at Doai station (土合駅).

Live web cam: Click here

Map: Click here. In addition, you can find a couple of beautifully illustrated free maps here. Scroll down to the bottom of the page and download the .pdf files.

Level of difficulty: 4 out of 5 (elevation change 1213m)

Mt. Tanzawa (丹沢山)

April 8, 2008

Last updated: Oct. 23, 2019

Mt. Tanzawa is a wonderful series of rolling hills located just west of Yokohama. The night views of Tokyo are incredible, as is the unobstructed view of Mt. Fuji.

tanzawa

The hike: From the bus stop, hike up the road past some houses and Japanese inns. The road will split after about 10 minutes or so. Take the left fork. Initially a forest road, the path will eventually turn into a proper hiking trail. During the first 90 minutes or so, you’ll pass by a number of ‘teahouses’ which sell basic refreshments during the summer hiking season. Horiyama-no-ie (堀山の家), is the first actual mountain hut in which you can stay. Click here to access the hut website. There’s also a trail junction at this hut, but keep going straight, towards Tou-no-dake (塔ノ岳). After 20 more minutes another trail will come in on the right, but ignore it and keep going up and up. There’s a seemingly endless array of wooden stairs along this point, and you’ll keep seeing them all the way to the top of the ridge line. Mt. Fuji should start coming into view just behind you if the weather is clear. Around 90 minutes from the hut at Horiyama you should be sitting on top of Tou-no-dake. Take a well deserved break and check into the hut if you’ve lost your energy or if it’s late. You’ve got about 2 hours of up & down ridge hiking in order to reach the high point of the mountain range. Please note that no camping is allowed anywhere on the mountain, so be prepared to fork over some money to stay in the huts. The hut on top of Tou-no-dake, named Sonbutsu-sansou (尊仏山荘) costs 5000 yen with dinner or 4000 yen without meals. Anyway, regardless of whether you stay here or not, you’ve got to traverse the entire Tanzawa ridge in order to say you’ve truly done it. Continue on the path that goes behind the hut, which leads to the true summit of Mt. Tanzawa(丹沢山). It’ll take about an hour or so to reach the top, where you’ll be greeted with another hut. This one is called Miyama-sansou (みやま山荘) and their website can be found here. If you’re a sucker for punishment (like I was) and want to traverse to the highest peak in the range all in one day, then take the trail to the left of the hut towards Hiru-ga-take (蛭ケ岳). It should take another hour or so from Mt. Tanzawa. I timed my arrival perfectly, as the sun was sinking just behind Mt. Fuji when I arrived on the doorstep of the hut. There are also tons of deer in this area who are looking for free handouts of food. The website for Hiru-ga-take Sansō (蛭ケ岳山荘) is here. The night views of Tokyo from here are out-of-this-world, especially on a clear winter night. If you stay at this hut, then you’ve got a much shorter 2nd day compared with staying at the other huts. Continue on the trail that leads past the hut. Your goal for the day is Higashino (東野), where there’s a bus back to civilization. It should take about 3 hours from Hiru-ga-take. Just follow the signposts and turn left at the 2nd trail junction you come to. The entire mountain is lacking in water, so make sure that you bring plenty. Even in the huts there isn’t any fresh water and you have to buy overpriced bottled water! Check the bus schedule at any of the huts before departing on the 2nd day.

When to go: This hike can be done year round, but bring some light crampons during the winter because of lingering ice in shady areas.

Access: From the northern exit of Shibusawa station (渋沢駅), take a bus bound for Ookura (大倉). The bus takes only 15 minutes and costs only 200 yen. Alternatively, you can grab a taxi to the trailhead for around 1500 yen. Click here for the bus schedule.

Map: Click here

Level of difficulty: 3 out of 5 (elevation change 1383m)

Yatsu-ga-take (八ヶ岳)

April 6, 2008

Last updated: Feb 20, 2025

Yatsu-ga-take, or ‘8 peaks’, is a volcanic mountain range nestled on the border of Nagano & Yamanashi prefectures.  The area is teeming with hikers all year round, and is one of the premier winter climbing destinations in Japan.

The hike: From the bus stop, hike up the forest road for about an hour until you reach Minoto-sanso (美濃戸山荘).  You can try hitching a ride if any cars come along the gravel road.  The trailhead starts at the end of the forest road, and you’ve got two options.  Take the right fork toward Gyoja Hut (行者小屋).  It’ll take about 2 hours or so of hiking on a well-marked path to reach the busy hut.  Drop your pack off here unless you plan on staying at the hut on top of Aka-dake (which doesn’t allow camping).   Take the trail that goes behind the hut and follow the signs to Aka-dake (赤岳).  Again, the trail is well-used and easy to follow.  You should reach the rocky ridge line in about 90 minutes or so.  Once you hit the ridge, turn right to reach Aka-dake.  There are two huts along the way, one just a short distance from the summit.  On a clear day the views are exhilirating, and you’ll probably be sharing the summit with dozens & dozens of other folk.  Traverse over the summit and take a right at the first junction, toward Amida-dake (阿弥陀岳).  The trail drops to a saddle, climbs briefly over Naka-dake (中岳), and drops again to another junction.  Amida-dake will be directly in front of you.  It’s about a 30-minute climb to the summit, if you’re feeling energetic.  Otherwise, take a right to descend back down to Gyoja Hut.  You can either camp or stay at the hut here, but I recommend hiking an extra 40 minutes on an easy trail over to Akadake-kosen (赤岳鉱泉).  This is a much nicer area to pitch a tent.  Plus, the hut has its own hot spring bath!  The next day you can either head back to Minodoguchi via a trail that leads away from the hut, or you could do a different loop hike, taking in Yoko-dake (横岳) and Iou-dake (硫黄岳) before heading back to civilization.

When to go: This hike can be done year round if you’ve got an ice axe and crampons.  Despite it’s easy access, the peak does claim its fair share of fatalities, so use caution when climbing up and around the rocky ridge line.

Access: From Chino station (茅野駅), take a bus bound for Minotoguchi (美濃戸口) and get off at the last stop.  Click here for the bus schedule.

Level of difficulty: 4 out of 5 (elevation change ~1419m)

Hyonosen (氷ノ山)

April 5, 2008

Last updated: Feb 26, 2025

Hyōnosen is the highest mountain in Hyogo Prefecture, and the only peak in the Kansai area where you can see the Juhyō (樹氷) phenomenon in the winter. It’s also one of the toughest day hikes in the region.

The hike: From the bus stop, walk a short way up the road and turn left on a small paved forest road marked for 氷ノ山登山口. Don’t descend to the parking lot or cross over to the ski lifts. I made that mistake and got a little lost on my first trip there. The forest road is pretty gentle, and after about 20 minutes you’ll reach the trailhead and campground. This place is called Fukusada-shisui-koen (福定親水公園). The trail starts behind the toilets (which are locked in the winter). The path passes through a park and campground before dropping down to a river bed. Follow the tape marks and cross the river to the base of the climb. After passing by a triangular distance marker (山頂まで4.5km) you will soon reach a junction for Nunotaki (布滝). Drop your pack here and head right to the wooden bridge overlooking the 65-meter high falls. Retreat back to the main trail and head up the steep slope towards the ridge. There is soon a white sign that reads 28曲り- this is the beginning of a series of 28 switchbacks that gain around 200 vertical meters of altitude. Along the route, you’ll pass by a buddhist statue overlooking Fudotaki (不動滝) which is difficult to see through the thick foliage. You’ll also climb higher above Nunotaki (布滝) and can get a glimpse back down to where you came. The other interesting sight on the route is the ‘connected tree’ (蓮樹), a series of 7 different trees all growing out of the stump of a larger tree. It’s on your right and the different trees are labeled with numbers 1 through 7. After about 20 minutes of climbing, the trail will start to ease and you’ll see a white sign pointing towards Jizōdō (地蔵堂) and a green sign that tells you the 28 turns have finished (曲がり坂終わり). It’s a short, flat walk to the blue corrugated-metal shack of Jizōdō, which houses a very old jizō statue inside. Take a break here if needed to prepare for the big climb ahead. The trail continues through a cedar forest before dropping down to a small stream. Fixed ladder have been installed to help with the steep drop and ascent. In winter and spring this river crossing can be dangerous, so bring ropes to help cross the snow-filled crevice in the snow season. Climb the ladder and continue traversing through the forest. On your left you’ll pass by the ruins of an old temple (木地屋跡) but there isn’t much to see here apart from the signpost. The path steepens and veers towards the right through a beautiful hardwood forest, past a sign indicating a 3.0km distance to the summit (山頂まで3.0km). From here, it’s a steep climb through an expansive forest of healthy beech trees as the views start to open up across the valley. After about 10 minutes you’ll reach a water source called Hienomizu (ひえの水), a fresh water stream providing drinking water. Fill up if necessary and continue climbing towards the ridge. Soon you’ll reach a viewpoint across the valley towards Tōrōiwa (とうろう岩). The rock formation in across the valley on your left, but it’s nearly impossible to see through the thick foliage. The next landmark is another water source named Guhōnomizu (弘法の水) and shortly after that you’ll see the green 2.5km signpost. Continue straight, past a white signpost pointing towards the ridge (氷ノ山越え). Just before reaching the ridge you’ll pass by one final water source (一口水) and a series of wooden log steps for the final climb to the junction. At the ridge you’ll find trilingual signposts (In Japanese, English, and Korean) marked for the summit. With so many signposts and large crowds of hikers, it’s pretty much impossible to get lost in the green season. Winter, on the other hand, is an entirely different matter. Anyway, there’s an emergency hut and 4-way junction at the ridge along with a couple of benches which make for good places to rest. You can see the summit further along the ridge towards the west, marked by the triangular roof of the emergency hut. Turn left once you’ve reached the junction and follow the broad ridge lined with bamboo grass and large beech trees. You’ll soon see a brown signpost for the Hyonogoe Course with a number (5/10) marked below. These signposts are situated along the ridge, with 10/10 on the summit of the peak itself. They’re good to use to mark your progress. The hiking map says it’ll take 1 hour and 10 minutes to reach the summit, but you can do it in about 45 minutes if you’re fit. Along the route you’ll occasionally see brown posts wrapped with yellow tape reading 119 on them. These are markers for helicopter rescue. If you do find yourself in trouble, walk to the nearest marker and supply the numbered code on the signpost when you call emergency services. The mountain does have its fair share of accidents, mostly due to elderly people who underestimate their abilities and stamina. If you’re fit and can avoid twisting an ankle on the exposed tree roots, then you should be ok. Carry a headlamp and emergency bivouac gear just in case you’re caught out after dark, however. It’s a long hike and the daylight hours in the autumn are shorter. Anyway, continue along the ridge, ignoring the junction on your left for a long steep climb to a false summit. Here, you’ll see the summit plateau directly in front of you, with a large rock formation between you and the summit. Drop down and along the narrow ridge to this rock outcrop named Koshiki-iwa (こしき岩). The trail skirts the rock formation on your left and that is the recommended path of travel. There is an unmarked route up and over the rock, but it is not used very much. It is terribly exposed and absolutely treacherous in wet weather. You can, however, climb about halfway up to a ledge which offers great views of the forest below. If you climb over the rock, you can follow a faint path that leads to the main trail again. My advice would be to just ignore the rock and stick to the main trail, which climbs via a series of long switchbacks and wooden stairs, to the summit of Hyonosen, the highest mountain in Hyogo Prefecture and only 200 meters lower than Daisen. The panoramic views are spectacular in clear weather, and if you climb the ladder on the side of the emergency hut, you can get even better views above the bamboo grass. After a well-deserved break, head down the trail to the right of the hut which leads to Higashi-one (東尾根) and Shindai Hyutte (神大ヒュッテ). The trail drops steeply off the eastern face of the mountain through an area of tall bamboo grass. Watch your footing if the trail is muddy, as it can get quite slippery. You’ll soon reach a junction on your right for Koseinuma (古生沼). It’s a short spur trail to a marsh hemmed on all sides by a tall deer-proof fence. It really isn’t worth the detour unless you like looking at grass. A little further down, there’s another junction on your left for Mitarashi-no-ike (みたらしの池). This trail dead ends after just a few meters and I couldn’t figure out where the pond lies. Better to ignore this one and just continue down the well-worn trail. Wooden planks line the trail through an area of giant cedar trees marked as Kosenbonsugi (古千本杉), the 100 old cedar trees. There are a few dozen giant cedar trees lining the trail and it’s a pleasant change from the bamboo grass that lies further ahead. After about 10 minutes of steep descending, you’ll reach a red-roofed hut and junction. This is the mountain hut for Kobe University and it’s closed to regular hikers. The porch out front makes for a great place to take a break. There’s a 3-way junction here. Turn left and follow the trail marked Higashi-one (東尾根). The route follows the ridge before detouring past a couple of water sources and a large rock formation (人面岩) until dropping along a beautiful ridge of large beech trees. The scenery reminds me of parts of Hokkaido, as you would expect a large bear to jump out at any minute and surprise. But don’t fear – you probably won’t encounter one, so just relax and enjoy the scenery. It’s a long traverse of about 40 minutes before the ridge narrows through an area of Dōdan-tsutsuji (ドウダンツツジ) trees and their beautiful white bell-shaped flowers. The path traverses the contours of the ridge with a cedar forest on your left. You’ll soon reach an unmarked junction with trails to the left and straight ahead along the ridge. You can take either but most people head to the left to avoid the short climb up and over the hump in front of you. A few minutes past this section you’ll reach the small shelter called the Higashione emergency hut (東尾根避難小屋). There is no water source at this hut, and you’re close to the ski lifts anyway, so there’s no reason to stay here (unless it’s an emergency of course!). Turn left at the junction just behind the hut, taking the trail marked for 親水公園. The path drops steeply through a cedar forest and ends up at a paved forest road. Turn left and follow this road all the way back to the bus stop. There is a shortcut trail down to the bus stop once you reach the main buildings of the ski resort. There is a path that cuts down through the ski lifts, but it may be overgrown depending on the season. At any rate, it’s a tough loop of about 6 to 7 hours to complete this beautiful hike. Since access by public transport is inconvenient, you may want to drive or to break up the hike by staying overnight in one of the emergency huts or in an inn near the trailhead.

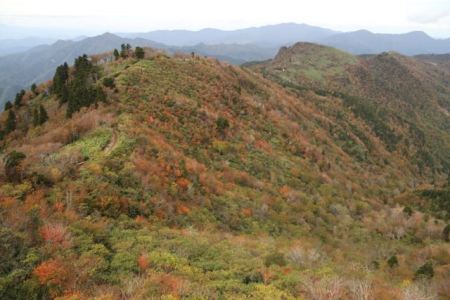
When to go: This hike can be done all year if you’ve got the right experience and equipment for a winter ascent. The Juhyō (樹氷) in the winter are popular for experienced trekkers, but the hike is not easy. Expect snow all the way until Golden Week. I did this hike in early April and the entire trail was buried under 1.5m of snow. The fall colors reach their peak in mid-October, making it one of the best times to visit.

Access: From Osaka station, take the JR Limited Express KitaKinki train and get off at Yoka station (八鹿駅). From there, take a bus bound for Hachibuse (鉢伏) and get off at Hyonosen-Hachibuseguchi (氷ノ山鉢伏口). Double check the train and bus times beforehand, as the trains are slow and infrequent. If you’re a slow hiker then consider breaking this hike up and staying at one of the many emergency huts on the mountain. Click here for the bus schedule.

Live web cam: Click here

Level of difficulty: 4 out of 5 (elevation change 930m)

Mt. Chōkai (鳥海山)

March 29, 2008

Last updated: Feb 17, 2025

Mt. Chōkai is a phenomenally beautiful volcanic peak nestled snugly on the border of Akita and Yamagata prefectures. The wildflowers blossom out of control, alpine lakes pop up all around, and the snow sticks around through all seasons, making this one of the best hikes in Japan.

Mt. Chokai

The hike: From the parking lot at Hokodate, drop your pack off at the Hokodate Sanso (鉾立山荘). The owner is really friendly, and it only costs about 1200 yen to stay here. It’s much better than staying in the cramped, expensive hut near the summit. The mountain doesn’t have any water sources, so make sure you bring plenty with you before approaching the hike (there’s a Max Value supermarket about a 10-minute walk north of the station) there aren’t any reliable sources on the mountain. The huts will gladly sell you water for ridiculous prices (500 yen for 500ml). The trail starts off rather gently, with a great view of an amazing gorge adjacent to Hokodate. Just after starting, you’ll see a mountain hut on your left. This is called Shinonome hut (東雲荘) and it’s owned by the TDK corporation. It’s possible to stay here but you’ll want to double check that the hut is actually open before starting your hike.  Anyway, ignore this hut and keep climbing the concrete steps and you’ll reach a lookout platform that has two picnic benches at the top of a series of concrete steps, where you’ll get a view straight down into the gorge.  From here, the concrete turns into a broad rock path that resembles an ancient Roman byway. After about 45 minutes of steady climbing, the angle will ease a bit and you should see your first traces of snow. You’ll also find some running streams to fill up your water, but I’d definitely filter it before drinking because of the popularity of the area. Your first big landmark is the flatlands of Sai no kawara (賽の河原). Here you’ll find a signpost indicating that   Ohama (御浜) is only 1.5km away. If you look up you can pretty much trace the outline of the trail to Ohama hut sitting on the edge of the plateau. There’s a small shrine just before the hut and just behind the hut there’s a scenic crater lake. There’s a toilet here and you can also stay overnight in the hut (advance reservations recommended, as it gets full pretty quickly during the busy season). The summit of Mt. Chokai will come into view just left of the lake, and it still looks so far away. Continue past the hut to the left for another half hour, and you’ll come to a junction. Ignore the spur on the right and continue straight, towards the peak. After another 30 minutes or so you’ll come to another junction, where a choice has to be made. You can either go left or right. The right spur is the ridge trail, with amazing views over to the summit. The left spur is the more direct route. I’ll describe a loop hike, climbing the left and descending via the ridge. Take the left trail, which cuts through a rather long snow field before climbing up the other side. The path becomes quite rocky, so just follow the paint marks and the crowds if you came on the weekend. You should reach the hut just below the summit in around 90 minutes or so. You could stay here, but the lack of water doesn’t make it very inviting. The hut does offer meals though (not sure if water is included in the price though) Continue behind the hut to the top of Mt. Chokai, called Shin-san (新山). There are lots of huge rock formations to traverse through, and chains make the trickier sections more manageable. The true summit only has room for only 3 people at a time, so be prepared to queue up, especially on weekends and during Obon.  Traverse up and over the summit and head down the other side, where you’ll find yet another snow field. Cross this and head up the other ridge over to Mt. Shichikou (七高山). This is the twin peak of Shin-san, which explains Chokai’s double hump appearance from a distance. After taking a quick rest, turn around and follow the signs to Mt. Gyouja (行者岳). Keep following the ridge, and ignore the trail coming in from the left. You should reach the summit of Mt. Monju (文珠岳) in about 20 minutes after the junction. After 20 more minutes, you’ll be back at the trail junction you first encountered, completing the loop hike of the summit. From here, you can retrace your steps all the way back to Hokodate.

When to go: This hike can be done from late April to early November, when the road to the trailhead (Chokai Blue Line) is open. If you go in late April, be prepared for meters upon meters of fresh snow. Click here to get an idea of the climbing conditions during Golden Week. Please note that bus service is extremely limited as of 2025.

Access: Starting in 2014, the bus to Hokodate runs by reservation only. You must make a reservation one day in advance by calling 0184-43-2030  or by filling out the on-line form (in Japanese) here. The bus costs 3000 yen one-way and is nothing more than a small, blue shuttle van when only a few people reserve. 99% of hikers now drive to the trailhead, so there’s a real danger that the bus will be discontinued altogether.  The bus starts from Kisakata station (象潟駅) and heads to Ōbirasansō (大平山荘), stopping at Hokodate (鉾立) along the way.  The bus runs every day from July and August, and then on weekends only throughout September until the end of October. There’s also a direct night bus from Tokyo station to Kisakata. 

Live web cam: Click here

Digital Map in English (Avenza App): Click here

Level of difficulty: 4 out of 5 (elevation change 1146m)

Mt. Kiso-komagatake (木曽駒ヶ岳)

March 29, 2008

This blog post was written back in 2008. For the latest information about this hike (including color photos and maps), please consider purchasing my guidebook to the Japan Alps. 

Clocking in just a few meters under 3000, Mt. Kiso-komagatake is the highest peak in the Central Alps mountain range. The panoramic views are outstanding, and there’s no shortage of accommodation on top.

Mt. Kiso-komagatake

The hike: From the top of the gondola, follow the trail leading off toward the right. You’ll already be above the tree line, so just follow the paint marks up through the rock formations. After about a half an hour of climbing, you’ll reach the ridgeline and a 3-way junction with a mountain hut in front. This is the Hoken-sanso (宝剣山荘), a great place to get a coffee if the cloud is in. Climb up past another hut to the top of Naka-dake (中岳) and then down the other side to a saddle and a blue-roof hut. From there, it’s a short climb to the summit of Komagatake, where the views are incredible. If you’ve got time, then consider staying in one of the huts to catch the sunrise/sunset. Anyway, retrace your steps to Hokensanso, and either take the trail back down to the gondola, or traverse up and over Mt. Hoken (宝剣岳). This trail is marked as an “expert” course, but it’s no more difficult than some of the climbs around Kamikochi. There are plenty of chains, ladders, and paint marks to help you get to the top. Traverse up and over this rocky peak and down the other side, where you’ll find a trail coming in the left. This is the way back down to the gondola. Alternatively, you could keep going straight and make it to Mt. Usugi in about 5 hours or so.

When to go: This hike can be done any time of year, thanks in part to the gondola that runs all year round. Bring crampons and an ice axe in the winter and be careful of white out conditions. The gondola gets extremely crowded when the leaves have changed colors in the autumn, so be prepared for a long wait. Click here to access the gondola website in English.

Access: From Okaya station (岡谷駅) in Nagano Pref. take the JR Iida line (JR飯田線) and get off at Komagane Station (駒ヶ根駅). The local train takes about an hour. From there, take a bus bound for Shirabi-daira (しらび平) and get off at the last stop. Click here for the bus schedule. If you don’t fancy waiting in line for the gondola or would like a more strenuous climb, then get off on stop before at Kitagosho-tozanguchi (北御所登山口). From there, you can climb to the summit in about 6 hours or so. Be careful if approaching this hike from Nagoya, because the JR Iida line from Toyohashi station takes over 5-1/2 hours to get to Komagane! It’s much faster to take the JR Chuo line and change at Shiojiri.

Map:

Live web cam: Click here

Level of difficulty: 1 out of 5 if using the gondola (elevation change ~300m)

Mt. Oku-shirane (奥白根山)

March 27, 2008

Mt. Shirane is the crown jewel of the Nikko area. Situated on the Gunma/Tochigi prefectural border and just north of Lake Shuzenji, the peak offers beautiful volcanic lakes, stunning views all the way out to Mt. Fuji, and eye-catching rock formations.

Mt. Oku-shirane

The hike: From the parking lot at Sugenuma, take the forest road directly in front of you. Fill up on water and use the facilities before departing. The path is relatively flat at first, and then climbs up the spine of the mountain. You’ll reach a small, beautiful lake in about 2 hours. The rocky peak of Oku-shirane will be visible directly above you, and the reflections of the peak in the lake are mesmerizing. At the far end of the lake, the trail will split in two, but take the right path for the steep climb to the summit. It’s pretty steep and rocky, but the path is well-marked and easy to follow. If you’re hiking in the autumn, there might be some ice, especially if it has rained recently, so a light pair of crampons will make things much safer. I was hiking in snow and ice in mid-October! You should reach the summit of Oku-shirane in after about an hour. The views are truly amazing if the weather is co-operating, with a bird’s eye view of Mt. Nantai, Mt. Hiuchi, Mt. Shibutsu, Mt. Sukai, and even out to Mt. Fuji! From the summit, continue on to a small shrine, and then turn left to head down the peak toward Goshikinuma (五色沼). The trail drops steeply at first, before flattening out at an emergency hut. You could consider staying here, but the lack of water and toilets doesn’t make for a comfy stay. Instead, continue for another 10 minutes to the lake. The reflections of Oku-shirane are wonderful, and there are plenty of places to sit, relax, and take in the scenery. From here you have a couple of options. You could head to the left to complete a loop back to the small lake in which you started, or you could traverse over to Yumoto Hot Spring. The traverse will take about 3 or 4 hours, so make the decision based on the time and weather. From lake Goshiki, take the trail leading off to the right. It’ll climb steeply up a spur before reaching the ridge line. There’s a water source about halfway up the climb, so fill up your bottles there. Turn left once you hit the ridge and you’ll be sitting on top of Mt. Maeshirane (前白根山) in about 30 minutes. From this peak, simply follow the signposts to Yumoto Hot Spring. The descent from the ridge line to the hot spring is one of the steepest I’ve ever encountered, so be especially careful in wet weather or anytime there’s snow on the ground.

When to go: This hike can be done between late April and early December. A winter hike is also possible if you approach from the top of the ski lifts at Marunuma Kogen. Click here to see a report of a winter ascent of the peak. Click here for an English account of an ascent in March.

Access: From Nikko station (日光駅), take a bus to Yumoto Hot Spring (湯元温泉). From there, you’ll either have to start your hike from here, or hitch to the trailhead at Sugenuma (菅沼). I stayed at a cheap minshuku in Yumoto, and the owner gave me a free ride early the next day to Sugenuma, so that’s an option as well. Alternatively, you could approach from Marunuma Kogen ski resort (丸沼高原スキー場), where the gondola will whisk you halfway up the mountain in next to no time. Click here for the bus schedule from Nikko station to Yumoto Hot Spring.

Level of difficulty: 3 out of 5 (elevation change 848m)

Mt. Hiuchi (火打山)

March 26, 2008

Mt. Hiuchi is a stunningly beautiful conical peak surrounded by lush greenery and scenic alpine marshlands. The wildflowers in summer bring the crowds and the fall foliage is splendid.

Mt. Hiuchi

The hike: From the bus stop, follow the parked cars to the trailhead, which is marked by a small shelter. The first hour of the hike is relatively flat, following a river. You’ll reach a bridge crossing the “black gully” (黒沢), where the real hike begins. The entire trail is divided into 9 different stages, which you can find signposts conveniently marking the divisions. You’ll gain close to 300 meters of altitude in next to no time, thanks to the “12 turns” (十二曲り). From the top of these switchbacks, it’s another 90 minutes of steep climbing to reach Fujimidaira (富士見平). The trail splits in two at this point. You could take the trail on the right to go to Mt. Myoko, but continue on the left fork for another 45 minutes to reach Kouyaike Hut (高谷池ヒュッテ), an amazing place to stay and contemplate life. Click here for the hut web site. From the hut, it should take about 90 minutes or so to reach the summit of Mt. Hiuchi. You’ll climb through some wonderful marshlands before hitting the steep ridgeline. I’m told the views are outstanding, but it was pouring rain when I went. Click here to see some wonderful pictures of someone who climbed on a perfect day! After taking lots of photos on the summit, either head back the same way you came, or traverse over to Mt. Myoko.

When to go: This hike can be done between late April and mid-November. The peak is popular with skiers during Golden Week, and the snow usually stays around until early August! The road to the trailhead is closed in the winter, but you could try traversing via Mt. Myoko if the weather is good and you’ve got the proper equipment and training.

Access: From Nagano station (長野駅), take a local train on the JR Shinetsu Line (JR信越線) and get off at Myoko-kogen station (妙高高原駅). From there, take a bus to Sasagamine (笹ケ峰). The bus takes about 50 minutes and it not very frequent. You could take a taxi to the trailhead from the station for about 5500 yen.

Live web cam: Click here

Level of difficulty: 3 out of 5 (elevation change ~1100m)

Mt. Bandai (磐梯山)

March 25, 2008

Last updated: Feb 17, 2025

Mt. Bandai is an active volcano located on the shores of Lake Inawashiro in Fukushima Prefecture. The views are splendid, the rock formations colorful, and the volcanic scenery picturesque.

Mt. Bandai

The hike: From the bottom of the lifts, follow the tozan michi (登山道) signs toward Mt. Bandai. Initally, the trail will climb on the left-hand side of the ski resort. There aren’t any switchbacks here. You’ll basically be hiking through the grassy ski fields. After about an hour of steep slogging, you’ll reach the ridge line, which turns to the right. It’s rocky at first, but it will flatten out as you approach the top of Mt. Akahani (赤埴山). There’s a short spur trail to the summit on the right-hand side. Head up here for a break if you’d like, or continue to the majestically splendid Numanotaira (沼ノ平) for a more scenic rest. This flat area features some beautiful marshes, alpine flowers, and stinky sulfurous gases. It should take about a half hour of easy hiking to reach the ridge line of Mt. Bandai. This is where the real hike begins, as the peak becomes very rocky. Follow the paint marks carefully if the cloud is in, because the drops to the right are huge. Eventually you’ll reach a series of 2 mountain huts, 2 water sources, and a trail junction. Take a break here, fill up your bottles, and prepare for the final ascent, which will take about 20 minutes or so. The views from the rocky summit are superb if the weather co-operates. Head back down to the junction and either head back the same way you came, all the way back to Inawashiro station, or take the trail to the left for a shorter, alternative way off the mountain.

When to go: This hike can be done between late April and early November. Although not impossible, a winter ascent is only for the really advanced climbers willing to deal with the frequent avalanches, because this peak gets a fair amount of snow in the winter. Click here for a report of a hiker who scaled during Golden Week to get an idea of the amount of snow.

Access: From Koriyama station (郡山駅), take a train on the JR Banetsu-sai Line (JR磐越西線) to Inawashiro station (猪苗代駅). From there, it’s a 1 hour walk to the trailhead at Inawashiro Ski Resort. (猪苗代スキー場) Alternatively, you can take a taxi for around 2000 yen that takes about 15 minutes.

Live web cam: Click here

Level of difficulty: 3 out of 5 (elevation change ~1200m)