Posted tagged ‘Hyakumeizan (百名山)’

Kita-dake (北岳)

April 20, 2008

This blog post was written back in 2008. For the latest information about this hike (including color photos and maps), please consider purchasing my guidebook to the Japan Alps. 

Kita-dake is the 2nd highest peak in Japan and has one of the best vantage points for viewing Mt. Fuji anywhere around.

The hike: From the huge parking lot at Hirogawara, walk a little back towards the main road and then turn left. You’ll see a pedestrian suspension bridge crossing the river, and this is where the trail starts. Cross the bridge and follow the path for about 20 minutes. You’ll come to a junction and you have 2 choices. Both trails lead to Kita-dake, but I recommend taking the one on the right towards Shiraneoike hut (白根御池小屋). It’ll take about 2-1/2 hours or moderate climbing to reach this hut. There’s a campground here, as well as a water source. Take a break here, because the real climb is about to start. Take the trail that goes past the campground, and begin your steep climb up to the ridge line. Most maps allocate 3 hours for reaching the ridge, but if you’re traveling light or in good shape then you can do it in half the time. Once you hit the ridge, turn left and hike for another half hour until reaching Kita-dake kata-no-koya (北岳肩ノ小屋). This hut is perched on a saddle just below the summit, and there’s a campground and water source here. You’re over 3000m now, so make sure you bring plenty of warm clothing even in the summer. I camped here in August and it definitely hovered around the freezing mark at night. The next day, rise early to watch the sunrise from the second highest peak in Japan. It should take about 45 minutes or so to reach the top. The views pretty much speak for themselves, and you can easily see why this mountain has become so popular for Japanese hikers. Continue down the other side of the rocky peak until reaching a junction. You can continue on to Ai-no-dake if you’d like, or you can take a left at the junction for an alternative route back to Hirogawara. Hike about 45 minutes and then take another left at the next junction. It should take about 2-1/2 hours to descend back to Hirogawara. I must admit that I’ve never done this trail, so I can’t attest to the condition/difficulty, but the maps say that snow remains until early August and that it’s quite rocky.

When to go: This hike can be done from around Golden Week to early November. The road to Hirogawara is closed in the winter, so it’ll be pretty difficult to get here unless you hike a long way to the trailhead. That being said, there are exceptions!

Access: From Kofu station (甲府駅), take a bus bound for Hirogawara (広河原). Click here for the bus schedule in Japanese.

Level of difficulty: 5 out of 5 (elevation change 1673m)

Mt. Tsukuba (筑波山)

April 19, 2008

Mt. Tsukuba is one of the easiest of the venerable Hyakumeizan to climb, and surprisingly close to Tokyo. The mountain is extremely over-developed, so consider giving it a miss unless you’re really intent on climbing all of the 100 famous peaks.

The hike: From the bus stop, walk up the hill towards the cable car station. The trail starts just before the station and parallels the tracks for most of the way. Despite the low elevation change, the trail is actually surprisingly steep and a nice little workout. It should take around 2 hours of moderate climbing to reach the top of the cable car station and ugly buildings/towers on the saddle. From here, you’ve got two options. You can climb to the top of Mt. Nantai (男体山) in about 10 minutes. The view towards the peaks of Nikko is excellent, and if the weather is good you should also be staring at Mt. Fuji in the distance. If you don’t fancy this detour, then head up to the high point of Tsukuba, called Mt. Nyotai (女体山). The path is very, very easy and there’s a concrete shrine on top (as well as some rock formations). Head down the other side of the summit, and you’ll see the top of the gondola station soon (why oh why did they have to build both a gondola and cable car – are Japanese people really that lazy?). Continue down the spine of the mountain, past some nice rock formations, and you’ll come to a trail junction. You have 2 options. You can keep going on the same path down to the parking lot at the bottom of the gondola, or turn right for a nice loop trail that’ll take you back to the start of the hike.

When to go: This hike can be easily done year round. Avoid weekends if you want to skip the crowds.

Access: From Akihabara station (秋葉原駅), take a train on the Tsukuba express line and get off at the terminus, Tsukuba station (筑波駅). An express train takes only 45 minutes and costs 1150 yen. Click here for information in English. From there, take a shuttle bus bound for Tsukuba shrine (筑波神社入口). The bus costs 700 yen. There are 2 buses each hour, each leaving at the top of the hour and half past the hour. Click here for the complete schedule in Japanese.

Map: Click here

Level of difficulty: 2 out of 5 (elevation change 636m)

Mt. Nantai (男体山)

April 19, 2008

Mt. Nantai is the Mt. Fuji of the Nikko area. Its easy access makes it one of the most popular hikes in the Kanto area, so be prepared for crowds during weekends and national holidays.

The hike: From the bus stop, head up the stairs to the shrine. The trail starts directly behind the shrine, and you’re supposed to pay 300 yen for the privilege of climbing to the summit, but I just hiked without paying and no one stopped me (but the deities got revenge by dumping freezing rain on me!) The path is very well-trodden and oh so steep. It’s less than 5km from the shrine to the summit, but you’re climbing over 1200 vertical meters! During the first hour or so, you’ll cross over a forest road several times, and part of the path actually follows the road for a short while. Once you leave the road, it’s no turning back and there are very few places to rest. You’ll come across 2 different emergency huts, neither of which are in very good condition. The course is very rocky, so use care on the descent, especially if the rocks are wet. Every year, people have to be airlifted out due to nasty falls. Anyway, after what seems like an eternity, you’ll finally reach the summit ridge above the tree line. The last 20 minutes of hiking is through reddish-brown volcanic strata, bringing images of Mt. Fuji to mind. There’s a shrine and emergency hut on the summit itself, but no water source, so unless you fancy lugging up a ton of water, you should accept this as a day trip. The hut has definitely seen better days, and can fit about 2 or 3 people comfortably. If the weather is good, then you’ll have an excellent birds-eye view of Lake Chuzenji. Either head back the same way you came, or traverse down the other side of the mountain. I’m told the trail on the back side isn’t used very much and is much, much longer (you’ll have to hike on a forest road for about 8 or 9km in order to get back to civilization).

When to go: This hike can be done between late April and early December. A winter hike is also possible, depending on the year. The peak is prone to avalanches during periods of heavy snowfall, so use caution and common sense if climbing in the winter.

Access: From Nikko station (日光駅), take a bus bound for Yumoto Hot Spring (湯元温泉) and get off at the Futarasan Jinjamae (二荒山神社前) bus stop. Click here for the bus schedule.

Live web cam: Click here

Level of difficulty: 4 out of 5 (elevation change 1212m)

Mt. Ontake (御嶽)

April 18, 2008

Last updated: Feb 19, 2025

Special note: On January 17, 2025, the volcano warning was raised to Level 2, meaning that the summit plateau is now off limits to hikers.

Clocking in at over 3000, Mt. Ontake is the nation’s tallest active volcano and 8th tallest mountain. Popular with Shinto pilgrims, the peaks offers outstanding panoramic views, pungent volcanic steam vents, and picturesque turquoise lakes.

The hike: From the bus stop at Tanohara, hike through the Shrine torii down into a flat meadow. If the weather is clear then you’ll see the massive volcano towering just above you. The path starts climbing on the other side of the meadow. The trail is well-marked and easy to follow, and you’ll pass by countless shrines and statues on your way to the summit. It should take an hour or so to reach the first emergency hut at the 6th stagepoint (六合目) Keep climbing higher and higher, and after another 90 minutes or so, you should reach a rather big shrine and hut on the summit ridge line. You’ll see the smoldering steam vents just in front of you, as well as the summit shrine. You’ve got another half an hour of climbing before reaching the summit, so keep going. The narrow summit is quite over-developed, with 2 different mountain huts and a shrine along with a concrete bunker to duck into should the mountain decide to burb. Go back the way you came, or consider descending to the small turquoise lake on the other side of the summit. This area is called Ni-no-ike (二ノ池), and you’ll find a couple of huts here, which are only open from July to September.  The closest hut is called Ni-no-ike Sansō (ニノ池山荘) while the other place is Ni-no-ike Hyutte (ニノ池ヒュッテ). Both huts require advanced reservations.  From here, you can descend to the gondola in about 2 hours or so. Just follow the signs to Ontake Ropeway (御岳ロープウェイ).

When to go: This hike can be done year round if you’ve got the right equipment and experience. Otherwise, aim to go during the summer when the huts are open. Ever since the 2014 eruption, hikers have been asked to wear a helmet and to prepare for any volcanic eruptions. Snow remains on the peak until early July usually. Click here to see the scenery in early May.

Access: From Kiso-Fukushima station (木曽福島駅), take a bus bound for Tanohara (田ノ原) and get off at the last stop. There are only 2 buses a day, weekends only from early June to mid October,  so plan accordingly. Click here to see the bus schedule. Alternatively, you can take the Ontake Ropeway, which will whisk you up to 2100m in just a few minutes. Take a Ontake Ropeway (御岳ロープウェイ) bound bus and get off at the gondola. Again, there are only 3 buses a day, so click here to find out the schedule. Scroll down to 観光路線 御岳ロープウェイ線 and select 夏山シーズン for the summer schedule and 秋山シーズン for the fall schedule. 

Live web cam: Click here and here

Level of difficulty: 3 out of 5 (elevation change 937m)

Mt. Yari (槍ヶ岳)

April 14, 2008

This blog post was written back in 2008. For the latest information about this hike (including color photos and maps), please consider purchasing my guidebook to the Japan Alps. 

Mt. Yari is one of the most famous peaks in the Kita Alps, and on the ‘must climb’ list of just about every Japanese hiker. Its remote access means that it’s impossible to do as a day trip, unless you fancy hiking over 40km in one day!

The hike: From Kamikochi bus terminal, take the trail that heads toward Kappabashi, but instead of crossing the bridge, stay on the same side of the river. You can basically follow the signposts toward Yari-ga-take (槍ヶ岳). It’s 22km one way from Kamikochi to the summit of Mt. Yari. Most guidebooks say to allow 2 days to get there, but if you get an early start (around 6am) you can make it in one day. The elevation change is only 1600m, and the first 14km or so is pretty flat. Anyway, your first landmark will be Myoujinkan (明神館), a famous hotel about an hour from the bus terminal. After that, you’ll come to Tokuzawa lodge and campground (徳沢ロッヂ). Continue following the river until you reach Yokoo-sansou (横尾山荘). This is the halfway point distance-wise to Mt. Yari. From here, the trail starts climbing a little, reaching Yarisawa lodge (槍沢ロッヂ) in about an hour. This would be a good place to stay if you’ve gotten a late start, but if you’ve brought a tent then continue for another half hour or so to the campsite. This site is behind a lodge that was destroyed by an avalanche, and there are plenty of places to pitch your tent, lots of water, and toilets. Before deciding whether or not to camp here, consider that you’ve got about 4 more hours of hiking before reaching the hut just below the top of Mt. Yari. The path is easy to follow and will climb up the cirque toward the ridge line. If the weather is good then you should start seeing the spear-like peak of the summit. There are tons of switchbacks and paint marks on the rocks. The climb seems like it takes forever, but eventually you’ll end up on the saddle just below the summit. This is where you’ll find Yari-sanso (槍ヶ岳山荘). You can pay lots of money to stay in the hut, or pitch your tent a short distance away. Please note that the campground is completely exposed on the ridge and you may not be able to pitch a tent if the winds are strong. Drop your pack at the hut, and prepare for the final climb to the summit. There are lots of chains and ladders, but just follow the crowds and arrows and you’ll be on top in no time. The views are exhilarating, so bring your camera if the cloud isn’t in. Descend back to the hut. The next day, you have 4 options. You can either descend the way you came all the way back to Kamikochi, do the daikiretto (大キレット) ridge walk over to Kita-hotaka, continue on the trail next to the hut over to Sugoroku hut (双六小屋), or take the trail away from the campgound down to Yaridaira (槍平小屋) and Shin-hotaka hot spring.

When to go: This hike can be done from early May to early November. The earlier you go, the more snow there will be, so bring crampons if climbing before the rainy season or anytime in late fall.

Access: From either Takayama (高山) or Matusmoto (松本) stations, take a bus bound for Kamikochi (上高地). There are also direct night buses from Tokyo and Osaka, depending on the season. Click here for the bus from Matsumoto to Kamikochi. From Takayama you’ll have to change buses at Hirayu Hot Spring.

Live web cam: Click here

Level of difficulty: 5 out of 5 (elevation change 1675m)

Mt. Daisen (大山)

April 13, 2008

Last updated: January 24, 2025

Special note:  The highest point, Ken-ga-mine, is officially closed to hikers, but some experienced people still do the knife-edge ridge. For Hyakumeizan climbers, the alternate summit of Mt Misen (described below) is completely acceptable. 

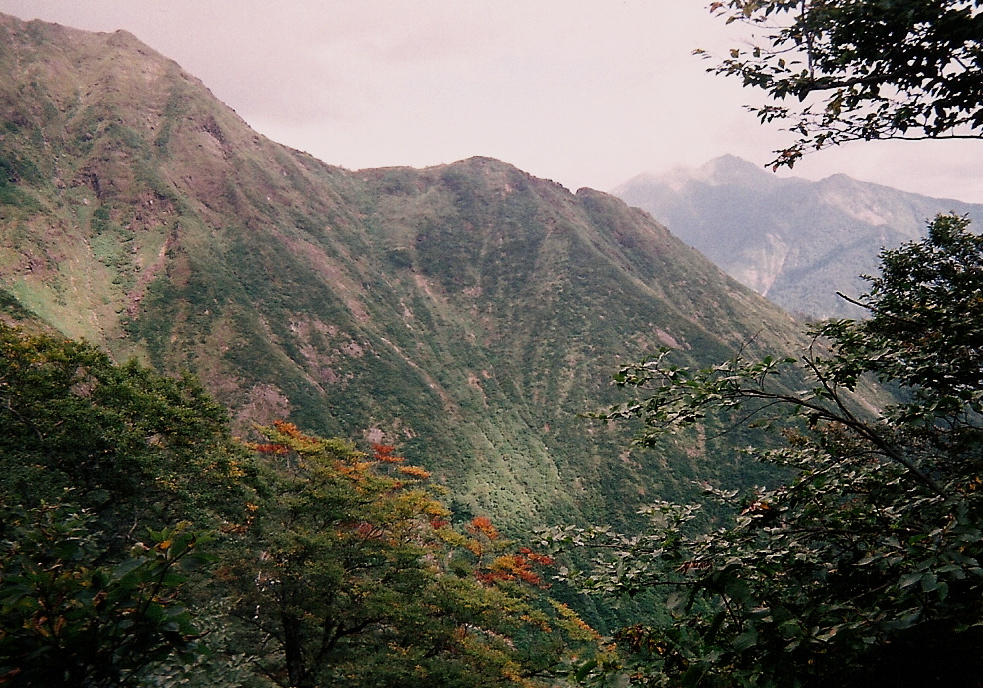
Mt. Daisen, the highest peak in the Chūgoku region, is a Fuji-esque volcanic edifice located southeast of Yonago city in Tottori Prefecture. The peak gets a ton of snow in the winter, and the wildflowers bring the crowds in the summer.

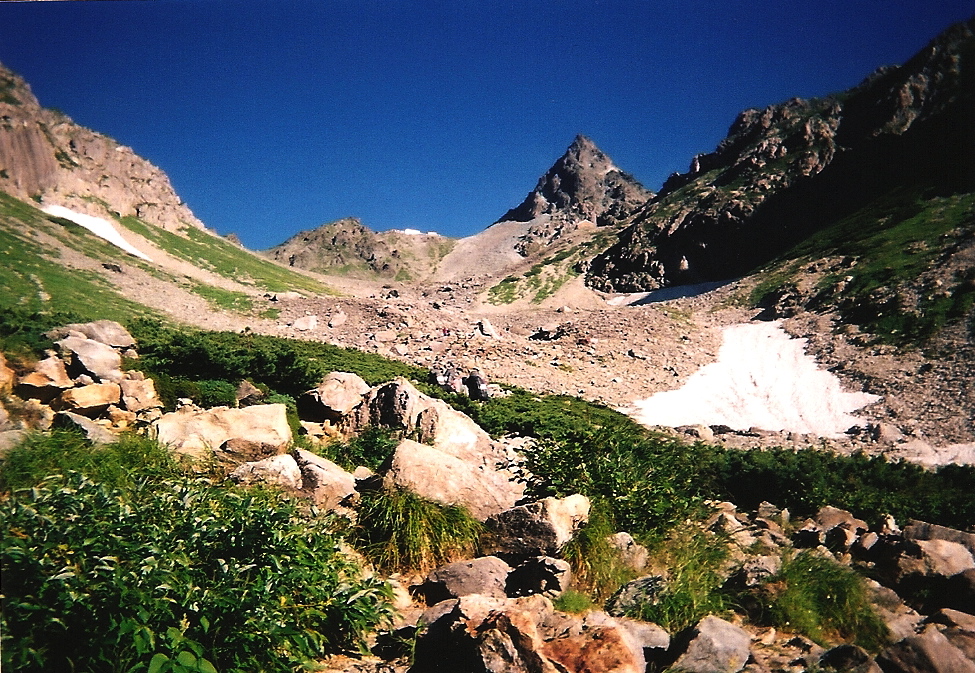
The hike: Directly beside the bus stop is the tourist information center. Drop in and pick up a free map and ask about trail conditions. After leaving the bus parking lot, walk out to the main street and turn left up the stone-paved street running directly through the center of town. Turn right on the first street past the Post Office. You’ll see two souvenir shops here, both of which sell basic snacks for the hike. Just past the shops you’ll find a huge Montbell store on your left. You can grab some freeze-dried rice packs and other gear here, but the selection isn’t great. Directly past the Montbell store, the street meets a larger road. Cross the bridge, ignoring the parking lot on your left. Go around the bend in the road and you’ll find the trailhead on the left side of the road, leading up a set of stone steps. This path will intersect the main route in about 100 meters. When you see the signpost, turn left and start the massive climb up a wide set of stone steps. At the top of the steps, you’ll see a shrine building on your right, which is a good place to pray for a safe voyage. After saying a prayer, return back to the trail and keep climbing up. The stone steps will give way to wooden ones, and after about 10 minutes you’ll reach the first stagepoint (大山一合目). The path is divided into 10 stages, and these will be marked all the way to the summit. Also, there’s a wooden marker at each 100 meters of vertical elevation gained, so it’s easy to track your progress. There’s only one trail to the top, so expect huge crowds if you’ve come during the peak holiday season. It should take about an hour or so to reach the first emergency hut at the 6th stage (六合目). Just before reaching this hut, a trail will branch off to the left towards Mototani (元谷), but just ignore it for the time being and keep going up. The hut is concrete and very basic, with room for 1 or 2 hikers to sleep. From the hut, you’ve got another 45 minutes of steep climbing until reaching the ridgeline just above the 8th stagepoint (大山八合目). Here you’ll find a junction, but turn left to start the long section of walking on wooden planks. You’ve only got about 15 more minutes to the summit of Mt. Misen (弥山), the official high point of Mt. Daisen. If the weather is clear then you’ll have a nice view of the knife-edge ridge leading to the true high point called Ken-ga-mine (剣ケ峰). There’s also a large emergency hut with toilets here, but the lack of water makes it an uncomfortable place to stay unless you happen to carry an extra 2 or 3 liters of water. Anyway, after admiring the views, take the trail that wraps around the summit behind the emergency hut for a nice loop back to the main trail. You can see a lot of wildflowers in the summer, and the stroll is quite peaceful when not shared with hundreds of other people. When you reach the junction at the end of the loop, turn left and start heading back down the mountain, past the 8th stagepoint. Just past the 6th stagepoint emergency hut, turn right on the Mototani (元谷) junction you passed earlier on the way up, which descends to a nice valley. After a half an hour of descending, you’ll reach the bottom of the valley and can see an emergency hut directly in front of you. While there is plenty of water in the valley, the lack of toilets at this hut make it quite uncomfortable to stay in, and should be a strong hint that you should boil any water from the neighboring stream. If you’re not staying for the night, the head down towards the left and cross the huge riverbed with all the concrete dams. Pretty unsightly I know, but what else can you do. After crossing the river, you’ll hit a forest road and see a small signpost reading Daisenji (大山寺). Turn left here and follow the trail for about 20 minutes until it spits you out at Okamiyama shrine (大神山神社). Take the stone steps leading down from the shine which connect to a stone lantern-lined path. This path will take you all the way back into town. If you have time, you really should check out Daisenji. There’s a small trail coming off the stone path right where you see the wooden “日本の一番長い石道” signpost. Walk to the main building and pay your 400 yen to the monk there. All in all it should take anywhere from 5 to 7 hours to complete the hike, so make sure you start early (or stay in the wonderful temple lodging named Sanraku-so).

When to go: This hike can be done year round if you’ve got the right equipment. In fact, winter is probably the best time of year where you can actually climb to the high point. The ridge line is very rugged and should only be attempted by those with the right equipment and experience. Otherwise, the snow will melt sometime in mid-May, and anyone can climb to the ‘legal’ high point of Misen.

Access: From Yonago station (米子駅), take a Nihon Kotsu (日本交通) bus bound for Daisenji (大山寺) and get off at the last stop. The first bus departs at 7:10am, arriving at the trailhead at 7:53am. Click here for the web site that has the bus schedule. When you open this page, click on 観光道路経由大山線 to download the .pdf file. The bus leaves from bus stop #4.

Digital Map (Avenza App): Click here

Map: Click here

Live web cam: Click here and here

Level of difficulty: 3 out of 5 (elevation change 939m)

This slideshow requires JavaScript.

Mt. Miyanoura (宮之浦岳)

April 11, 2008

Mt. Miyanoura is the highest peak on Yakushima, a World Heritage island located a boat ride away from Kagoshima city. Known for its remote access, gigantic cedar trees and wet weather, the mountain challenges even the most experienced of hikers.

The hike: From Yodogawa trailhead, it’s an easy 40-minute walk to Yodogawa hut (淀川小屋). If you’ve gotten a late start then this is an ideal place to stay, as the hut is free, unmanned, and has a water source. You can also camp in front of the hut, but if you arrive late in the afternoon then all of the good sites will be taken. When I went, everyone was camping and we had the hut to ourselves! From the hut, you’ve only got 600m of vertical climbing but it seems like a lot higher! The first 2 hours or so are pretty straightforward on a well trodden path, passing through a wonderful marshland with lots of wooden planks to walk on. You’ll hit a 4-way junction, but just follow the signs to Mt. Miyanoura (宮之浦岳). In about 20 minutes you’ll reach a water source, so take a break and fill up your water bottles. There’s also a spur trail to the top of Mt. Kuromi (黒味岳). This makes for an interesting detour when the weather is fine, but if the cloud is in then just continue onward toward the summit. The trail becomes quite rocky and you can have loads of fun trying to determine if the rocks look like tofu, rabbits, turtles, or other imaginative shapes. Over the next hour or so, you’ll pass by numerous peaks, including Mt. Anbo (安房岳) before reaching yet another water source. From here it’s a 30-minute slog to the summit, where the panoramic views are stunning in clear weather. Remember that Mt. Miyanoura is a rain magnet, and while it can be sunny along the coast of the island, it’ll probably be foggy or raining on the peaks, but that doesn’t take away from the scenery. It only makes taking breaks a bit inconvenient. Anyway, traverse up and over the narrow summit and down towards Shin-takatsuga hut (新高塚小屋). It should take around 2-1/2 hours from the summit to the hut. If you arrive late in the day then all of the good camp sites will be taken, and you’ll be forced to stay in the hut (for free of course!). Most people camp on the wooden planks outside of the hut, but it’s also possible to find some nice flat areas just off the main trail. There’s a water source here, but I’m dubious of the quality, so it’s better to be safe and use your water filter. After leaving the hut the next morning, you’ll come to the old Takatsuga hut in about an hour. It’s a dump compared to the hut you just left, so don’t stay here unless it really is an emergency. The area is suffering quite a bit from overuse, so try not to contribute to the erosion. In about 10 minutes from the hut you’ll reach Jomon-sugi, the most famous tree on Yakushima. This is also where you’ll run into all of the tourists. You might be a bit disappointed after 2 days of solitude! The path is basically one giant wooden plank, and there will be human traffic jams if you’ve come during any holiday period, so be prepared. You’ll reach Wilson stump in about an hour, and this is a much better place to take a break than Jomon-sugi. You should reach the ‘trailhead’ in another 30 minutes. This is not the official trailhead, but the start of the train tracks! (no kidding). Although you’ll see no actual trains, you might run across a rail car that’s been designed to carry timber from the forest (and you thought this was a World Heritage site, didn’t you?). The trail basically follows the railroad tracks for what seems like an eternity. It’s flat and relatively mundane, so make sure you don’t fall through the gaps in the bridges! In about an hour you’ll reach a trail coming in on your left. Take this trail if you’d like to go through the Mononoke forest and an alternative finishing point. Otherwise, continue descending the mountain for another hour until reaching the real trailhead at Arakawa. (荒川登山口). You can take a bus or taxi from here back into town (or try your luck hitching).

When to go: This hike can be done from March to late November. Despite its southern location, this peak gets a lot of snow in the winter and should not be attempted without an experienced mountain guide or a GPS device and climbing equipment.

Access: From Miyanoura port, take a bus to Anbo (安房) and get off at the Anbo bus stop. From there, change to a bus bound for Yakusugi Land (ヤクスギランド) and get off at the last stop, called Kigen Sugi (紀元杉). From this tree, it’s a 20-minute walk to the trailhead at Yodogawa (淀川登山口). Alternatively, you can take a taxi from Anbo directly to the trailhead. The taxi drivers on Yakushima are accustomed to bargaining for rates, and they’ll definitely give you a discount in the off season!

Level of difficulty: 3 out of 5 (elevation change 1336m)

Mt. Tanigawa (谷川岳)

April 9, 2008

Mt. Tanigawa is a rocky peak sitting complacently on the border of Gunma and Niigata Prefectures. Notorious for its nasty weather and head deep snow, the mountain affords wonderful panoramic views and an abundance of plant life.

The hike: From Doai station, head out the front door and turn right on the paved road. Walk uphill about 20 minutes and you’ll come to the Mt. Tanigawa gondola. Take the gondola if you’d like to save 600m of vertical climbing. Otherwise, take the gravel service road that runs to the left of the gondola. This road will take you all the way to the top of the gondola, and it should take around an hour or so. The trail actually branches off this road about halfway up, but you can ignore the actual trail and follow the road toward the left to get to the ski resort. It’s much better to go directly to the ski resort so you can fill up on water in the rest house, as there’s no other water source on the hike. The trail runs in front of the rest house, and then away from the ski lifts toward the rocky peaks of Mt. Tanigawa. It should take about 45 minutes to reach the emergency hut at Kuma-ana sawa (熊穴沢避難小屋). From the hut, turn right and start the real climb toward the summit. There are a few areas with chains to help you on the narrow ridge line, but all in all it’s not too treacherous. You’ll reach the hut just below the summit in about 90 minutes. If the weather is good then the views will be stunning. If not, then take extra care on the knife-edge traverse over to the high point. The summit has 2 twin peaks. The first one you’ll come to is called Tomanomimi (トマノ耳), while the higher peak is called Okinomimi (オキノ耳). After scaling the two peaks, you could continue traversing along the ridge or go back the same way you came. There are also 2 other alternative ways off the mountain. The first one is to take the trail leading away from the hut. This trail is very rocky, with lots of chains and ladders, which probably makes for a safer ascent than descent. The other alternative is to retrace your steps back to the Kuma-ana hut, and take a right. This trail will eventually dump you out at Minakami station (水上駅). I ended up flying back down to the base of the gondola to escape an incoming rainstorm. Grab a map and explore the vast network of trails that this legendary peak has to offer.

When to go: This hike can be done year round if you’ve got an ice axe and crampons. Be especially careful of avalanches in the middle of winter, and be prepared for tons of snow until at least the rainy season.

Access: From Echigo-yuzawa station (越後湯沢駅), take a local JR train bound for Minakami (水上) and get off at Doai station (土合駅).

Live web cam: Click here

Map: Click here. In addition, you can find a couple of beautifully illustrated free maps here. Scroll down to the bottom of the page and download the .pdf files.

Level of difficulty: 4 out of 5 (elevation change 1213m)

Mt. Tanzawa (丹沢山)

April 8, 2008

Last updated: Oct. 23, 2019

Mt. Tanzawa is a wonderful series of rolling hills located just west of Yokohama. The night views of Tokyo are incredible, as is the unobstructed view of Mt. Fuji.

tanzawa

The hike: From the bus stop, hike up the road past some houses and Japanese inns. The road will split after about 10 minutes or so. Take the left fork. Initially a forest road, the path will eventually turn into a proper hiking trail. During the first 90 minutes or so, you’ll pass by a number of ‘teahouses’ which sell basic refreshments during the summer hiking season. Horiyama-no-ie (堀山の家), is the first actual mountain hut in which you can stay. Click here to access the hut website. There’s also a trail junction at this hut, but keep going straight, towards Tou-no-dake (塔ノ岳). After 20 more minutes another trail will come in on the right, but ignore it and keep going up and up. There’s a seemingly endless array of wooden stairs along this point, and you’ll keep seeing them all the way to the top of the ridge line. Mt. Fuji should start coming into view just behind you if the weather is clear. Around 90 minutes from the hut at Horiyama you should be sitting on top of Tou-no-dake. Take a well deserved break and check into the hut if you’ve lost your energy or if it’s late. You’ve got about 2 hours of up & down ridge hiking in order to reach the high point of the mountain range. Please note that no camping is allowed anywhere on the mountain, so be prepared to fork over some money to stay in the huts. The hut on top of Tou-no-dake, named Sonbutsu-sansou (尊仏山荘) costs 5000 yen with dinner or 4000 yen without meals. Anyway, regardless of whether you stay here or not, you’ve got to traverse the entire Tanzawa ridge in order to say you’ve truly done it. Continue on the path that goes behind the hut, which leads to the true summit of Mt. Tanzawa(丹沢山). It’ll take about an hour or so to reach the top, where you’ll be greeted with another hut. This one is called Miyama-sansou (みやま山荘) and their website can be found here. If you’re a sucker for punishment (like I was) and want to traverse to the highest peak in the range all in one day, then take the trail to the left of the hut towards Hiru-ga-take (蛭ケ岳). It should take another hour or so from Mt. Tanzawa. I timed my arrival perfectly, as the sun was sinking just behind Mt. Fuji when I arrived on the doorstep of the hut. There are also tons of deer in this area who are looking for free handouts of food. The website for Hiru-ga-take Sansō (蛭ケ岳山荘) is here. The night views of Tokyo from here are out-of-this-world, especially on a clear winter night. If you stay at this hut, then you’ve got a much shorter 2nd day compared with staying at the other huts. Continue on the trail that leads past the hut. Your goal for the day is Higashino (東野), where there’s a bus back to civilization. It should take about 3 hours from Hiru-ga-take. Just follow the signposts and turn left at the 2nd trail junction you come to. The entire mountain is lacking in water, so make sure that you bring plenty. Even in the huts there isn’t any fresh water and you have to buy overpriced bottled water! Check the bus schedule at any of the huts before departing on the 2nd day.

When to go: This hike can be done year round, but bring some light crampons during the winter because of lingering ice in shady areas.

Access: From the northern exit of Shibusawa station (渋沢駅), take a bus bound for Ookura (大倉). The bus takes only 15 minutes and costs only 200 yen. Alternatively, you can grab a taxi to the trailhead for around 1500 yen. Click here for the bus schedule.

Map: Click here

Level of difficulty: 3 out of 5 (elevation change 1383m)

Yatsu-ga-take (八ヶ岳)

April 6, 2008

Last updated: Feb 20, 2025

Yatsu-ga-take, or ‘8 peaks’, is a volcanic mountain range nestled on the border of Nagano & Yamanashi prefectures.  The area is teeming with hikers all year round, and is one of the premier winter climbing destinations in Japan.

The hike: From the bus stop, hike up the forest road for about an hour until you reach Minoto-sanso (美濃戸山荘).  You can try hitching a ride if any cars come along the gravel road.  The trailhead starts at the end of the forest road, and you’ve got two options.  Take the right fork toward Gyoja Hut (行者小屋).  It’ll take about 2 hours or so of hiking on a well-marked path to reach the busy hut.  Drop your pack off here unless you plan on staying at the hut on top of Aka-dake (which doesn’t allow camping).   Take the trail that goes behind the hut and follow the signs to Aka-dake (赤岳).  Again, the trail is well-used and easy to follow.  You should reach the rocky ridge line in about 90 minutes or so.  Once you hit the ridge, turn right to reach Aka-dake.  There are two huts along the way, one just a short distance from the summit.  On a clear day the views are exhilirating, and you’ll probably be sharing the summit with dozens & dozens of other folk.  Traverse over the summit and take a right at the first junction, toward Amida-dake (阿弥陀岳).  The trail drops to a saddle, climbs briefly over Naka-dake (中岳), and drops again to another junction.  Amida-dake will be directly in front of you.  It’s about a 30-minute climb to the summit, if you’re feeling energetic.  Otherwise, take a right to descend back down to Gyoja Hut.  You can either camp or stay at the hut here, but I recommend hiking an extra 40 minutes on an easy trail over to Akadake-kosen (赤岳鉱泉).  This is a much nicer area to pitch a tent.  Plus, the hut has its own hot spring bath!  The next day you can either head back to Minodoguchi via a trail that leads away from the hut, or you could do a different loop hike, taking in Yoko-dake (横岳) and Iou-dake (硫黄岳) before heading back to civilization.

When to go: This hike can be done year round if you’ve got an ice axe and crampons.  Despite it’s easy access, the peak does claim its fair share of fatalities, so use caution when climbing up and around the rocky ridge line.

Access: From Chino station (茅野駅), take a bus bound for Minotoguchi (美濃戸口) and get off at the last stop.  Click here for the bus schedule.

Level of difficulty: 4 out of 5 (elevation change ~1419m)