Posted tagged ‘Kita Alps’

Mt. Shirouma (白馬岳)

February 17, 2009

This blog post was written back in 2009. For the latest information about this hike (including color photos and maps), please consider purchasing my guidebook to the Japan Alps. 

Mt. Shirouma is the highest peak in the Hakuba section of the Kita Alps and on the top of most Japanese hikers ‘to climb’ list. It also happens to be one of the few peaks in Japan with year-round snow fields.

shirouma1

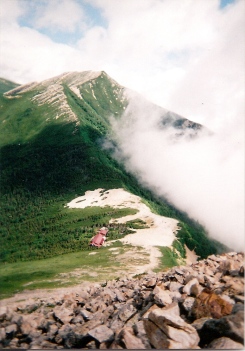
The hike: From the bus stop, the trail starts between the large mountain hut and the toilet. If you don’t have crampons then you can usually buy simple 2-pointers from the hut which should be sufficient (unless climbing early in the season). The trail initially follows a gravel forest road, passing by a gargantuan concrete waterfall – easily the tallest artificial fall in Japan. The road eventually turns into a hiking trail proper, and you’ll reach a pair of huts and campground, just below the start of the Daisekkei (great snow field). Take a break and inquire at the hut about current snow conditions/avalanche risk. The Daisekkei is not to be taken lightly, as a landslide in July 2008 killed two people and rockfalls are very common. Bring a helmet just in case if you’ve got one. Put on your crampons before stepping out into the snowfield and please wear some eye protection if the sun is out. You’ll be hiking in the snow for most of the way, so just follow the crowds/footprints. Overall it’s not too bad of a slog, and you should reach the ridge line in anywhere from 2-1/2 to 4 hours, depending on conditions. There’s a huge hut staring at you at the junction, as well as a modest campground. Turn right and pass another hut, and you’ll be on the summit of Mt. Shirouma in another 10 minutes or so. The views are outstanding if the weather is good (consider yourself very lucky if it is – Hakuba is notorious for cloudy weather in the Alpine backcountry). From the summit, you’ve got 4 options. You can either retrace your steps all the way back to Sarukura, or continue on the same ridge line over to Mt. Yukigura (雪倉岳) or down to Mt. Norikura (乗鞍岳). Alternatively, you can head down the back side of the mountain towards Keyaki-daira (欅平). This trail is not used very much, so I can’t attest for the condition. A better option might be to stay on top overnight, catch the sunrise, and then hike along the ridge over to Mt. Yari (鎗ヶ岳) and down to Yari Hot Spring (鎗温泉). Take a left at the first junction on the other side of Mt. Yari, and you’ll arrive at the hot spring in another hour. This trail actually ends up back at Sarukura, making a great 3-day loop hike.

When to go: This hike can be done from early June to early October, when the buses to Sarukura are running. You could also go earlier if you’ve got crampons and an ice axe. Avalanches are common in the Daisekkei until the end of May, so be careful if hiking in the spring. Click here if you don’t believe me.

Access: From Matsumoto (松本) station, take the JR Ooito line to Hakuba (白馬) station. From there, take a bus bound for Sarukura (猿倉) and get off at the final stop. Click here for the bus schedule. There are also overnight Alpico Group buses from Shinjuku station in Tokyo directly to Hakuba

Live web cam: Click here

Level of difficulty: 5 out of 5 (elevation change 1702m)

Mt. Suisho (水晶岳)

November 9, 2008

Mt. Suisho, also known as Mt. Kuro, is a spectacular alpine peak located a stone’s throw from Mt. Washiba in the Kita Alps. In fact, most people climb these 2 peaks in succession as a side trip from the main Kamikochi-Tateyama trekking route.

kuro1

The hike: Follow the same instructions for the Mt. Washiba hike. From the top of Mt. Washiba, continue hiking north on the ridge line (up and over Mt. Warimo) until reaching a junction called Iwakoke-norikoshi (岩苔乗越). If you turn left then you’ll soon reach a 3 way junction down to Kumo-no-taira (雲ノ平), but ignore this and continue on the trail in front of you. In about 30 minutes or so you’ll reach the Suisho hut (水晶小屋). Open from mid-July to mid-September, it’s a very small hut with room for only 30 people. Click here for the website. There’s no reliable water source, so make sure you’ve filled up your bottles at the Mitsumata hut before the climb up to Washiba. Leave your pack in front of the Suisho hut and prepare yourself for the short, adrenalin-inducing climb to the summit. Unlike its close neighbor Washiba, Mt. Suisho is a steep, rocky peak with plenty of chains bolted to make things easier. The views from the peak are stunning to say the least. Retrace your steps back to the hut and make a decision about where to go next. You have 3 options. The first option is to retrace your steps all the way back to Mitsumata and the main trekking route. Option 2 is to retreat back to the junction and descending down to Kumo-no-daira. I must admit that it’s one area of the Northern Alps I have yet to explore, but the area looks spectacular and there’s a hidden hot spring at the end of a long valley. The third option would be to take the only trail you haven’t been on, which will take you across a long saddle and over to an adjacent ridge line. This is the route I took and it should take you about 90 minutes or so to reach Mt. Masago (真砂岳). Just before the summit you’ll find a trail junction that leads down to Yumata Hot Spring (湯俣温泉). This is another of Japan’s hidden hot springs, and there are a couple of huts you can stay at. It really is in the middle of nowhere, and it’ll take a few hours to get there from the junction. Unless you’re anxious to get out of the mountains, I’d recommend staying on the ridge for the time being and climb up and over Mt. Masago. 20 minutes past this peak, you’ll be sitting on top of Mt. Noguchigoro (野口五郎岳), which has incredible views back across the valley to Mt. Suisho. It’s from this vantage point that you can see how Suisho also goes by the name of Mt. Kuro. There’s a hut and plenty of fresh water here. If you’ve still got the energy, then I’d recommend continuing along the ridge to Eboshi hut, which is about 2-1/2 hours further north. Click here for the hut website. I made it all the way from Sugoroku hut to this point in one day, but I was carrying a fairly light pack and was acclimatized to the altitude. There’s plenty of room to camp around the hut and the sunsets are magical. The next day, wake up early and traverse about 40 minutes further north to the summit of Mt. Eboshi (烏帽子岳), one of the 200 famous mountains. The final rock climb to the summit is pretty challenging, but fun. You can continue climbing on the ridge line all the way to Hakuba if you’d like, but please make sure you take a right when descending to the river and not a left, or you’ll end up at Kurobe lake and not at the top of Mt. Harinoki. If you’d like to get out of the mountains, then it’s a 4-hour hike from Eboshi hut to Takase dam (高瀬ダム), which is an 8000 yen taxi ride out to Shinani-Omachi (信濃大町) station. You could also try your luck hitching.

When to go: This hike can be done from late May to early November. Just like the neighboring peaks of the Kita Alps, Mt. Suisho is considered an expert climb in the winter, and challenging even during Golden Week because of all the remaining snow.

Access: From Takayama (高山駅) station, take a bus bound for Shin-Hotaka Hot Spring (新穂高温泉) and get off at the last stop. Click here for the bus schedule. There are also buses from Matsumoto station (松本駅) in Nagano, and there may even be direct night buses from Tokyo.

Level of difficulty: 5 out of 5 (elevation change 1896m).

Mt. Yari (槍ヶ岳)

April 14, 2008

This blog post was written back in 2008. For the latest information about this hike (including color photos and maps), please consider purchasing my guidebook to the Japan Alps. 

Mt. Yari is one of the most famous peaks in the Kita Alps, and on the ‘must climb’ list of just about every Japanese hiker. Its remote access means that it’s impossible to do as a day trip, unless you fancy hiking over 40km in one day!

The hike: From Kamikochi bus terminal, take the trail that heads toward Kappabashi, but instead of crossing the bridge, stay on the same side of the river. You can basically follow the signposts toward Yari-ga-take (槍ヶ岳). It’s 22km one way from Kamikochi to the summit of Mt. Yari. Most guidebooks say to allow 2 days to get there, but if you get an early start (around 6am) you can make it in one day. The elevation change is only 1600m, and the first 14km or so is pretty flat. Anyway, your first landmark will be Myoujinkan (明神館), a famous hotel about an hour from the bus terminal. After that, you’ll come to Tokuzawa lodge and campground (徳沢ロッヂ). Continue following the river until you reach Yokoo-sansou (横尾山荘). This is the halfway point distance-wise to Mt. Yari. From here, the trail starts climbing a little, reaching Yarisawa lodge (槍沢ロッヂ) in about an hour. This would be a good place to stay if you’ve gotten a late start, but if you’ve brought a tent then continue for another half hour or so to the campsite. This site is behind a lodge that was destroyed by an avalanche, and there are plenty of places to pitch your tent, lots of water, and toilets. Before deciding whether or not to camp here, consider that you’ve got about 4 more hours of hiking before reaching the hut just below the top of Mt. Yari. The path is easy to follow and will climb up the cirque toward the ridge line. If the weather is good then you should start seeing the spear-like peak of the summit. There are tons of switchbacks and paint marks on the rocks. The climb seems like it takes forever, but eventually you’ll end up on the saddle just below the summit. This is where you’ll find Yari-sanso (槍ヶ岳山荘). You can pay lots of money to stay in the hut, or pitch your tent a short distance away. Please note that the campground is completely exposed on the ridge and you may not be able to pitch a tent if the winds are strong. Drop your pack at the hut, and prepare for the final climb to the summit. There are lots of chains and ladders, but just follow the crowds and arrows and you’ll be on top in no time. The views are exhilarating, so bring your camera if the cloud isn’t in. Descend back to the hut. The next day, you have 4 options. You can either descend the way you came all the way back to Kamikochi, do the daikiretto (大キレット) ridge walk over to Kita-hotaka, continue on the trail next to the hut over to Sugoroku hut (双六小屋), or take the trail away from the campgound down to Yaridaira (槍平小屋) and Shin-hotaka hot spring.

When to go: This hike can be done from early May to early November. The earlier you go, the more snow there will be, so bring crampons if climbing before the rainy season or anytime in late fall.

Access: From either Takayama (高山) or Matusmoto (松本) stations, take a bus bound for Kamikochi (上高地). There are also direct night buses from Tokyo and Osaka, depending on the season. Click here for the bus from Matsumoto to Kamikochi. From Takayama you’ll have to change buses at Hirayu Hot Spring.

Live web cam: Click here

Level of difficulty: 5 out of 5 (elevation change 1675m)

Mt. Kasa (笠ヶ岳)

March 18, 2008

This blog post was written back in 2008. For the latest information about this hike (including color photos and maps), please consider purchasing my guidebook to the Japan Alps. 

Mt. Kasa is a glorious ‘bamboo-shaped’ peak towering over nearby Shin-hotaka Hot Spring. It’s arguably the toughest day hike in the Kita Alps.

Mt. Kasa

The hike: From the bus stop at Shin-hotaka, cross the bridge and follow the paved road toward the right. It’ll climb past the Hotel New Hotaka (ホテルニューホタカ) before turning into a dirt forest road. The road is really easy hiking, following a river. After hiking about a hour on the road, you’ll see the trailhead on the left-hand side. There’s a water source here, so fill up your bottles and take a long break before starting. This trail is called Kasa Shindou (笠新道) but is better known by its Japanese nickname “Shindo Kasa”. (Shindoi is a Japanese word meaning “tired”). The trail becomes steep almost instantly, and there is an endless array of switchbacks. If the weather is good, then the peaks of Hotaka and Yari will come into view shortly. You’ve got a 4-hour hike before coming to the first real place to take a break. It’s called Shakushidaira (杓子平), which translates as “bamboo ladle plateau”. The views toward Mt. Kasa are exhilarating but depressing, since you’ve still got a long way to go! I thought I’d made it to the top after so much difficult climbing, but realized the climb was just beginning! Anyway, eat some snacks and psyche yourself up and you should be ok. From this plateau, it should take a little over an hour to reach the ridge line of Mt. Kasa, coming in just below the peak of Mt. Nukedo (抜戸岳). When you reach the trail junction on the ridge, turn left to get to the summit. There’s a lot of up & down between here and your destination, but it should take around a hour or so to reach the hut below the peak. There’s a campground and water source here. Consider staying if you’re not confident about making it back before dark. You can either go back the same way you came, or traverse over the peak down to a different park of Shin-hotaka Hot Spring (which should take about 5 hours to reach). I did this hike in September and started at the break of dawn. Not only did I climb Mt. Kasa, but I traversed all the way over to Mt. Sugoroku and stayed there. A 14-hour marathon of a hike, but it set up a leisurely 2nd day scaling Mt. Washiba and Mt. Kuro.

When to go: This hike can be done from late May to early November. Just like the neighboring peaks of the Kita Alps, Mt. Kasa is considered an expert climb in the winter, and tough even during Golden Week because of all the remaining snow.

Access: From Takayama (高山駅) station, take a bus bound for Shin-Hotaka Hot Spring (新穂高温泉) and get off at the last stop. The first bus is at 7am, arriving at the hot spring around 8:30am. Click here for the bus schedule. There are also buses from Matsumoto station (松本駅) in Nagano, and there may even be direct night buses from Tokyo.

Map:

Level of difficulty: 5 out of 5 (elevation change ~1900m)

Mt. Jonen (常念岳)

March 3, 2008

This blog post was written back in 2008. For the latest information about this hike (including color photos and maps), please consider purchasing my guidebook to the Japan Alps. 

Mt. Jonen is a wonderful alpine peak located just across the valley from Hotaka mountain range and Kamikochi. Sunrise and sunset are magical.

Mt. Jonen

The hike: From the parking lot, walk 4 km on a heavily damaged forest road until reaching the trailhead at Hiedaira (ヒエ平). The road was completely washed out in flooding a few years ago, and if they’ve re-opened it then you can save 8km of easy round-trip hiking. The trail starts off quite flat, following the Ichinosawa (一ノ沢) river upstream to its source. You’ll cross a few tributaries coming off the right side before the real climb begins. It should take about 3 or 3-1/2 hours of hiking along the river before reaching the final steep climb to the ridge line. You’ll know you’ve reached the point when the trail crosses a tributary and starts switching back quite rapidly. Make sure you fill your water bottle at the stream. It should take about an hour of steep climbing before reaching the ridge. Ther’ll be a massive hut greeting you, with the trail to the top of Mt. Jonen branching off to the left. The hut is called Jonengoya (常念小屋) and it’s a good place for a snack break. There’s a descent sized campground here, as well as some toilets. The views toward Mt. Yari and Hotaka are stunning. From the hut, the trail zigzags for about an hour before reaching the summit. The views are incredible if the weather is clear. For some reason, the fog seems to come in very quickly on this shy peak. There are 2 trails branching off from the top, but head back to the hut unless you’d like to traverse onward to Kamikochi. You can either head back down the way you came, stay at the hut, or continue on the ridge line to either Mt. Tsubakuro or Mt. Yari. The extensive network of ridge trails make for an interesting couple of days exploring the beauty of the Kita Alps.

When to go: This hike is popular from Golden Week to early November. Although not impossible, a winter hike requires experience and equipment, but neighboring Mt. Tsubakuro (燕岳) is popular for winter climbing, so a ridge traverse is quite feasible.

Access: While there are a number of approaches to this peak (including from Kamikochi), the hike described here is only accessible by car or taxi, and the forest road may still be closed to vehicular traffic. The nearest station is Toyoshina (豊科駅), on the JR Ooito Line (大糸線) conecting Matsumoto to Hakuba stations. The forest road to the trailhead at Hiedaira (ヒエ平) was closed at the time of writing, which means you’ve got an extra 4km of hiking from the parking lot to the trailhead, so get an early start.

Level of difficulty: 4 out of 5 (elevation change ~1500m)

Mt. Norikura (乗鞍岳)

March 1, 2008

This blog post was written back in 2008. For the latest information about this hike (including color photos and maps), please consider purchasing my guidebook to the Japan Alps. 

Mt. Norikura is a massive volcanic edifice located between Kamikochi and Mt. Ondake on the Nagano-Gifu border. Famed for summer skiiing, the peak affords awe-inspiring views of the Japan Alps.

Mt. Norikura

The hike: From the ugly, overdeveloped parking lot at Tatami-daira, take the trail to Fujimidake (富士見岳). It should take about 20 minutes or so to reach the top, depending on how well you’ve adjusted to the altitude. The views are stunning, especially looking toward the Kita Alps! From the top, continue on the same trail until you hit a small, paved service road. Hike along the road (I know, I wish it weren’t so overdeveloped either!) until you reach a hut called Katanogoya (肩の小屋). From this hut to the high point of Kengamine (剣ケ峰), it’s a pleasant, well-maintained alpine trail. It should take about an hour or so from the hut to the top. The views are incredible, and if you came on the weekend in nice weather, you’ll be sharing them with heaps of others! Continue back the way you came, or consider descending all the way to Norikura-kogen to save some money.

When to go: The roads to Tatami-daira are closed from November to May, so you’ve basically limited to this time period unless you’d like to try a winter hike. Click here for a report in Japanese of a guy who climbed in March!

Access: Private cars are not allowed to the trailhead at Tatamidaira (畳平), so you have to take a bus from either Norikura-kogen (乗鞍高原)or Hirayu-onsen (平湯温泉). Please note that the buses start running from July 1st to October 31st on the Norikura-kogen side, but from May 15th to October 31st on the Hirayu side. Click here for the Norikura-kogen bus and here for the Hirayu bus. Bicycles are allowed on the road, so that would be another option. Or you could start hiking from Norikura-kogen, a trail which pretty much parallels the road but requires a 1500m elevation change. You can get to Norikura-kogen by bus from Shin-shimashima station, which is about an hour by train from Matsumoto station.

Live web cam: Click here

Level of difficulty: 1 out of 5 (elevation change 416m)

Mt. Kashimayari (鹿島槍ヶ岳)

February 21, 2008

Mt. Kashimayari is arguably one of the toughest day hikes around, and the hike described here is a shorter (and more scenic?) route than the Ogisawa (扇沢) approach.

the ridge to Kashimayari

The hike: The trailhead is at the end of a long, dirt, forest road that is, unfortunately, closed to vehicular traffic. That means you’ve got a 4km warm-up at the beginning of the day. The forest road follows a beautiful river, and you should reach the end in about an hour or so, depending on your pace. You know you’ve reached the end because there’s a giant concrete dam staring right at you! This dam is so big that a tunnel has been built to let hikers through to the other side. When I did this hike, it looked like they were preparing to build some kind of pedestrian bridge across the river, but if they haven’t then just use the tunnel. The trail wastes no time in gaining altitude, so fill your water bottles at the dam before setting off. The trail climbs up, up, and up some more. It’s not too difficult at first, thanks to the abundance of small log ladders built into the mountainside. After about 2-1/2 or 3 hours of climbing, you come to a flat spot known as the Takachihodai (高千穂台). This is a great place for a snack, as you’ve got the huge peak of Kashimayari rising directly in front of you. It’s difficult to believe that you’ll be sitting on the top in several hours. After adequate rest, head up the mountain some more. Depending on when you go, you’ll probably run into your first batches of snow in the next area. The trail definitely gets rockier and steeper, but if the weather is good you should have no trouble finding your way. The ridge line will come closer and closer, and eventually you’ll have to traverse to the right in order to hit the ridge. Everything is marked with paint and arrows, but be very careful if it’s raining or foggy. Once you reach the ridge, the trail splits. Left will take you to the top of Jii-ga-take in about an hour, but you’ll want to go right for about 30 minutes until reaching Tsumetaike Hut (冷池山荘). This is a good place to stay if you want to turn this into a 2-day hike. Otherwise, fill up on water and prepare to climb some more. It’ll probably take about 1-1/2 to 2 hours to reach the summit from the hut, as you’ve got a lot of up and down. If the weather is good the views will be phenomenal. If not, then race as quickly as you can so you can come back and rest at the hut! Kashimayari has 2 twin peaks, and the first one you come to, nanhou (南峰) is the higher of the two. The views are stunning to say the least. Mt. Tateyama and Mt. Tsurugi tower to the north, as Mt. Goyru and Shirouma flow gracefully to the east. Look westward, and you can just about count every peak in the Kita Alps. Mt. Fuji? Yep, it’s visible too (on a clear day, that is). Once you pat yourself on the back and pinch your to see if it’s a dream (and take some photos), head back to civilization the same way you came. Or, turn this into a multi-day trek by heading toward Mt. Goryu or the other way to Mt. Harinoki.

When to go: This hike can be done from late April to early November, but the earlier you go, the more snow you’ll encounter. I did this hike in early June, just before the rainy season, and you can see how much snow there still was!

Access: To do the hike described here, you really need your own car (or lots of money to hire a taxi). The trailhead is accessible on the road that goes past Jiigatake Ski Resort (爺が岳スキー場). If you can make it to Oomachi Hot Spring (大町温泉)by bus from Shinano-Omachi Station (信濃大町駅), then you can take a taxi from there or try your luck hitching. Because of the length and difficulty of the hike, you need to camp at the trailhead in order to make it off the mountain before dark!

Level of difficulty: 5 out of 5 (elevation change: ~1600m).