Posted tagged ‘Hokkaido’

Mt. Shokanbetsu (暑寒別岳)

July 5, 2016

Mt. Shokanbetsu is one of Hokkaido’s best kept secrets. The long approach turns off all but the most hardcore of hikers, and the alpine scenery and panoramic views make the effort worthwhile.

IMG_3194

Note: There are three different routes up the mountain. The most popular route is called the Uryū route (雨竜ルート) which traverses through the Uryū marshlands and over Mt. Minami Shokanbetsu before reaching the summit. It’s a one-way 12km hike that isn’t too steep but really long. There’s a great description here if you’re interested. The second most popular route is called the Shokan route (署寒ルート) and it starts from a forest road that is well-signposted in Mashike town (you’ll see a signpost at the 7-11 along the main road through town). This route is an 11km hike to the top that follows the northern ridge of the peak. The third route (and the one described here) is called the Hashibetsu route (箸別ルート) and it traverses the northeastern ridge through an area teeming with alpine wildflowers. It’s the shortest trail up the mountain (9km one-way) and offers a taste of alpine scenery without the crowds of the marshlands to the south. There is a free emergency hut each trailhead, which means you could easily traverse up and over the mountain, staying at one of the huts at either end. This is a long but relatively easy way to experience the beauty that the Shokanbetsu range has to offer.

The hike: From the parking lot, take the trail that starts next to the emergency hut. There’s a box here where you can register your hiking intentions. The path immediately dives into a beautiful pristine forest alive with insects and the sounds of nature. Bring some insect repellent if you don’t want to get eaten alive by mosquitos. Also, keep an eye out for bears, as the animals like to use the hiking trails to travel. The first few kilometers of the hike are relatively flat, and the route, like most big hikes in Japan, is divided into 10 stage points which can help you with the pacing. It should take about 30 minutes or so to reach the first stage point (一合目), which will likely have you gazing in disbelief that the hiking has only just begun. After an hour or so you should reach the 3rd stage point (三合目), where the real climb begins. It’s a gentle climb at first, which become steeper the higher you go. Once you reach the 5th stage point (五合目) the views will start to open up a bit and the path will become much rockier. In rainy weather the route will turn into a creek, so make sure you bring some rain protection or a change of clothes to help keep you dry. At the 7th stage point (七合目), the trail will finally break out of the treeline and will traverse through an area of splendid wildflowers. The views towards the Uryū marshlands will also open up, and you can see Mt. Minami Shokanbetsu off in the distance, a deep valley between your present position and the mountain. In good weather the path is easy to pick up, but in fog make sure you stick to the paint marks on the rocks. Just past the 8th stage point (八合目) you’ll top out on your first summit, and the path will drop steeply to a saddle at the 9th stage point before climbing a long peak directly in front of you. At the top of this long rise you’ll reach a junction where the Shokan route meets up with this route. The two paths will merge into one, so turn left at this junction and follow the signs to the summit (署寒別岳山頂). It should take about 15 minutes from this point to reach the high point, which is marked by several signposts. If the weather is good you’ll be staring down at the Sea of Japan directly below you, and behind you the Daisetsuzan mountain will soar off in the distance. From here a decision will have to be made. If you came by car, simply retrace your steps all the way back to the trailhead. If you want to do the full traverse, then follow the signs to Mt. Minami Shokanbetsu (南署寒別岳). It’s a long drop to a broad saddle, followed by a long climb to the summit. From there, follow the signs to Uryū numa (雨竜沼), which will take several more hours of long but easy hiking to reach. Allow around 10 hours to complete the full traverse, and bring enough gear and food to overnight at the emergency hut at the trailhead. If you need a place to stay in Mashike, I recommend the guesthouse Bochibochi Ikouka Mashikekan (ぼちぼちいこか増毛館), run by a friendly family from Osaka. It costs 4900 yen with two meals and the traditional structure dates from 1933. The owner can give you climbing advice and also has a free map of the mountain.

When to go: This hike can be done from July to early October, when most of the snow is gone. The peak is popular with cross-country skiers in late spring. A winter ascent is for experts only, as the deep snow drifts and unforgiving weather cause a few fatalities every year.

Access: You really do need your own transport to complete this hike. From Mashike town, take route 231 out of town to the north. Just before crossing Hashibetsu Overbridge (箸別跨線橋) turn right (you’ll see an old folks home on your right). There’s no signpost here so it’s really easy to miss. If you reach Hashibetsu station then you’ve gone too far. As soon as you turn right you’ll see a signpost pointing to the right for the Hashibetsu route of Shokanbetsu (署寒別岳箸別ルート). Turn right here and follow the signs to the trailhead. The road will climb via a few switchbacks before reaching the terminus, which is marked by a free emergency hut and small parking lot. You could take a taxi there from Mashike station if you don’t have your own transport, traversing down the other side of the mountain through Uryū marshlands (雨竜沼湿原), where you could possibly hitch a ride from there. Be warned that it’s a grueling 25km hike, so get an early start if you want to do the full traverse.

Level of difficulty: 4 out of 5 (elevation change ~1000m)

Total round-trip distance: 18km (6 to 8 hours)

This slideshow requires JavaScript.


Mt. Furano-nishi (富良野西岳)

July 19, 2015

Mt. Furano-nishi is a lovely peak situated on the southwestern edge of the idyllic ski town of Furano in central Hokkaido. The mountain affords outstanding panoramic views and offers a taste of the terrain found in the deeper mountains of the region.

furano7

The hike: If you don’t take the gondola, then head up the ski slopes just to the left of the gondola (behind the tennis courts). The first part of the trail follows a mountain bike path, but you can pretty much make your own trail through the open grass slopes. As long as you keep heading up you’ll be ok. It should take about an hour or so to reach the top of the gondola, where you’ll find some restrooms and some vending machines! From here you’ve got two choices. You can either take the trail directly in front of the gondola exit (it starts at the beginning of the forest) or head left up the black diamond slope to the ridgeline. The ski slope is incredibly steep but offers fantastic views of Furano city below. There are also a plethora of wildflowers in bloom to make the sweat worthwhile. It’ll take about 20 minutes of slogging to reach the top of the final ski lift. Take a break here because you’ve done most of the legwork and it’ll be on the ridge the rest of the way. The path dives into the forest here, and you’ll want to make some noise or carry your bell in order not to startle any bears. Meeting a bear on the narrow path here would be a death wish, since there’s no place to escape if the bear should come knocking. While easy to follow, the route is overgrown in some places, so wear pants that you don’t mind getting dirty as the morning dew or recent rains will leave the foliage soaked. There are a few ups and downs as you make your way over to Furano-nishi, which you should see directly in front of you. The views towards the valley below will start to open up a bit, as will the scenery of the other side of the ridge between the dense foliage. Your next landmark will be crossing a small stream and climbing up a short eroded section of the trail with a fixed rope in place to assist in the ascent. This is where the real climb begins, and it’s a steady 20 to 30 minute slog up a rapidly steepening trail towards the summit. If it’s been raining then parts of the trail will resemble a small river, so take care in the muddy sections. Once you reach the final summit ridge, turn left for the short climb to Furano-nishi’s rocky perch. The views on a clear day are out-of-this-world, with uninterrupted panoramic views of most of Hokkaido’s taller peaks. The Tokachi mountains dominate the horizon across the vast valley that plays host to Furano city, while Ashibetsu-dake looks on from an adjacent ridge directly behind you. Between those peaks you’ll find a vast expanse of dozens of mountain ridges folding back on each other. After soaking up the views you can either retrace your steps (like I did), or continue along the ridge for an alternative way off the mountain. The path is considered for experienced hikers only, and drops sharply off the back side of the mountain until reaching a stream, which must be crossed several dozen times. I’m told that the there are tape marks in place to help with navigation, and that the route should not be attempted after heavy rains (hence my choice for not doing the route). In addition, the area is crawling with bears, so you’ll need a whistle to help keep them away. (Bear bells are useless because the noise of the rapids will drown them out. You’ll need to use something that makes a lot more noise). When you reach a junction, turn left and descend back towards the gondola and hot spring (if you’d like a bath). Otherwise you can stay on the trail and it will dump you out on a road that will lead to Gosen bus stop (5線), which is on the same bus route that you used to get to the trailhead. All in all you’re looking at 4 to 6 hours of hard hiking to complete the route.

When to go: This hike can be done from June to October, when the trail is free of snow. Additionally, the peak is a popular place for backcountry skiers, but you’ll need some snowshoes to complete the hike (and don’t attempt on days with poor visibility or blizzard conditions). Budget some time to soak your bones in the hot spring at the Prince hotel. It’s a nice place for a bath if you get over the fact that it costs 1500 yen to enter!

Access: From Furano station, take a bus from bus stop #3 bound for Goryou Kyuu Sen (御料9線) and get off at the Yon sen (4線) stop. From there, walk up the road towards the ski resort until you arrive at the Prince Hotel. The gondola is next to the hotel. Please note that there are only 3 buses per day. The morning bus leaves at 8:10am and the next bus isn’t until 2:55pm, so you might be better off taking a taxi. Click here for the bus schedule. Another alternative is to base yourself at Goryo Guesthouse, which is on the same bus line as the trailhead. You can either walk from the guesthouse to the gondola (about 45 minutes brisk walk) or catch the bus from near there to the Yon sen bus stop.

Map: You can find a free map in the English publication called the “Furano Area Guide” available at the Tourist Information Offices in Asahikawa or Furano. There’s a good map on page 14 of  the book (the 2015-2016 edition). Here’s an online version of the book.

Level of difficulty: 2.5 out of 5 (elevation change ~500m if you use the ropeway, ~900m if you don’t)

Distance: 9km ( 4 to 6 hours, depending on whether you take the ropeway or not)

This slideshow requires JavaScript.

Mt. Apoi (アポイ岳)

September 1, 2013

Mt. Apoi is a treasure trove of alpine flowers and unique geological phenomena. The panoramic views in sunny weather make the effort to get there all worthwhile.

IMG_4576

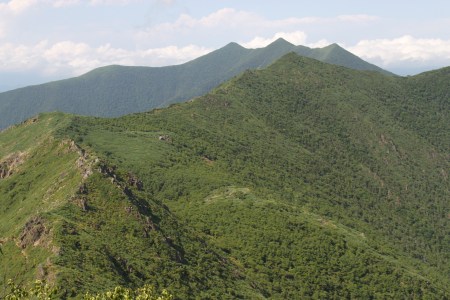
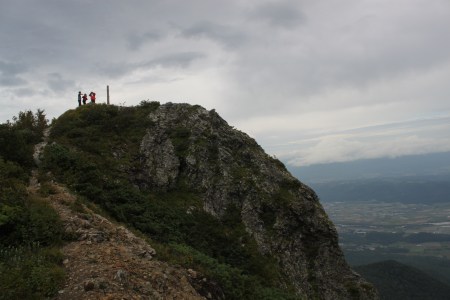
The hike:  The trailhead starts just to the right of Mt. Apoi Geo Park Visitor’s Center. The center itself is a good place to look around if you’ve got some extra time, as the bi-lingual displays are very informative. Anyway, take the gravel road that leads up to the trailhead. Follow the signs that say アポイ岳 and you should be ok. Just after crossing a concrete bridge, the road will turn into the trail proper, and you’ll soon reach your first trail marker for the 1st stagepoint (一合目). There are 9 stagepoints between here and the summit, and they’re a good way to pace yourself. The trail climbs gently for a while until reaching the second stagepoint (二合目). Halfway between the stagepoints you’ll come across a cylindrical metal canister hanging from a tree on the right side of the trail. This is a bell you can ring to scare away bears (and any other wildlife). Be warned: the bell is extremely loud and wouldn’t sound out of place in a Japanese temple. Just past the second stagepoint, you’ll find an area of downed trees. I’m not sure what brought those trees down, but it must’ve been a powerful storm. Soon after, the trail will cross a small stream. Take a break on the benches here, because the real climb is about to begin. From here to the 5th stagepoint (五合目) it’s a steady, somewhat steep climb. At the 5th stagepoint, you’ll find an emergency hut, as well as your first views of the target peak. Just down from the hut, you’ll find an interesting tent that has been set up as a makeshift toilet. You’re required to pack out your poop in order not to damage the delicate ecosystem. Take a peek inside the tent to check out the set-up. From here to the summit, the trail leaves the forest and enters the alpine zone, with lots of unique flowers and creeping pine. It’s hard to believe that you’re only 500 meters above sea level, but that’s what makes Mt. Apoi so intriguing. In sunny weather the lack of shade can be brutal, so wear a hat and don’t forget your sunscreen. The trail climbs steeply from the emergency hut, passing through some rock formations that are home to poisonous pit vipers, so be careful where you tread. Just beyond the 7th stagepoint (七合目), you’ll reach the ridgeline, where the views will really start to open up. Just in front of you, along the knife edge ridge, lies the peak of Mt. Apoi. To the left of that are more peaks in the Hidaka mountains. If the weather is really clear, then you can see as far as the Daisetsuzan mountains. Behind you, you can trace the coastline back towards Tomakomai. Continue climbing on the rocky, undulating ridge until reaching a junction. Take the left fork marked 山頂へ. (Ignore the right fork, as you’ll use this trail on the return). From here to the top it is a relentless climb with wonderful views. Take it snow and steady and don’t forget to look back to check your progress (and to get those wonderful ocean views). Eventually you’ll reach a birch forest that marks the summit of Mt. Apoi. That’s right, you re-enter the tree line at the top of the peak. There are no views to speak of on the summit, but if you follow the trail towards Mt. Yoshida (吉田岳) for a few minutes you’ll see some views between the trees. If you’re fast and don’t take many breaks, you can reach the summit in only 2 hours. Most people take 2-1/2 to 3 hours however. After sufficient rest, instead of heading back down the knife edge ridge, take the trail that is marked 幌満登山口. The path follows the ridge for about 20 minutes until reaching a junction with an English signboard explaining about the Horoman Flower Fields. Turn right here, on the trail marked アポイ公園登山口. The trail is narrow and loops through the forest back to the main ridge trail you took earlier. Once you reach the main trail again, head straight and back the way you came, all the way to the trailhead.

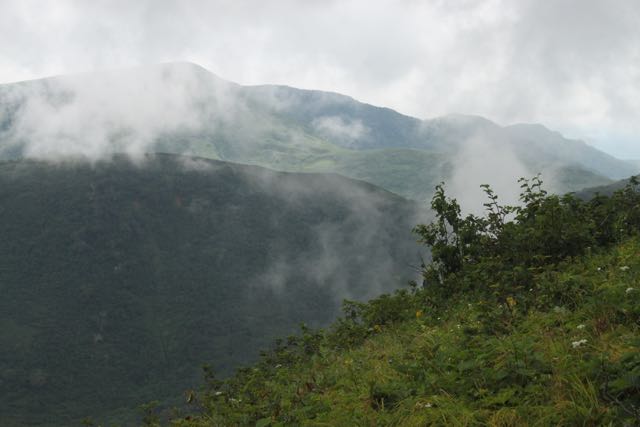
When to go: This hike can be done year round, but be prepared for some snow in winter. The alpine flowers hit their peak in June, and mid-summer can be hot on the peak (especially on sunny days). Stay on the trail unless you want to be infested with ticks, who make their home in the dense undergrowth of the forest. The mountain is a also magnet for fog rolling in off the cool waters of the Pacific Ocean, so consider yourself lucky if you get views.

Access: From Tomakomai (苫小牧) station, take a local train on the JR Hidaka Line (日高線) bound for Samani (様似) and get off at the final stop. The train takes nearly 3-1/2 hours, so make sure you check the train schedule before setting off. The 8am train will get you to Samani at 11:16am. From there, change to a JR bus bound for either Hiroo (広尾) or Misaki Shogakko (岬小学校) and get off at Apoi Tozanguchi (アポイ登山口). Click here for the bus schedule. Another option would be to book accommodation at Apoi-Sanso (アポイ山荘). They will pick you up from Samani station if you call ahead. Apoi-Sanso is a great place to stay, with a relaxing hot-spring bath and tasty food. There’s also a campground near the trailhead for budget-conscious mountaineers.

Level of difficulty: 3 out of 5 (elevation change 810m)

Distance: 9.5km (4 to 7 hours round-trip)

This slideshow requires JavaScript.


Mt. Mashu (摩周岳)

February 6, 2012

Perched on the shores of a stellar volcanic lake, Mt. Mashu offers a chance to experience a taste of the Hokkaido backcountry without a huge climb to get there. It may also offer your best opportunity to spot the elusive Japanese brown bear.

The hike: The trail starts at the end of the massive parking lot, just beyond the toilets. Look for the sign that says 摩周岳登山口. Don’t forget to write your details in the trail register located just below the signpost. The trail starts with a long descent to a saddle, with outstanding views of Lake Mashu on your left, framed nicely in the foreground by some photogenic wildflowers. From here, the trail starts a series of gentle climbs, followed by some long, gradual descents. There are signposts spaced evenly throughout the entire hike showing distances, which you can used to judge your pace. The trail really doesn’t fully pop out of the treeline until around the halfway point. When you see the signpost that reads “摩周岳3.3km”, the trail will start to open up a bit. Be careful on this next section, because at the crest of the next hill is where I saw two bears, right in the middle of the trail! Luckily it was on the return trip, so I could spot them from a very long way away. Fortunately, they escaped into the forest when they heard my bell, so please make sure you carry one. If you don’t have one, then the hostel owner will probably let you borrow his. Your next landmark will be a trail junction for Mt. Nishibetsu (西別岳). This is a good place for a break, because the steepest part of the hike now awaits. Ignore this junction and continue to the left for the final 1.9km push to the summit. The trail will start to become quite steep as you climb towards the crater rim. Keep climbing, and after an hour or so you’ll find yourself sitting on top of the bald, rocky top of Mt. Mashu. The highest point on the ridge is directly in front of you, but the ridge is much too treacherous to proceed any further. You’ll have an awe-inspiring panoramic view of the entire lake, as well as nearby Mt. Nishibetsu. If visibility is really good, you should also be able to see Mt. Shari and the peaks of Shiretoko National Park. After admiring the views, retrace your steps all the way back to the trailhead, and drop by the visitor’s center to eat some ice cream or warm noodles. It should take anywhere from 4 to 6 hours to complete the hike, depending on how many breaks you take. Bring plenty of water in the summer, because there are no water sources on the entire trail.

When to go: This hike can be done from late April to mid-October, when the buses to Lake Mashu are running. If going early or late in the season, be prepared for a lot of snow and perhaps some hungry bears. Be careful of horseflies if hiking in August and whatever you do, don’t forget your bear bell!

Access: From Mashu station (摩周駅), take a bus bound for Mashu Daiichi Tenboudai (摩周湖第1展望台) and get off at the last stop. Please note that between July 16th and October 10th you’ll need to buy a 1-day bus pass just to get on the bus. It’ll set you back 1500 yen, even if you’re only going up to the lake and back. It’s a good value if you plan on seeing other sites, but if not, then consider staying at Mashu Youth Hostel and just hitching up and back from the lake like I did. Catching a ride should be easy, since there’s only 1 road to the top. Another option would be just to take the regular non-tourist bus between April 23rd and July 15th. Click here for the bus schedule.

Live web cam: Click here

Level of difficulty: 2 out of 5 (elevation change 320m)

Distance: 14.4km (4 to 6 hours)

This slideshow requires JavaScript.

Mt. Oakan (雄阿寒岳)

September 8, 2011

Mt. Oakan is a dormant, conical volcano situated on the shores of Lake Akan in Eastern Hokkaido. The panoramic views from the summit are incredible on the rare occasion when the cloud isn’t in.

The hike: The trail starts at the end of a gravel road. Cross over the concrete dam and enter the forest. Don’t forget to register your details in the logbook (and write your finish time when you return as well, or someone may go searching for you). The path follows the edge of Lake Akan for a short time before crossing over a concrete dam. You’ll see a wooden dock on your left. This is a great place to hang out after you’ve finished the hike. Anyway, the path heads towards the right, making its way over to Lake Taro. At one point you’ll reach an unmarked junction with a path going straight or towards the right. Take the right fork which skirts the edge of the lake before climbing back up the other side. After about 10 minutes you’ll reach another junction with a signpost marked for Lake Jiro (次郎湖). You can either take the 2 minute detour down to the lake shore or continue heading straight on the path in front of you. I recommend visiting the lake in the morning, as the lighting is much better. You might be lucky enough to catch the mist clearing off the calm waters. Retrace your steps back to the junction and continue climbing. The path becomes quite steep momentarily, but will flatten out and you’ll soon reach the 1st stagepoint (一合目). The next hour or so of hiking is a monotonous pattern of meandering switchbacks followed by long flat sections. You’ll see a few caves hidden in the moss and rocks. If you kneel on the ground you can feel the frigid air gushing out of the holes. The path starts to become a bit steeper once you  reach the 3rd stagepoint  (三合目). Continue pushing on until reaching the 4th stagepoint (四合目). Take a break here and fill up on nutrients because things are about to become tough. The next section is the steepest section of the entire hike, and if the horseflies are around, it’ll be the most agonizing. Take it slow and steady and you’ll eventually end up at the 5th stagepoint (五合目). Congratulate yourself, as you’re actually 80% of the way there. If the weather is good then you’ll see your first views down to Lake Akan. From here the trail climbs for a few more minutes before descending down to a long saddle. Your legs will appreciate the respite, but rest assured, you’ll start climbing again momentarily. The next section of the route involves another set of switchbacks, with each turn offering a better view of the lake below. If you’re really lucky then you’ll also be able to see Mt. Meakan and Akan-fuji rising up on the other side of the lake. The alpine flowers will steadily increase in number as well. After a relatively gentle climb, you’ll reach the 8th stagepoint (八合目). There’s an old foundation of a weather monitoring station here which would make for a great campsite if there were only a water source and toilets. From the 8th stage to the summit it’s a series of ups and downs. Just before the 9th stagepoint you should get your first view of the crater rim. Unlike its active neighbor to the south, Mt. Oakan’s crater is filled with grass and trees, but you could easily imagine what life must’ve been like on the peak millions of years ago. Anyway, there’s one final drop followed by a short, steep climb and you’ll reach the rocky summit. Again, if the cloud isn’t in you’ll have unobstructed views in all directions. Unfortunately it was one white, misty mess when I climbed, but click here to see the views in good weather. After a well-deserved break on the top, retrace your steps all the way back to the trailhead, taking care not to frighten any bears on the way down. There are quite a few in this area, so consider bringing a bell or bear spray.

When to go: This hike can be done from May to October, when most of the snow is gone. A winter hiking is a serious challenge and should only be attempted by those with the equipment and experience to do so.

Access: There’s no public transport to the trailhead, so you’ll either have to walk the 4km on route 240 or take a taxi. Alternatively, if you’re staying at a minshuku at Lake Akan then they might be able to give you a lift to the trailhead. Hitching is quite possible as well.

Live web cam: Click here

Level of difficulty: 4 out of 5 (elevation change ~920m)

Distance: 12.5km (5 to 7 hours)

This slideshow requires JavaScript.


Mt. Rebun (礼文岳)

August 27, 2011

Mt. Rebun is the highest peak on Rebun Island, a long, remote  isle located about 50km off the northern coast of Hokkaido. The hike is best known for the plethora of wildflowers, as well as the panoramic views of the entire island.

The hike: The path starts at the far end of the small gravel parking lot. Climb the steel stairs and head towards the right, climbing through bamboo grass. The initial 15 minutes is relatively steep, but it flattens out quite a bit after that. It’s 4km from the start to the summit, and the path is very easy to follow. The views back down to the trailhead and coast are quite nice before the path takes a left turn and heads into the bush. The forest here is outstandingly beautiful. Even though it looks like bear country rest assured: there are no furry brown creatures on the island. After an hour of gentle ups and downs you’ll reach a signpost which marks the halfway point in the hike. There used to be a trail junction here, but the old trail is now closed. (hence the reason for the vinyl cover over the signpost) Continue climbing up towards the summit through more beautiful forest land. About 1km from the summit, you’ll start to pop out above the tree line and will be rewarded with outstanding views if the cloud isn’t in. Soon you’ll reach the summit of a rocky outcrop with views of Mt. Rebun directly in front of you. There’s a short steep drop followed by a long, gentle climb before reaching Rebun’s bald summit. The panoramic views are superb, especially if the clouds over Mt. Rishiri are gone. Mt. Rishiri will be directly behind the path you just came from, while Cape Sukoton is straight ahead. Mt. Rebun is an incredibly shy island, so consider yourself lucky if you can get any view at all. After taking a well-deserved break on the top, retrace your steps all the way back to the trailhead and consider having a bath at the hot spring near the ferry terminal.

When to go: This hike can be done from May to October, when most of the snow is gone and the buses are running. A winter hike is also possible, but be prepared for windy, cloudy, and snowy conditions.

Access: From Wakkanai Ferry Terminal, take a ferry bound for Kafuka (香深) Port on Rebun Island. From there, take a bus bound for Sukoton Cape (スコトン岬) and get off at Nairo (内路). The trailhead is near the post office, so look for the sign that says “Mt. Rebun Climbing Trail”.  Click here for the schedule for May and September, and here for the schedule between June and August. Hitching to/from the trailhead is also quite possible, and if you stay on the island, your place of accomodation might be able to give you a lift as well.

Level of difficulty: 2 out of 5 (elevation change 490m)

Distance: 8km (4 to 5 hours)

This slideshow requires JavaScript.

Mt. Niseko Annupuri (ニセコアンヌプリ)

August 27, 2010

Mt. Niseko Annupuri is the highest peak in the Niseko mountain range and popular with hikers throughout the year. The views across the valley towards Mt. Yotei are nothing short of magical.

The hike: Walk on the concrete road between Yama no Ie hut and the campground, where you’ll find the trailhead a short distance from the parking lot. Fill up on water at the campground, as there’s no water source on the mountain. The well-used trail crawls its way through a dense forest for the first half hour or so, before popping out of the trees onto the main ridge. About 15 minutes into your ascent, you’ll see an unmarked trail branch off towards the right. Ignore this path, as it leads to Mt. Moiwa and Niseko Annupuri ski resort. Stay towards the left and keep climbing. In clear weather it’s easy to see where you’re going, but if the cloud is in then be careful because there are no signposts or paint marks on the rocks. The views will start to open up when you hit the ridge, and you’ll see the summit peaks rising sharply across the col on your right. As you rise higher and higher above the tree line, the trail becomes much rockier. This is where the switchbacks start, making navigation a lot smoother than just shooting straight up the side of a steep mountain. After another 20 minutes of meandering towards your destination, the trail will flatten out, with the high point directly ahead. Continue straight ahead towards the summit of Niseko Annupuri, where you’ll be rewarded with a breaktaking view of Mt. Yotei across the valley. You can see whyYotei was nicknamed Ezo-fuji in the old days. There’s a concrete emergency hut here that smells of paint inside. Don’t stay here unless you have adequate water and want to have a chemical induced headache from inhaling all the harmful fumes. From the summit, you can either retrace your steps back to the hot spring, or take the trail directly in front of you that drops down into the ski resort. You’ll reach the ski lifts after about 10 minutes, where you can follow them all the way down to Hirafu. Another interesting option would be to turn left once you reach the top of Grand Hirafu Summer Gondola and follow the signs towards Kagami-ike (鏡池), which has beautiful mirror-like reflections of the surrounding peaks. From the lake, it’s another hour or so to the bus stop at Hanaen (花園), where you can take a bus back to Kucchan station.

When to go: This hike can be done year round if you approach from the top lift of the ski resort in the winter. Otherwise, aim to go when the road/bus to Goshiki Onsen is running between early July and late October. If you’ve got your own transport then you can go earlier in the season.

Access: From Niseko station (ニセコ駅), take a red-colored bus bound for Goshiki Onsen (五色温泉) and get off at the last stop. You can also take this bus from Kucchan station (倶知安).  Please note that there are only 2 buses a day, one leaving Niseko station at 10:10am, and the other departing at 2:35pm. I recommend staying at the beautiful Goshiki Onsen Ryokan, where you’ll find 2 outstanding outdoor baths. The lodge across the street (Niseko Yama no Ie) is a bit run down but has a very friendly/helpful manager and a nice bath as well. Click here for the bus schedule.

Map: You can get a decent free map at the tourist information center at Kucchan station, or from the huts at Goshiki Onsen.

Live web cam: Click here

Level of difficulty: 2 out of 5 (elevation change ~500m).

This slideshow requires JavaScript.