The mountain is easily accessible from Hiroshima station (take a train to Kaitaichi station and hike from there) and can be combined with other sightseeing in the area (Miyajima, Peace Museum, Hiroshima castle) Try to come on a clear and sunny day for the views.
Bakery: Just a few minutes walk from Kaitaichi station (海田市) you will find the bakery Jun, which is a great place for trail goodies.
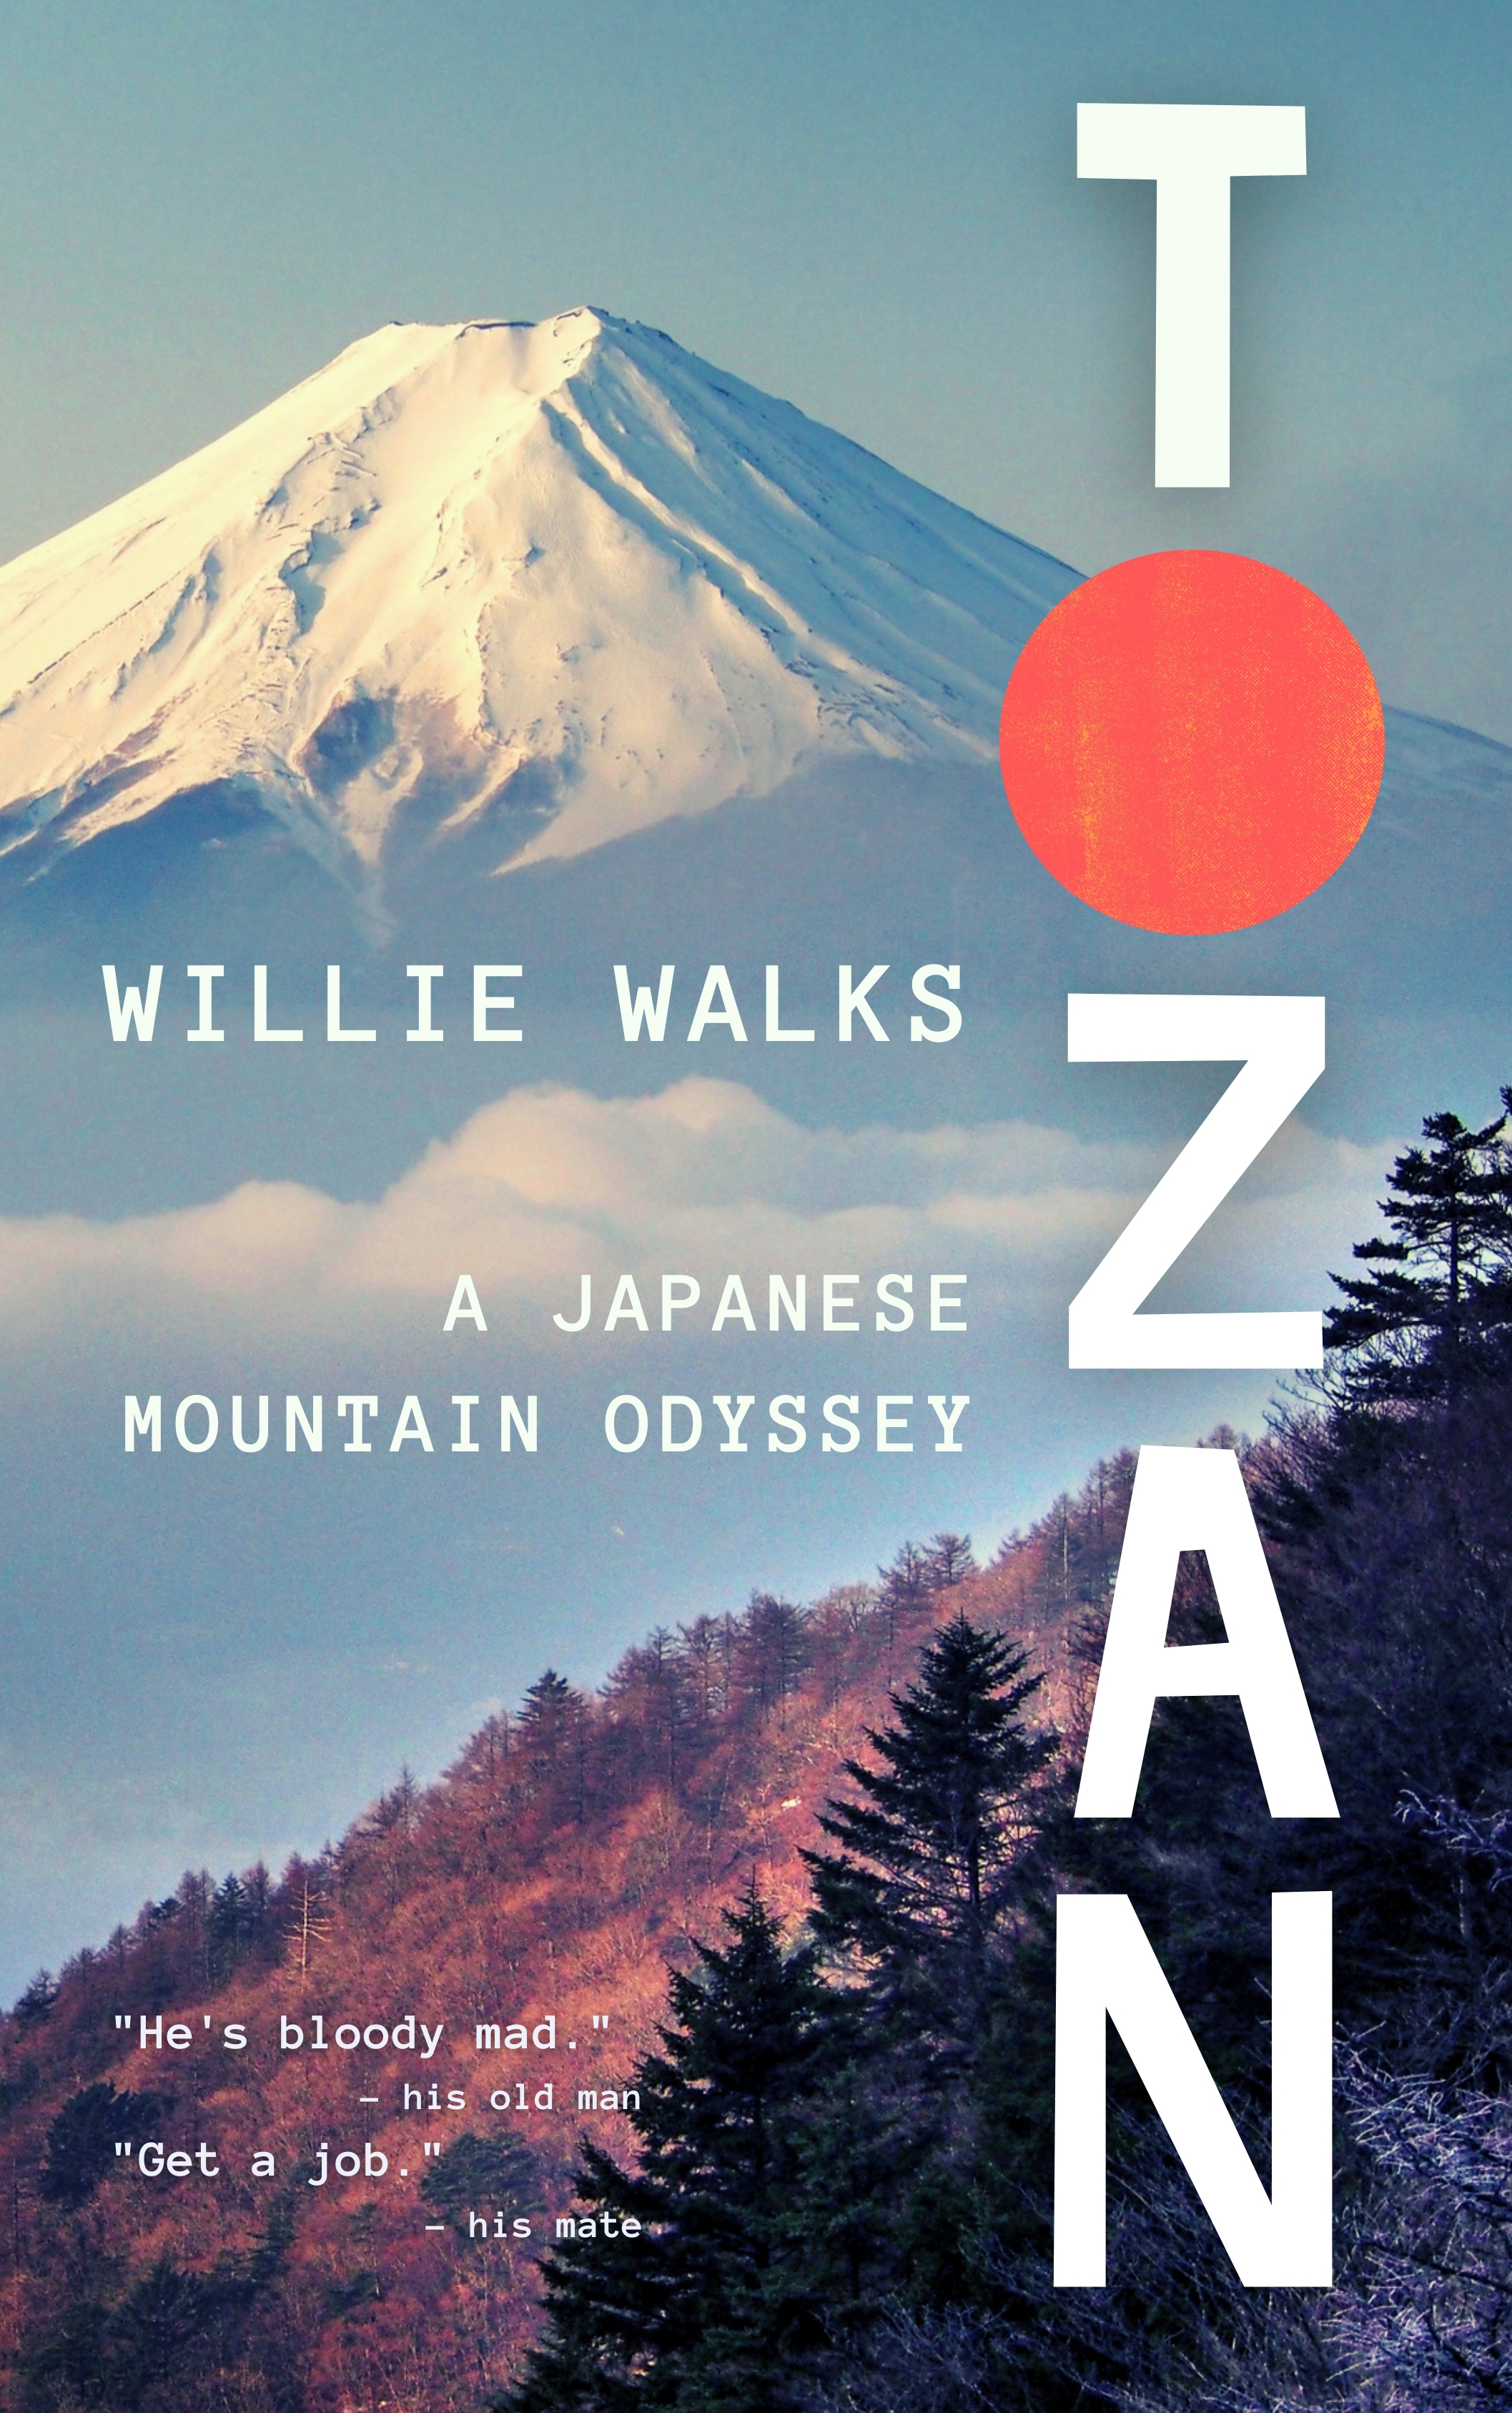
Did you know that a dollar bill weighs about 100 grams? And if you have a stack of 700 one-dollar bills in your hand that they would still weigh less than Tozan, a monstrous new self-published book about Willie’s quest to climb the 100 mountains of Japan?
William Banff, better known by his pen name Willie Walks, is the first known Australian to have climbed the Nihon Hyakumeizan, or One Hundred Mountains of Japan, and this book is a travelogue of sorts, documenting his journey in agonizing detail.
Clocking in at well north of 100,000 words, the 546-page behemoth may appear daunting at first, but not as formidable as Willie’s own challenge to climb the Hundred Peaks. The book starts with an informative introduction and then presents each mountain chronologically rather than geographically, so readers can follow along in “real time” on Willie’s quest.
Willie is not one to mince words, and with colorful language and creative Willie-isms scattered throughout the book, it is one hell of a wagon ride. You know it’s going to be an epic tale when the first word of the narrative is “CHRIST!”
If there’s any way to describe Willie’s writing style, if would have to be: Bill Bryson on speed. Willie will make you laugh, shake your head in disbelief, and head under the blankets for cover, all in one sentence! His adjective-laden style takes a bit getting used to at first, but once you dive in there’s no turning back, and his attention to detail, his natural gift to help “paint the scene” if you will, is second to none. For instance, in chapter 57:
“The sky wheels above me, the sun adheres to its set course, and the cloud and rain drift at the mercy of the winds. The ground is an ever-mutating treadmill of surfaces beneath my boots. Rock, earth, mud, moss. It’s introspection on steroids. A meandering meditation. All the façades held in place by the demands and expectations of life down on the flats long fallen away. I can hear myself again. Who have I been all these years? Who will I be when I walk out of these mountains?”
Despite the War-and-Peace size of the volume, readers can rest assured that it is definitely a page turner, and straight into the first chapter on Ibuki-yama, there’s already a sense of being drawn into the narrative, eager to discover the next hiccup and anecdote along the way. These are the kinds of stories that grandpa might tell you on his death bed, full of life and vigor of days long gone.
Each mountain is broken into its own chapter, so it can be taken in small doses, similar to someone climbing the Hundred Mountains themselves, so if you read just one chapter a day you can finish in a little over three months, which is a lot faster than actually trying to climb the Hundred Mountains yourself.
Every chapter is headed with a sketch of the mountain climbed, crafted by Willie’s own hand. In addition, he has also hand-drawn a map for each region, which is by no means an easy task. The only thing that could better complement the book would be to perhaps fill some of the dead space on some of the chapters with a black and white photograph or two, so readers could further visualize the scenery at play. To compensate for this, Willie has put photos of each mountain on his website.
What the book could look like with some photos included
So as we head toward the holiday season and cooler weather, consider picking up a copy of all 788 grams of Tozan at your online bookseller named after a South American river. You just might not be the same and you don’t have to be a mountaineer, a Japanologist, or even someone interested in the outdoors to enjoy it. Click here for more details.
Access: Baraki station (原木駅) is on the Sunzu Line of the Izu Hakone Railway. It’s just a 16-minute train ride from Mishima Station (三島駅). If coming from Tokyo, you’ll find it faster to take the Shinkansen to Mishima and transfer there. From Numazu Station (沼津駅) at the end of the hike, it’s a 5-minute train ride back to Mishima Station.
The hike: While the hike is relatively well-marked, the route is long, with plenty of fixed ropes, so make sure you start early to avoid running out of daylight. However, there are plenty of escape routes along the way so you can bail early if you don’t have to stamina or time to do the full hike. Bring plenty of water and snacks as there aren’t any places to replenish supplies along the way.
When to go: The views of Mt Fuji are pleasant, so aim to go when the weather is good and Mt Fuji is not hidden in cloud. April and May are the best times, as well as October and November. Summer is also possible but avoid the extreme heat in July and August.
The trail is relatively easy to follow and you shouldn’t get lost if you use the Avenza digital map linked below.
Post hike bath: Asamushi is often called the “Atami of Tōhoku” and there are many options for baths, from the Michi no Eki across the street over to the public bathhouse Matsu no Yu behind the station. However, if you’re looking for a really nice outdoor bath with good facilities, then I recommend Tatsumikan.
When to go: This hike is best done from April to November. Winter is possible with the right experience and equipment, but the peak does get a lot of snow. Click here for a report in Japanese about a winter ascent.
Access: Asamushi Onsen (浅虫温泉) station is on the Aoimori Railway that connects Aomori station with Hachinohe station. This used to be part of JR Tohoku but the line was privatized in 2022 following the completion of the Tohoku Shinkansen. Trains run from inside JR Aomori station but a separate ticket is required (you can buy one from the ticket machine just outside the ticket gate). Trains are infrequent and here is the latest schedule.
The trail is pretty well-marked, but the 33 Kannon statues on the slopes of Mt Sekisen (石船山) are hard to find.
When to go: This can be done year round except for the days when snow falls in Hofu city. Be careful of heatstroke in the summer and Japanese hornets in September and October.
Access: While you can walk from Hofu station (about 90 minutes to the trailhead), a taxi will save you a lot of time and hassle. The bus from Tsukahara at the end of the hike is infrequent. You can use this website to search. Just type Tsukahara and select for Hofu station and it will tell you when the next bus will arrive.
The trail is marked with heavily corroded signposts at irregular intervals. It’s better to either use YAMAP or Yamareco to help assist in navigation. The ridge is also heavily overgrown. Watch out for ticks in the summer as I picked up one on the mountain.
Side trip to Mt Muri: If you want to extend the hike, then at the far end of the summit on the ridge, turn left at the junction marked with a white stick. Allow around 2-3 hours return from the main ridge over to Mt Muri (武利岳)and back. Mt Muri is the highest mountain in the range and offers fantastic views, but it’s not well-traveled, so take care and be careful of bears.
When to go: The autumn colors usually reach their peak in mid-to-late September while the first snowfall usually occurs in October. Summer is great when the peak is snow free.
Access: The trailhead is accessible via car only (unless you want to take a taxi). When coming from Sounkyo on Route 39, look for a gravel forest road on your left after you pass Sekihoku pass (石北峠). Here is a link for a Google map pin.
The hike described in this video is a quick up-and-back from Koma station. If you want a longer hike, you can continue along the ridge to Mt Takasashi (髙挿山) [sometimes pronounced as Takazasu or even Takasasu] and onward to Mt Monomi (物見山) and down to Musashi-Yokote station. A detailed description of the hike in reverse can be found here.
There aren’t many signposts in English, so from Koma station, just follow the signs in Japanese to 巾着田 (Kinchakuda) and then to 日和田山 (Hiwada Yama).
Map: Click here for a detailed map published by Seibu Railway.
Access: Koma station (高麗) is on the Seibu Ikebukuro line. Take an express train from Ikebukuro and change to a Chichibu train at Hanno station (飯能). Double check the train and connection times before you head out so you’re not stuck with a long layover at Hanno. Pick up supplies before heading out of Tokyo as there isn’t much at Koma station apart from a vending machine.
Korean history: As mentioned in the video, Hidaka city and the area around Koma station have been an important part of Korean culture in Japan. Here is some more information from Hidaka city about their history. The area is worthy of a day’s exploration of all of the historic buildings and relics.
The peak is also known as Echizen Fuji and is one of the 5 Mountains of Echizen. It was supposedly first climbed by Taicho Daishi, the founder of the Hakusan faith. It is mentioned in Matsuo Basho’s classic Narrow Road to the Deep North. In addition, Murasaki Kishibu, the author of The Tale of Genji, lived at the base of the mountain for a short time.
Shinkansanen route (aka Aratani route) : Exit Echizen-takefu station on the Hokuriku Shinkansen. Exit the station on the east (the opposite side of the bus rotary and Michi-no-eki shops). Walk through the parking lot and turn right (south) and walk parallel to the Shinkansen tracks in the direction of Tsuruga. Follow a narrow road with a small stream on your left and you can see the towering pointy, Fuji-shaped figure of Mt Hino right in front of you. Turn left when the road dead-ends at Route 201 and then an immediate right through the torii gate. Walk on the narrow road past a shrine and keep going south in the direction of the mountain (Google Maps will be helpful here). Pass through the village and then walk on a narrow road through rice fields and re-enter the village at the base of the mountain. Walk straight and you’ll find Hino Shrine, the trailhead for the Aratani route. The trail starts to the right on the shrine and climbs up to an electrical pylon, drops to a saddle, and climbs steeply (via fixed ropes) up the northern face. Just before the summit plateau you’ll reach a junction with a trail merging in from the left. Ascend the final section of boulders and fixed ropes to reach the summit plateau at the northern shrine (北の社), which has spectacular panoramic views. Continue on the ridge for a few minutes to the inner shrine, and then the triangulation point a few minutes beyond.
Viewpoint: I forgot to mention it in the video, but if you want the view featured in the thumbnail, then make sure to walk out to the Northern Shrine (北の社), which is a short walk north (to the left) of the inner shrine. If you’re coming from the Shinkansen route then this viewpoint is the first thing you will see when you reach the summit ridge. The route in this video does NOT visit this point, as you need to make a short side trip from the inner shrine.
Map:If you need a digital map for the mountain, here is the YAMAP map.
The peak actually goes by two names, and the locals don’t seem to know which one is correct. Most people call it Misumi-dake (三角岳) but others use the name Sankaku-dake (三角岳).
The mountain is a good day hike from Kumamoto city and offers spectacular panoramic views.
There aren’t any convenience stores in Misumi, so make sure you pick up supplies/snacks in Kumamoto before boarding your train.
The trail described in this video isn’t well used between signposts 2 and 7. One safer alternative would be to take what I call the “adventure course” up to the Buddhist pagoda rock carvings and then retrace your steps back to signpost 2 and then continue up the well-maintained main trail to the right pointing to signpost 9.
It should take 2 – 3 hours to do the hike (longer if you take it slow and have lots of breaks). After you reach the forest road at the bottom of the loop, continue straight past the elementary school and then meander back toward the station. Instead of crossing the same bridge on the approach, you might want to head down to the 7-11 and cross over the smaller bridge further east. Just use Google Maps on your phone to navigate your way back to the train station. There’s only about 1 train an hour, so take a photo of the train schedule at the station before you start your hike.