Posted tagged ‘Kansai hikes’

Mt. Taishaku (帝釈山)

November 28, 2012

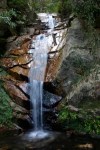
Surrounded by serene broadleaf forests, Mt. Taishaku is a secluded peak in western Kobe city with wonderful views of Awaji Island and the Inland Sea. Even on weekends, you’ll find the lack of people a nice change from the hoards of hikers on neighboring Mt. Rokko.

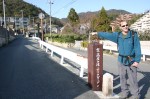
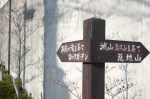
The hike: If you need to use the toilet, then go in the large brown building next to the bus stop, since there are no other toilets on the entire hike. From the bus stop, walk away from the main road and into the small village past the cigarette and udon shop. After 50 meters, you’ll see a large thatched farmhouse on your left. Next to the farmhouse there’s a house with a giant tanuki statue outside. The 600-year old house is an Important Cultural Property and well worth the 300 yen admission price. After checking out the house, take the road that runs perpendicular to the house until you reach the river. Turn right and then left, crossing the concrete bridge over the river. Turn right when you reach the other side and you’ll see a large concrete building with large letters in katakana that read サイクリングターミナル on the roof. The trail starts just to the left of this building and is easy to miss since the signpost is small. Walk to the front of the metal gate that marks the entrance to the building and take the road on your left. You’ll see the trail near the rear of the building with a small sign that reads 丹生山登山口. The path dives into the woods and skirts past a small pond before winding up towards the ridge. The route is easy to follow and not too difficult, with views opening up the higher you get. After 20 minutes you’ll reach a false ridge and the trail will flatten out a bit before starting a longer, steeper climb. Your next landmark will be a small graveyard on the left side of the trail, marked with old stone graves and a couple of jizo statues. After another 10 minutes of climbing you’ll reach the ridge line and a junction for the main trail to Mt Tanjo (丹生山). Turn left when you hit this junction and you’ll reach the shrine in about 5 minutes. The shrine is built on top of the ruins of an old castle, and you can still see the castle walls as you make your way to the top. Before you cross under the shrine gate (torii) look to your right and you’ll see a trail that heads into the forest. This is the trail that you want to take, so retrace your steps after checking out the adjacent shrine. The views are pretty nice just to the left of the highest shrine building and there’s a giant maple tree one level below that is absolutely stunning in the autumn. The giant tree has a sister located next to the shrine gate and both trees are a must-see when the leaves change color. Once you’re back at the shrine torii, take the path that runs perpendicular to the gate that is marked as シビレ山・帝釈山. The route follows a concrete forest road to a saddle and then climbs up the other side of the ridge. Head towards the right, being careful not to take the path that heads straight ahead. There’s a small, handwritten brown sign that reads 帝釈山縦走路. There’s a bit of a gentle up-and-down for the next several minutes until the path takes a sudden dip and a sharp left. Be careful not to miss this turnoff, since it’s not well-marked. Your momentum will likely carry you forward on the wrong path if you’re not careful. When you hit the dip, bank hard towards the left, following the sign that reads 太陽と緑の道. Once past this tricky point, it’s a straightforward, gradual climb up to the summit of Mt. Taishaku, where you’ll have views out to the south towards Awaji Island and the Inland Sea. Unfortunately, the tree cover means you won’t be able to see Mt. Rokko or Kobe city unless it’s the dead of winter and the leaves are gone. The summit is marked by several small stone shrines and makes a pleasant place to kick back and enjoy your lunch. After a modest break, continue on the trail away from the direction you came. The path drops rather steeply and then banks hard to the left. There’s a trail straight ahead marked with blue tape, but ignore this and continue descending for about 5 minutes until the path flattens out and you reach a large junction. The path continues towards your left, but you’ll find a poorly marked trail on your right that looks a bit like an old road. It is marked by a small white metal sign with red Chinese characters that read 歩. Next to this sign you’ll see a tree with a red smiley face painted on it, topped off by yellow tape. This is your landmark, so turn here and descend into the forest. The route follows a dry creek bed that is covered with dried leaves and is incredibly rocky and steep. If there’s any place where you’re likely to turn an ankle it’s here, so descend with caution. After 20 minutes or so you’ll see a cave on your right in a flat area. There’s an unmarked trail that leads off to your right at this point. This area used to be a coal mine, and if you climb this unmarked trail for a few minutes, you’ll see one of the old mine shafts. The mine is big enough to enter, but you’ll need a flashlight and you should watch out for wild boar, who probably live in the old caves (I advise against entering the mine shaft without proper spelunking experience). After checking out the cave, retrace your steps and continue descending down the valley. You’ll soon reach a small river. Cross the river and follow the overgrown path on the other side. In another 5 minutes you’ll reach an unmarked forest road. Instead of taking this road to the left and down towards the river, head straight ahead and follow the road as it climbs gently up to a mountain pass and then flat for about 15 minutes until connecting with another road. When you hit this next road, turn left and go past a couple of abandoned vehicles on the left side of the road. You’ll soon reach yet another junction, so turn left here and follow the handwritten sign that says 丹生会館. It should take another 20 minutes of descending on a route dotted with old stone markers to reach the village below. You know you’re getting close when you enter a bamboo thicket. Once you hit the road, turn right and follow it straight past some persimmon trees and rice fields until reaching the main road. You’ll see the bus stop on your left, and you can take the bus back to Minotani station. All in all it should take about 4 hours or so to complete the loop, depending on how many breaks you take.

When to go: Autumn is by far the best season to do this hike, as the mountain comes alive with brilliant hues of yellow. The shrine on the peak is home to two giant mountain maple trees whose leaves change from green to yellow to red. It has to be seen to be believed. Summer is hot and sticky, with heaps of mosquitos.

Access: From Umeda station in Osaka, take an express train on the Hankyu line bound for Shinkaichi (新開地) and get off at Shinkaichi. From there, change to the Kobe Dentetsu Line and take a train bound for either Sanda (三田) or Arima Onsen (有馬温泉) and get off at Minotani (箕谷) station. You might find it faster to take an express train to Suzurandai first and then change to the local, since Minotani is only 3 stops further on. There’s also a direct bus from Sannomiya to Minotani, so take your pick of public transport. From Minotani station, go out the ticket gates, and walk downhill for a couple of minutes to the bus roundabout. From there, take bus #111 bound for Tsukihara (衝原) and get off at the last stop. There’s one bus an hour, so try to line up the train and bus schedule so you don’t have to sit around waiting long. Click here for the bus schedule.

Level of difficulty: 3.5 out of 5 (elevation change ~400 meters)

Distance: 7km (3.5 to 4.5 hours)

This slideshow requires JavaScript.


Mt. Takatori (高取山)

August 1, 2012

Mt. Takatori is the site of Japan’s oldest mountaintop castle, and the hike takes you up, around, and through the ruins of the castle walls, with views of both the Yamato plain and the Omine mountain range. It makes for a great half-day excursion from Osaka or Nara cities.

The hike: From Tsubosakayama station, exit the ticket gate and take the road running perpendicular to the station. Cross over the busy two-lane road, walk about 100 meters or so, and then turn right on the stone paved street running through the center of town. You’ll see a wooden signpost that says 高取城跡 5.0km. The next 20 minutes or so is a pleasant walk through a traditional Edo-era town that is surprisingly devoid of tourists. If this town were in Kyoto there would be thousands of tourists, so appreciate the beauty of the old buildings and lack of people. You’ll find a lot of distractions while marching up the main street, including some paper-mache cows on a side road on the right, followed by another brilliant display of elegantly dressed dragons on your left. Continue heading straight on the road out of town, as it starts to narrow and follow a river. A little further on, you’ll see a brown sign in white letters that says 俳人·阿波野青畝生家 150m pointing straight ahead. The road turns a bend before reaching a traditional bark-thatched structure housing a waterwheel. It’s worth crossing the stream and walking down to the rustic structure before heading up the paved road towards the trailhead. After passing by a public restroom on your left (your first and only chance to use the facilities), the road will turn into a hiking path and enter the forest. A few minutes on you’ll reach a junction with a sign pointing towards Sousenji (宗泉寺) Temple on your right. There are 88 different jizo statues scattered on the hillside behind the temple, and watch out for that vicious dog tied to the rope just to the right of the main temple gate. Anyway, after a quick look around, retrace your steps back to the junction and continue on the path that leaves the forest road and starts climbing up towards the ridge. Follow the signs that point towards Takatori-Shiroato (高取城跡) as the route follows a small stream and zigzags through the quiet woods. After 20 minutes of hiking you’ll reach a junction with a sign pointing towards 岩屋不動 on your right. You can visit this as a quick side trip if you’d like or continue on towards the summit. I didn’t bother checking it out, so please let me know if it’s interesting if you choose to explore it. Your next landmark will be a trail on your left marked by a stone monkey statue. This path apparently leads down to Asuka, one of the ancient burial centers of the Nara era. Ignore this trail and continue as the path starts to follow the ridge. After passing by a small lake on your left (which is just off the trail), you’ll soon see some signposts marking the foundations of some old castle gates. The castle complex was massive, taking up most of the mounainside when it was originally built. Your next landmark will be a path on your right marked for Kumini-Yagura (国見櫓), the remnants of an old watchtower. You should definitely take this trail as a sidetrip, since the views over the Yamato plain are second-to-none. It’s also a good place to take a break, since there are some moss-covered wooden logs to sit on. It should only take about 5 minutes to reach the lookout point. After admiring the scenery, retrace your steps back to the junction and turn right, following the signs towards the main castle area (本丸). A few hundred meters on, you’ll reach yet another junction marked for Hachiman-Guchi (八幡口), but ignore this trail for now and head to the 本丸. Once you reach the castle walls, keep climbing up until you can climb no more. On the far side of the highest castle area there is a lookout to the north, where you can see the Omine mountain range on a clear day. Take a rest here, as you’re at the highest point in the hike. Once you’ve regained your strength, backtrack to the Hachiman-Guchi junction and turn left down a set of wooden steps towards a forest road. Once your reach the road, follow the signs towards Hachiman Jinja (八幡神社), which climbs a series of steep log steps through the trees. If you’re tired of climbing, you can ignore this path and continue on the trail that bypasses this shrine to your immediate right. Either way both paths will meet up a short time later. The shrine is interesting as far as small secluded mountain shrines go, and there’s a small view of the valley below behind the shrine. Descend down the steep unmarked path in front of the shrine, which will soon meet up with the main path. Turn left here and keep following the signs towards Tsubosaka Temple (壺坂寺). You’ll cross the forest road a couple of times, but as long as you keep following the signage you’ll be ok. At one point you’ll reach a junction with 2 different signs pointing towards 壺坂寺. This is an important junction because if you go left then you’ll miss all of the good stuff. Take the path marked 五百羅漢遊歩道を経て壺坂寺, which, after a short climb, will start to descend through the dense forest. Be on the lookout for rock formations with Arhat statues carved into them. There are hundreds of ancient stone statues carved into the hillside. Some of them are easy to miss, so look for the white signboards with Chinese characters on them. Eventually you’ll loop around and meet up with the main path, which turns towards the right and descends to the paved road. Walk down the asphalt road for about 15 minutes and you’ll arrive at Tsubosaka temple, which is famous for a 10 meter tall Buddha statue. The temple costs 600 yen to enter, but is well worth a look around. If you don’t have the time or money, then you can continue on the trail that leaves just to the left of the bus stop at the end of the parking lot. This path drops down to a stream and follows it for about 30 minutes until meeting up with the main road back into town. Turn right when you hit the road and meander your way through the back streets towards the station, following the signs for 壺坂山駅.

When to go: This hike is most popular in autumn, when the leaves are ablaze with color. Spring is also a good time to check out the mountain cherry blossoms. Avoid the middle of summer during the intense heat, but early summer can be a good time to see wonderful greenery.

Access: This is one of the few hikes that is approachable directly from a train station. From Abenobashi (阿部野橋) station in Tennoji, take an express train on the Kintetsu line bound for Yoshino (吉野) and get off at Tsubosakayama (壺阪山) station. The train takes about 45 minutes or so from Osaka. Don’t take a limited express train because you’ll have to pay extra money and it really doesn’t save very much time.

Level of difficulty: 2 out of 5 (elevation change ~450m)

Distance: 11km (3 to 5 hours)

This slideshow requires JavaScript.

Mt. Seppiko (雪彦山)

June 4, 2012

Mt. Seppiko is a collection of vertical crags located due north of Himeji city in Hyogo Prefecture. The cliff faces attract rock climbers from all over Japan, while the well-marked hiking path affords breathtaking views into the valley far below.

The hike: From the parking lot, head uphill, crossing the river on a metal bridge until reaching a collection of wooden bungalows. There’s a small campground on your left, and a shack on your right housing the caretaker of the facilities. There’s a box here where you can register your hiking intentions, which is an excellent idea if you’re out on your own. On the left side of the road, just adjacent to the bungalows, you’ll see a steep path heading into the forest via some wooden log steps. Take this trail and prepare yourself for a whirlwind of a climb up to the ridge. There’s really no place to go but up, following the switchbacks and fluorescent pink arrows up, over, and around some rock formations. After an hour of so you’ll reach Izumo Rock (出雲岩), an impressive mass of stone that is extremely popular with expert climbers. If you look up the rock face you’ll see countless rows of anchors bolted into the overhanging face. After passing by Izumo, the path becomes much tougher, as you nagivate through rock outcroppings with the assistance of ropes and chains. Your next rock formation is called Seri (せり岩), which has a jaw-dropping view of the southern half of Hyogo prefecture. The path here traverses through a tight gap in the rocks, and if you’re a bit muscular or heavy set, there’s a good chance you could become stuck. Take your day pack off and push it in front of you. This will make things a bit easier. If you can’t fit through this tight squeeze then simply walk over to the lookout point (見晴らしい岩) and head around to your left and you should find a trail that will bypass this rock. Once past Seri, it becomes a series of manageable rock climbs to the summit of Otenshou (大天井岳), the official target peak for the majority of hikers. Take a rest here and admire the views. From here, the trail drops off the back side of the peak, just behind the shrine. At first the going is easy but you’ll soon reach the top of a rock formation, where a chain will drape off the rocks to the right. Instead of taking the chain, head down the faint trail on the left, which is a much easier and safer alternative. Both trails meet up a little lower on the saddle, so take your pick. Once at the saddle, the path climbs and you’ll soon reach a junction, which is labeled with the signpost A-9. If you’re short on time, then take the trail to the right, which descends very steeply to the valley below. Otherwise, turn left here and stay on the ridge, following the sign that reads Shikagatsubo (鹿ヶ壷). The ridge is pretty gentle, especially considering what you’ve just been through. You next landmark will be at signpost B-4, where the trail splits towards 安富町. Instead of turning left here, go right, following the sign that says 三角点雪彦山. You’ll reach the top of the true summit of Mt. Seppiko in about 20 minutes, but there’s no view to speak of. Continue on the ridge, following the sign that says 峰山方面へ and you will arrive at another peak called Mt. Hokotate (鉾立山), which is the tallest peak on of Mt. Seppiko. Though the south is covered by trees, you’ll have an open view to the north, where you can see Mt. Hyonosen on a clear day. Take a breather here, because you’re about to descend very steeply to the valley below. 5 minutes after leaving the summit, you’ll reach a junction labeled B-8, where you should turn right. The path will ramble along the ridge before hanging a sharp turn at the next signpost (B-9), where it zigzags through a cedar forest to a stream far below. This stream will gradually grow in size the further down the gorge you get, and eventually you’ll reach a series of waterfalls (signpost B-13). The path becomes much more rockier, so be careful with your footing, especially if it’s been raining recently. A few minutes on, you’ll reach rainbow waterfall (虹ヶ滝), which is not signposted but makes a good place for a break. Soon after the waterfall you’ll reach a junction labeled A-14, where the trail from Mt. Otensho will come in from the right. This is where the path meets up from signpost A-9 high on the ridge. Ignore this path and drop down to the river, where you’ll need some creative footwork to cross over the river and climb steeply back up to a junction on the opposite bank of the stream. Follow the broad path that is signposted for  賀野神社, which passes through a beautiful section of deciduous forest that will surely be ablaze with color during the autumn. A few minutes on you’ll reach another junction called  大曲 (A-16). Turn right here and descend back to the river that you left earlier. The path can be difficult to pick up, so look for the pink arrows painted on the rocks and follow the faint outline of a path. A forest road used to come all the way up here a long time ago, and the last part of the path will follow the remainder of that road until reaching a huge concrete dam with some incredible pipework. This is what is known as an “open dam”, which was built not to contain the water but to save the valley from rocks and debris during a mudslide. I’m not sure if the dam could withstand an actual landslide, but you have to admit that it was a creative way for Hyogo Prefecture to use all that money from the central government. Anyway, go down the concrete stairs here and you’ll reach a paved road that will take you back to the parking lot where you started.

When to go: This hike can easily be done year round, but extra care should be taken in the winter, especially when there is snow on the ground. The rock faces can be incredibly slippery, so it’s best to avoid the place in wet weather. Autumn is probably the most scenic time to visit, but expect huge crowds if coming on a weekend.

Access: The bus to the trailhead was discontinued in 2010, so you really need your own transport to complete the hike. The bus, however, does run to within 5km of the start of the hike, so you could always try your luck hitching. From the north exit of Himeji station, take bus #51 bound for Yamanouchi (山之内) and get off at the last stop. There’s one bus at 7:40am, but the next one doesn’t depart until 12:35am, so you can see why having a car will give you a huge advantage. Click here for the Shinki bus website.   

Level of difficulty: 4 out of 5 (elevation change 680m)

Distance: 6km (6 to 8 hours)

This slideshow requires JavaScript.

Mt. Minago (皆子山)

September 17, 2011

Special Note: The ascent trail described below is currently closed to hikers because of a landslide. If climbing the mountain, please go up via the trail outlined for the descent below. (June 2017)

Mt. Minago is the tallest peak in Kyoto Prefecture and one of the most secluded mountains in the Kitayama range. The views of Buna-ga-take and Mt. Horai as well as the lack of people make this a great getaway from the nearby urban Kyoto chaos.

The hike: From the bus stop, walk back up the road the bus just came down. You’ll see an old Japanese house on your right with a rather interesting cherry tree, which is a cross breed between two different species. The river will be on your left and soon you’ll reach the crest of the hill which intersects the main road. Cross the main road (watch out for traffic coming out of the tunnel). Don’t enter the tunnel, but continue on the small paved road on the other side of the road. Soon you’ll reach a concrete bridge. Look for the sign that says “あしびだにはし” on a concrete pedestal just on the right-hand side of the bridge. You’ll see a gravel road branching off to the right just before your cross the bridge. If you look on the electrical pole, you’ll see a sign for “Mt. Minago” spray-painted in red. This is your clue to follow the gravel road and not cross the concrete bridge. The old road follows the river before eventually turning into the trail, where you’ll reach your first set of river crossings. There are wooden planks built across the river to help aid in crossing, but please be careful in wet weather. All of the crossings are clearly marked and some of them have rope to assist you in the traverse. Continue following the river up the valley, paying attention to the blue arrows on the signposts and tape in the trees. Eventually the path will cut off towards the left, following a small mountain stream to its source. The path suddenly becomes quite steep, and your shins and calf muscles will get an unexpected workout. The forest here is really beautiful, and after a half an hour of sweaty climbing you’ll pop on directly on the summit! There’s no ridge hike in this no-nonsense approach. Take a break on top of Kyoto’s highest peak and admire the views across the valley. Buna-ga-take is the peak on the left, followed by Mt. Horai to the right of that. From the summit, the trail becomes a bit tricky to find. Continue on the path for about 20 meters and you’ll see a signpost and arrow for ヒノコ. This is not the trail you want to take, so be careful. Instead, look towards the left and you’ll see a sign marked 寺谷 on a tree. Just beyond this sign the trail will split. You can either go towards the left and descend through the cedar forest, or continue straight ahead on an unmarked trail with a piece of yellow tape. I’m told that the trail to the left is difficult to find and easy to get lost, so take the trail straight ahead. Soon you’ll enter a cedar forest with some really steep switchbacks and colored tape wrapped around most of the trees. This is the 寺谷 course, but you won’t see any signposts. Soon you will drop down to a stream and follow it for around 40 minutes or so, passing by an abandoned mountain hut. The trail will leave the forest, crossing a long wooden bridge made from an old cedar tree, where it meets up with a forest road. Turn left on the road and follow it out to the main road and bus stop at Taira (平). If you’ve got time to kill before the next bus, then there’s a really neat old farmhouse/cafe/shop that sells some organic tea and has light meals. If you don’t want to wait for the bus, then hitching is definitely an option, as I easily flagged down a ride back to Kyoto.

When to go: This hike can be done from March to early December, when most of the snow is gone. A winter hiking is also possible with snowshoes and a GPS device. Watch out for avalanches on the final summit approach. Also, beware of leeches between early June and early August.

Access: From Katata (堅田) station, take bus #50 bound for Hosokawa (細川) and get off at Sakashita (坂下) bus stop. The only convenient bus leaves Katata at 8:45am. Click here for the schedule. Katata is about 25 minutes by local train on the JR Kosei line from Kyoto station.

Level of difficulty: 4 out of 5 (elevation change ~600m)

Distance: 8km (5 to 7 hours)

This slideshow requires JavaScript.

Mt. Buna-ga-take (武奈ヶ岳)

May 23, 2010

photo and text by James McCrostie

The hike described here is an alternative, longer way to climb the Buna-ga-take hike listed in the Lonely Planet hiking guide. This hike begins from Shiga station (志賀駅) near the shores of Lake Biwa and requires one night’s camp in the mountains.

The hike:

DAY ONE: (5-6 hours) Exit Shiga station by turning right to walk back along the tracks in the direction the train came into the station. When you come to the third road that crosses the tracks turn right, cross the tracks, and head up the hill towards Kinoshita Shrine (樹下神社). Turn right when you reach the shrine’s torii gate and follow the hiking course signs. After crossing highway 161 via a pedestrian tunnel you’ll come to a sign-posted path called Kitadaka-michi (キタダカ道) which heads up into the mountains. It takes about 40 minutes from the station to this start of the hiking trail proper. After crossing a small concrete bridge, the trail makes a slow and steady climb up, going around a pair of dams. There are plenty of switchbacks and after about two and a half hours you’ll reach a junction leading to Kido-touge (木戸峠) or to Biwako Alps lodge (びわ湖アルプス山荘) and Biwako valley ski area (びわ湖バレイ). Head towards Kido-touge and after about 20 minutes the trail reaches another junction. This time head towards the 1,051 meter Hira-dake (比良岳) and after about 20-30 minutes there is a stream marked on maps and with a small wooden sign as a water source but it should probably be filtered, boiled or treated before drinking. The rubbish pits around this stream raise the philosophical question when do discarded cans and bottles stop being garbage and start being historical artefacts? Depending on your answer, you might consider bringing an extra garbage bag with you on this hike to pack out some of the rubbish. After reaching Hira-dake continue on the trail to Karatoyama (烏谷山) then Arakawa-touge (荒川峠). Twenty minutes after Arakawa-touge the trail reaches Minami-hira-touge (南比良峠) where you should take the trail down to Kanakuso-touge (金糞峠). From Kanakuso-touge, ignore the trail leading to Kitahira-touge (北比良峠) and follow the trail down towards Yakumo-ga-hara (八雲ヶ原) and Naka-touge (中峠). From Kanakuso-touge you can hear the sound of rushing water and the trail soon begins to follow a stream. Beside this stream, where the trail splits towards Yakumo-ga-hara or Naka-touge, there is an unofficial campsite with several flat areas to pitch a tent. This is also the last good place to get water so make sure you fill all your canteens. There’s no reliable source of good water on day two so you’ll need two days worth. The lack of proper toilet facilities around this unofficial campsite also means you should filter, boil or otherwise treat the water.

DAY TWO:(9+ hours) Following the trail towards Yakumo-ga-hara you’ll crisscross the same stream several times, reaching Yakumo-ga-hara and the now abandoned Hira ski hill after about 40 minutes. Take some time to explore the Yakumo marsh; depending on the time of year you may spot flora such as white egret orchids or fauna including fire-bellied newts or forest green tree frogs. During rainy season these frogs lay large egg sacks in tree branches above ponds. After hatching, the tadpoles fall into the water below. Keep to the boardwalk to avoid damaging the delicate ecosystem and ponder how anyone got permission to build a ski resort essentially on top of it. From Yakumo-ga-hara, it’s nearly an hour and a half to the peak of Buna-ga-take. Initially, it’s a steep climb up to the top of an abandoned ski run, then the trail heads back into the forest. After 30-40 minutes in the forest you’ll pass through a section of the trail littered with old bottles and cans and, not long after, reach the 1,214 meter peak of Buna-ga-take. From the peak, take the Kita-ryou route (北稜) towards Hosokawagoe (細川越) and Tsurube-dake (釣瓶岳) and continue on to Ikuwata-touge-kita-mine (イクワタ峠北峰) which should take about an hour and a half. However, after descending from the top of Buna-ga-take and shortly after passing a rock cairn, avoid taking an unofficial trail that leads off to the left. There is no sign-post marking the start of this unofficial trail and it isn’t marked on the maps but it leads straight down the mountain, reaching highway 367 after 2-3 hours. Itユs poorly marked with red and silver or red-faded-to-pink tape tied to branches and isn’t nearly as well maintained as the main trail. From Ikuwata-touge, avoid the trail going down to Hotorayama (ホトラ山) and take the trail to Sugawa-touge (須川峠), which you should reach after about two hours. A little more than an hour walking will then bring you to the top of the 901-meter Jyatani-ga-mine (蛇谷ヶ峰). If the clouds cooperate you can enjoy views of Lake Biwa and Mount Ibuki. Keep to the trail leading down to Kutsuki-onsen-tenku (くつき温泉てんくう), which takes about an hour and forty minutes from the top of Jyatani-ga-mine. From Kutsuki-onsen-tenku there’s a shuttle bus leading to the Kutsuki-gakko-mae bus stop (朽木学校前) where buses run twice a day to Demachiyanagi bus stop in Kyoto (leaving at 9:30 and 17:00 and taking about 90 min.) and nine times a day to Adogawa station (安曇川) on the JR Kosei line (about 30 min.). Click here for the latest bus schedules and more information about the hot spring

When to go: The most picturesque, though busiest, time is during the autumn when the leaves have changed colour, usually from late October to early November. Only hikers with winter hiking experience and gear should even think about climbing Buna-ga-take in the winter.

Access: From Kyoto (京都) station, take a local (普通) JR Kosei line (湖西線) train bound for Ohmi-Imazu (近江今津) or Tsuruga (敦賀). Get off at Shiga Station, 36 minutes from Kyoto Station.

Map: Hira-Yama-Kei (比良山系) No. 45 in the Yama to Kogen Chizu (山と高原地図) series should definitely be carried by those attempting this hike. It has several alternative approaches and ways off the mountain in case of emergency.

Level of difficulty: 3.5 out of 5 (elevation change ~1000m). Being gradual, the climb to the top itself isn’t too strenuous. However, the second day is fairly long and made more difficult by the lack of water sources. While mountain huts are labelled on maps, most (if not all) are locked and/or abandoned so a tent and cooking gear are required for this hike.

Rokku Gaaden (ロックガーデン)

January 6, 2010

The “rock garden” is one of the most popular hikes in the Kobe area, and is renowned for wild board sightings, as well as incredible views of Osaka and Kobe cities.

Special note: It’s quite easy to get lost on this hike, due to the confusing signpost and plethora of side trails that lead to nowhere. My best advice to you is to stay on the main ridge as much as possible, follow the other hikers, and use your instinct.

The hike: Go out the north exit (北出口) of Ashiya-gawa station, cut through the small concrete plaza directly in front of you and continue climbing straight ahead. Follow the road towards the mountains, keeping the river on your right. Across the river there’s a beautiful Frank Lloyd Wright designed building sitting on the hill. Built in 1924, it’s one of a handful of original Wright buildings still remaining in Japan, and the only one in the Kansai area. After about 5 minutes, you’ll cross a bridge and see a sign in blue letters reading “高座の滝/ロックガーデン with a red arrow point towards the right. Follow this road for a short bit until reaching a fork in the road and a wooden sign with the same Chinese characters as before. This one has a 左 on top, which is the character for “left”. Take the upper road on the left that climbs up and not the flat road on the right. Another 100 meters or so, you’ll see a road going straight with a yellow sign in black letters reading この先行き止まり/Uターンできません。Strangely, there is are no signs telling you where to go, but turn left here and do not go straight. After 10 meters you’ll see a road going straight but keep towards the right, following the overgrown hedges that curve around on the right side. A little further ahead you’ll see a brown sign reading 高座の滝. Continue on the road you’re on and shortly you’ll enter the forest. The trailhead starts at the very end of the road. Don’t cross the metal bridge on your left, but continue straight past a tea shop selling food and drinks. Kouza (高座) waterfall, just behind the teahouse, is considered to be one of the 100 most beautiful waterfalls in Japan. Cross the small rock bridge in front of the waterfall and you’ll immedately start climbing up some steep switchbacks. You’re now entering the ‘rock garden’, a series of large sandstone formations that are suffering from a massive bout of erosion and overuse. After about 50 meters you’ll see a small clearing on your right with a large concrete dam. This is the hangout of the wild boar, known in Japanese as Inoshishi. Sightings are apparently quite common, but in the half a dozen times I’ve done this hike I’ve only managed to see 1 of the elusive creatures. The trail continues straight ahead and is very easy to follow due to all of the scuff marks. There’s an area with metal chains at one point, but it’s not too difficult. While climbing, don’t forget to look behind you and admire the stellar view of Kobe city. The path meanders through the rock formations for about 15 minutes until reaching the bottom of a large electrical tower. Turn right here and follow the ridge, ignoring the spur trails that branch off down the mountain. As long as you continue ascending and follow the most worn path you should be ok. Occasionally you’ll see a signpost pointing you towards Kazafukiiwa (風吹岩), and you’ll pass under another electrical pylon before reaching the summit. On the summit you’ll find (surprise, surprise), yet another electrical tower! If you’re not sterile before the completion of this hike then consider yourself lucky. Drop your pack and admire the incredible views that are only slightly marred by the power lines. If you want to continue on to Mt. Rokko, then take the trail on the other side of the summit. Otherwise, to complete the loop, pass under the electrical pylon and descend to a saddle. Follow the flat trail for a short distance until reaching a trail junction. Turn right when you see the signpost reading 金鳥山保久良神社を経て阪急岡本JR岡本駅。You’ll pass under another electrical tower before descending to a saddle and a 3-way junction. Turn left here, and you’ll start descending through an area of bamboo grass and steep steps built into the hillside. This area was recently clearcut, revealing mouth-watering panoramic views of Kobe below. If you’re lucky you can also catch glimpses of Akashi bridge and Awaji island on your right. Continue descending and eventually you’ll end up back in the city. There aren’t very many sign posts in the lower section of the hike, and I’ve ended up at 3 entire different locations on 3 separate occasions! Wherever you do end up, just head downhill and ask someone how to get to Okamoto station. The entire hike should take around 3 hours or so, which is perfect as an afternoon hike.

When to go: This hike can easily be done year round, but you should avoid the place during periods or snowy or icy weather, as the sandstone scramble can be potentially deadly if you slip on any ice.

Access: From Hankyu Umeda station, take a Limited Express train on the Kobe line bound for Shinkaichi (新開地) and change to a local train at either Nishinomiya-Kitaguchi or Shukugawa stations. Take a local train on the same line to Ashiya-gawa (芦屋川) station, which is one stop from Shukugawa. On the return, you can take a Hankyu train on the same line from Okamoto (岡本)station, which is only one stop from Ashiya-gawa. The price is 270 yen for a one-way ticket.

Level of difficulty: 2 out of 5 (elevation change ~400m)

Mt. Mikuma (三熊山)

July 26, 2009

Mt. Mikuma is a small hill overlooking the coastal resort town of Sumoto on Awaji Island. The small elevation change and outstanding panoramic views make it the perfect afternoon stroll after a morning on the beach.

mikuma1

The hike: There’s a tourist information center at the bus terminal if you’d like to get a basic map or inquire about accomodation options. Walk out the main entrance of the terminal and turn right, heading for the large supermarket just in front of you. This is an excellent place to pick up supplies. You can also marvel at the grass parking spaces! Anyway, continue walking past the supermarket on the main road into town. If you want a little more scenic and quieter approach to the beach, then walk a few blocks towards the sea, where you’ll find a wonderful wooden boardwalk. Cross over the bridge and decent to the beach. This is actually one of nicest beaches in the Kansai area (sans Shirahama), but beware that there are no coin lockers here. (There are a few at the bus station if you’d like to save some money). Otherwise, you can pay 1000 yen at any of the shops on the beach and they’ll keep your stuff and let you have a warm shower. If you want to do the hike first, then walk all the way along the beach until reaching a rather large, modern hotel called the Hotel New Awaji. The hiking path starts just beyond the hotel, on a steep paved driveway. Follow the road to the top of the hill, where you’ll see signs pointing towards Mt. Mikuma. Turn left and follow the paved path as it winds its way through a spectacular forest. Despite the fact that it’s a completely concrete path, the beauty of the flora really makes you forget about this unfortunate truth. If you’re walking in sandals, then you might actually appreciate the grip the path has to offer. Continue climbing and turn left at the first major junction you see. Again, there’s a signpost here, so it’s difficult to get lost. After another couple of switchbacks you’ll arrive at the top of the ridge. Turn left again and the castle will come into view directly in front of you. There’s a hidden parking lot for people who are lazy and want to drive up, but I guarantee that you’ll pretty much have the place to yourself during the summer, as the hot and humid weather will keep most in their fancy hotels below. There’s a shop just below the summit that sells shaved ice and soft drinks. Make your way towards the castle, where you’ll be rewarded with stunning views of the beach below. The castle itself is a concrete reproduction built in 1928, but the castle walls date from the 6th century. The castle is free to enter and has outstanding vistas all the way over towards Wakayama city. If you’re keen to do a little more walking, then you can retrace your steps back towards the paved path, where you’ll find a loop trail over to nishi-no-maru (西の丸). There aren’t any views on that side of the mountain, but it looks like a good place to escape if there are any big crowds near the castle (which there could be in autumn.) Anyway, retreat back to the beach and reward yourself with a refreshing swim. In addition, Hotel New Awaji has two amazing hot spring baths that can be yours for a measly 1800 yen (surely the steepest day-use fee for any hot spring in Japan). There’s plenty of free camping on the beach, or you can shell out the big bucks for the hotel. There’s also a hostel-eque place right on the beach that gets very crowded with groups in the summer.

When to go: This hike can easily be done year round, but the best time is probably the summer, where you can combine the hike with a lovely swim on the beach. In addition, it can be easily done in sandals, eliminating the need to carry an extra pair of walking shoes.

Access: From the Hankyu bus terminal in Umeda, take a bus bound for Sumoto bus center (洲本バスセンター). The bus takes 2 hours and costs 2300 yen (one-way). Click here for the schedule. There are also JR buses leaving from the JR highway bus center (also in Umeda) which cost the same price and take about the same amount of time. Alternatively, you can also take a bus from Sannomiya station in Kobe. Click here for the schedule (click on the PDF file on that page).

Level of difficulty: 1 out of 5 (elevation change 133m)

This slideshow requires JavaScript.


Mt. Ryōzen (霊仙山)

March 30, 2009

Last updated: Sept. 07, 2019

Mt. Ryōzen (pronounced in Japanese as ‘ryouzen zan’), is a spectacular peak located on the eastern shores of Lake Biwa, across the valley from Mt. Ibuki. Despite being only 1000m in height, the mountain is known throughout Japan for its stunning collection of alpine flowers, excellent panoramic views, and broad grasslands reminiscent of the hills of Scotland.

ryouzen1

Warning: The leeches on Ryouzen are brutal, so you should definitely avoid hiking during the rainy season and most of the summer. Perhaps this one is best left for an autumn or spring hike. Also, the waterfall route is currently closed, so use the alternative approach described below.


The hike (waterfall route): (currently closed to hikers)From Samegai station, head out the front door and walk straight for about 20 meters, where a street will branch off diagonally towards the right. You’ll pass a small grocery store on your left side, which is a good place to pick up supplies. Continue walking on the paved road for about 3km or so, following the signs towards the trout farm (養鱒場). It’s an easy, flat walk that should take about 30 minutes or so. Just after passing the bus stop at Kaminyuu (上丹生), the road will curve towards the right, crossing a bridge over the river. Instead of crossing the bridge, turn left and follow a small paved road next to the river, following the sign that says 霊仙登山道. The water is really clean and you’ll find lots of bridges crossing over to houses on your right. Continue walking straight another 1/2 km or so until reaching what appears to be a water treatment plant. Turn right on the forest road just in front of the facility and follow the road to its terminus, where you’ll find the trailhead. The trail starts off gentle, and soon follows a huge dry riverbed. There may be water flowing during the rainy season, but it was bone-dry during my hike in late March. Follow the paint marks on the rocks and the red tape on the trees. After about 20 minutes or so, you’ll see a huge gully coming in from the right, as well as your first signs of running water. This place is called Ichi-no-tani (一の谷). There’s an alternate trail that climbs the gully to the right, but you’ll want to continue hiking straight, along the river. The path will meander through the river, but there’ll be plenty of places to cross if it hasn’t rained lately. Continue past the area marked ni-no-tani (二の谷) and after a short time, the path will start climbing on your right, away from the river. Don’t worry – you haven’t made a wrong turn, as the steep path will rejoin the river a little further along. Soon you’ll reach a trail junction. If the river is swollen, then take the path to the right. Otherwise, take the signpost marked うるしが滝. You’ll immediately pass under a huge boulder, and then follow the river for another 10 minutes or so until arriving at the base of the falls. Drop your pack at the junction, and cross the river towards the left and you can actually go to the base of the falls. This is one of the more impressive waterfalls in the Kansai area, and in old times mountain priests used to pray under its waters. Retrace your steps back to the junction, and take the trail marked 頂上. The path will climb up and over the falls, following the river for a few hundred meters before branching off towards a gully on your right. The trail will become much steeper now, but there are plenty of ropes tied into the mountain to assist you on the ascent. If it’s been raining then the trail will become one ugly, muddy mess, so consider bringing gaiters. There are lots of red tape marks tied to the trees, so it’s easy to find your way. After about 20 minutes, you’ll reach yet another trail junction. Don’t turn right, as it’ll take you back down the mountain. The signpost has 頂上 pointed towards the left, but the actual trail is straight ahead, so don’t get confused. The trail will branch off to the right, following another small gully before popping out on the ridgeline. Turn right once you reach the junction, and you’ll start climbing through bamboo grass. The views will start to open up significantly, as you’ll rise above the tree line. Mt. Ibuki will be on your right, with Hakusan rising just to the right of it. Behind you, you’ll see Ondake, Mt. Norikura, the Chuo Alps, Yatsugatake, and the Minami Alps (if it’s a clear day). Keep climbing straight ahead, where you’ll reach an emergency hut in about 10 minutes. The hut is unstaffed and free to stay in, but there’s no water source or toilets. Continue climbing on the well worn path towards the first rocky peak directly in front of you. At the summit, there’s a trail branching off to your right, but ignore it and continue straight, towards the top. You’ll descent to a huge col and climb up the other side. Once on top, ignore a trail on the left that heads to the high point (最高点) and head to the summit, where the views towards lake Biwa are superb. Retrace your steps back to the junction and turn right to head to the high point. From here, you’ve got a few options, but the best would be to continue on the same trail towards Sasa-tōge (笹峠), which will take about an hour to reach. Another 30 minutes beyond that, you’ll descend to a river and junction. Turn right and make your way along the river to Asefuki-tōge (汗拭峠) and down to the parking lot at Kura-ga-hata (榑ヶ畑). You can try hitchhiking from here, or you can walk down the road for about an hour before reaching the bus stop at the trout farm. All in all, the entire loop should take anywhere from 6 to 8 hours, so be sure to get an early start.

The hike (trout farm route): From Samegai station, take the bus bound for yōsonjō (養鱒場) and get off at the final stop. Follow the paved road that hugs the left bank of the stream, with a large trout farm across the water on your right. It’s a long walk on the paved road for 3.8km to reach the start of the hike. There are a couple of smaller forest roads that branch off the main one, but stay on the main road as it follows the river upstream. After passing by a small parking lot the road turns to gravel and you’ll see a small hand-painted signpost that reads 登山口 just before a bend in the road. Take this route as it leaves the main road and continues following the narrow stream past an area dotted with moss-covered platforms. There used to be a small village here that was abandoned during World War II but now all you’ll find is a small, creepy-looking mountain hut. Pass by the hut and cross the small stream, where you’ll find some cold drinks for sale. There’s an honesty box where you can deposit your money if you’d like to purchase a refreshing (but not necessarily fresh) beverage. The trail climbs steeply from this point, switchbacking a couple of times until reaching Asefuki-tōge (汗拭峠). Turn left here at the signpost marked for summit (山頂). The path continues its steep climb towards the summit ridge, through a magnificent forest that really comes to life in the autumn. The route is very clearly marked and is divided into 7 stagepoints. The views really start to open up when you reach the 5th stagepoint (五合目), and the rock formations here make a great place for a break. If you look above you, you can see the summit ridgeline peeking out above the treeline. Continue straight on and you will soon leave the treeline and switchback through the grasslands to the summit of the first peak on the vast plateau. This is the 7th stagepoint (七合目). The path gradient eases up nicely here, and it’s a wonderful but long stroll through the grasslands to the summit. Keep an eye on time, as the final bus from the trout farm back to Samegai station leaves at 5pm. If you miss this bus, then you need to walk an extra 4km back to the station. Anyway, continue straight on and you will soon pass by a small pond marked by a large wooden shrine gate. From here it’s a steady climb up and towards the right to the crest of the ridge, where the views towards Mt. Ibuki and the Japan Alps really start to open up. Turn right here at this junction for a long drop to a saddle, followed by an even longer climb to the high point (最高点). If you want to save a bit of time on the return, then there’s an unmarked deer trail at the bottom of the saddle. Retrace your steps to the saddle and turn left, continuing left at every unmarked junction. You will eventually reach a small pond, so veer right here and climb back up to the 7th stagepoint (七合目). Retrace your steps back to the trout farm. All in all, it’s a strenuous hike that should take about 6 or 7 hours, depending on your speed.

When to go: This hike can be done year round, but you’ll want to be prepared for winter climbing conditions between December and April. The busiest times are during the summer months when the alpine flowers are in bloom, but you’ll have to fight with the leeches. Autumn and spring offer the most favorable hiking conditions. Be sure to bring a headlamp or flashlight if you happen to get caught out after dark, as the hike is quite long.

Access: From Kyoto (京都) station, take the JR Shin-kaisoku (新快速) on the Tokaido line bound for either Maibara (米原) or Nagahama (長浜) and get off at Maibara. Change to either a local or kaisoku train bound for either Ogaki or Toyohashi and get off at Samegai (醒ケ井) station, which is only one stop from Maibara. It’s a 4km walk to the trailhead, or you can take one of the infrequent buses, which now require advanced booking. Click here for more information.

Level of difficulty: 4 out of 5 (elevation change ~900m)

Total round-trip distance: 15km (6 to 8 hours)

This slideshow requires JavaScript.