Posted tagged ‘Kyoto’

Mt Ryūō (竜王岳)

January 14, 2023

Extra Tips:

A longer path to Ōhara is to take the main ridge from the junction to Mt Amagatake (天ヶ岳) which is one of the 10 peaks of Ōhara. Please note that it is easy to get lost, especially on the far side of the peak, so make sure you have the digital and paper maps. Here is my trip report so you can get an idea of what to expect.

Another good way to end your hike is by having a soak at the baths at Kurama Onsen. There are two bath houses, and I personally recommend the outdoor bath. However, please note that the hot spring is currently closed due to a COVID infection among staff, so double check their website before heading there.

Konze Alps (金勝アルプス)

September 9, 2014

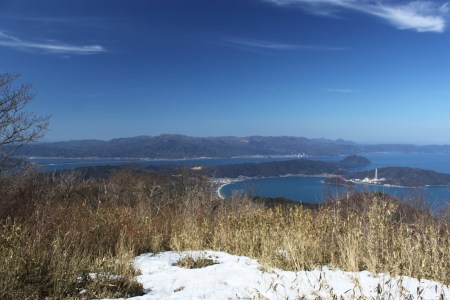
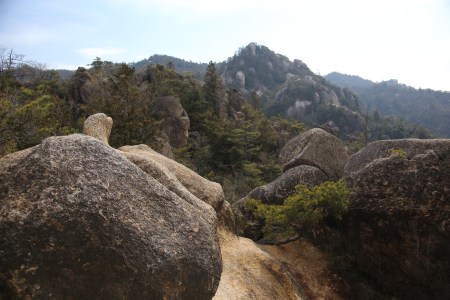
Located near the shores of Lake Biwa in southern Shiga Prefecture, the Konze Alps offers a refreshing escape from the urban sprawl of Kansai. The hike features not only gigantic sandstone formations and ancient Buddhist carvings, but also a chance to experience a forest relatively untouched by human encroachment.

konze10

The hike: From the bus stop, walk up the narrow paved road that runs upstream parallel to the river. The road will soon branch, so turn left and follow the sign to Mt. Tosaka (鶏冠山) and Tengu-iwa (天狗岩). Walk through the parking lot, past the toilets, and up the paved forest road that may or may not have a chain over it. You’ll soon pass by a small pond on your left, followed by another pond a little further along. The trailhead starts just after the second pond and is marked with a white sign reading  落ヶ滝線 1900m 50分. Turn right here and follow the gravel road. You’ll pass by a small lake and log cabin shack before entering the woods. You’ll soon see a small trail branching off to the right, marked by a corroding signpost. Ignore this trail and stay on the main path which will veer towards the left. The route runs next to a small stream that you will follow most of the way up. There are numerous crossings marked by colored tape on the trees. After about 10 minutes or so you’ll cross over a paved forest road, with a trail crossing a bridge on your left. Instead of crossing the bridge, continue straight on, following the sign to 落ヶ滝. After crossing the creek you’ll come to another junction with an trail branching off to your left for Mt. Tosaka (鶏冠山) and 北谷林道. Ignore this trail and follow the trail to 落ヶ滝 which crosses the creek straight ahead. The entire route is marked systematically with yellow metal signs bolted to the trees that read コールポイント. These signs are coded with a numerical system that is used to help with helicopter rescues. Every year, some hikers take a tumble and need to be airlifted out of the mountains, and these signs indicate places where rescuers can safely abseil from the helicopter. Anyway, the route continues weaving back and forth along both banks of the creek for about 15 more minutes until reaching another junction with a trail branching off to the right for 落ヶ滝. Drop your gear here and cross the creek for the short climb up to the waterfall. While the waterfall itself isn’t particularly big, the rock formations and peace of the narrow valley make it a good place to contemplate life. After enjoying the scenery, retrace your steps back to the junction and continue heading up the mountain. After passing by a couple of more rescue points, the views will start to open up towards lake Biwa and Hieizan as you climb towards the ridge. The route starts to flatten out, traversing through a large plateau flanked by massive undergrowth all around. It can be a bit tricky to find the trail in places, so make sure you follow the tape marks on the trees and any signage pointing towards 落ヶ谷 and for 天狗岩. There are several places with ropes to help you up the steeper sections of rock. Eventually you’ll pop out on the main ridge (rescue point #K-7), where a decision will have to be made. If you’re fit and energetic, then I recommend stashing your gear in the woods and turning left for the 20 minute climb to the summit of Mt. Tosaka. The trail is steep and will pass over three false summits before reaching the peak. While the summit is covered with trees, there are a couple of places along the way where you can get views down into the valley below. If that’s not your cup of tea, then you can skip the climb because the best part of the hike lies ahead. Turn right here and follow the signs towards Tengu-iwa (天狗岩), which will take anywhere between 45 minutes and 1 hour to reach. En route you’ll pass by several fascinating rock formations that offer splendid views into the valley below. Watch your footing in dry weather, as the sandstone offers little traction. Just before reaching Tengu, the path will drop down into the forest before climbing steeply up to the base of the rocks. Drop your pack here and follow the red arrows painted on the rocks to climb to the top. It’s an adrenaline-inducing climb with incredible panoramic views and most likely the highlight of the entire hike. When you’ve had enough fun, retrace your steps to the ridge and continue straight along, following the sign for Mimi-iwa 耳岩. You’ll soon find a junction on your left for 十九道ダム, but ignore this and continue straight on. You’ll start to get views back towards Tengu and you’ll also see a rock formation that looks like a giant ear (hence the name, Mimi-iwa). When you reach this rock formation you’ll find yet another junction (there are no shortage of trails in this area). Here another decision will have to be made. If you’re tired, then take the trail to the right marked for Kami-Kiryuu (上桐生). Otherwise, continue on the ridge towards 白石峰 for the climb to Mt. Ryuuou (竜王山), which will take about another half an hour to reach. The path will climb up a series of steps before reaching a junction marked by a giant brown signboard. There is also a box here for hikers to register their hiking plans. Usually these are found at the trailheads, so I have no idea why there is a box sitting here on the top of a mountain. Anyway, turn left here and follow the rolling ridge through an area of pine trees. Soon you’ll reach an ancient Kannon statue carved into a rock called 茶沸観音. After this the route strolls along a relatively flat ridge with nice views out to your right. After 10 minutes or so you’ll reach a clearing with a large flat rock and small shrine, as well as a spur trail to the right for the summit of Mt. Ryuuou (竜王山頂). The top itself has no views to speak of, so it’s better to take a break at this clearing. After this retrace your steps back to the big junction with the brown signboard. Here another decision will have to be made. If you turn left here you’ll follow a route on the spiny ridge that will take you past an ancient Buddhist rock carving. The route is marked as 狛坂線 and it should take you about 90 minutes to loop back to the bus stop. I haven’t done this route to be honest (I was torn between this one and the earlier escape route from Mimi-iwa), so I can’t give you a trail description at this time. What I did was to retrace my steps back to Mimi-iwa and turn left, following the signs to 上桐生. The trail drops steeply off the ridge, with ropes in place to help you down the slippery sandstone scree. After scurrying through the limestone maze, you’ll reach another junction marked 水晶谷 on your left. Ignore this and drop steeply to the right, following the tape marks and signs through yet more boulders. At rescue point T-3 the trail will drop off the ridge to the right and pass through an area of ferns before eventually dropping down to a creek bed. Follow the route as it crisscrosses the creek about a dozen times. Keep your eyes peeled for the tape marks when you’re not sure where the path goes. At rescue point T-6 you’ll reach a campground and then a gravel road. Turn left and cross the wooden bridge that will take you to a paved road. Follow this road for a few minutes until reaching a fork in the road marked by a bust of Johannis de Rijke, the guy who designed the aqueduct from Lake Biwa to Kyoto. The stone dam behind his statue was also designed by him in the Meiji era. Anyway, to get to the bus stop turn right, but if you’ve still got time and energy there’s still one little detour to make. Turn left, following the signs to さかさ観音. After walking about 5-minutes, you’ll see a paved trail on your left that crosses a bridge to a gazebo. Take this and you’ll find the rock carving next to the resthouse. This is unique because the statues were carved upside down. From here, retrace your steps back to the statue and turn left, where you’ll reach the bus stop in about 10 minutes. As you can see, the hike offers a number of different option and there are enough trails in the area to keep you occupied for a while.

When to go: This hike can be done year round, but you need to be wary of ice in the winter months, as the rock formations are slippery enough without the added challenge of frozen water. Summer is hot and humid with a lot of hornets, but the small river makes a good place to cool off the body. Parts of the trail are closed in early autumn (Sept. 19 to Nov. 10 to be exact) to prevent people from stealing matsutake mushrooms, a highly-prized delicacy. The locals are strict with trespassers, so please pay attention to the Do Not Enter signs reading 入山禁止. This is a very popular weekend destination, so try to go on a weekday if you want to photograph the wonderful rock formations without people in the way.

Access: From Osaka or Kyoto stations, take the JR Shinkaisoku (新快速) either bound for Maibara (米原) or Nagahama (長浜) and get off at Kusatsu (草津) station. Go out the ticket gates and turn left towards the East Exit (東口). Go down the stairs on your left and you’ll find bus stop #4 directly in front of you. Take bus #153 bound for Kami-Kiryuu (上桐生) and get off at the final stop. Click here for the schedule.

Map: Click here

Level of difficulty: 4 out of 5 (elevation change ~500 meters)

Total round-trip distance: 12km (5 to 7 hours)

This slideshow requires JavaScript.

Mt. Yura (由良ヶ岳)

March 16, 2013

Rising from the mouth of the Yura river in northern Kyoto Prefecture, Mt. Yura is a fantastic day hike for those looking for wonderful ocean views on one side, and a sea of mountains on the other.

yura9

The hike:  When exiting the train, give your ticket to the train driver, cross the overhead pedestrian bridge, and exit the station, checking the return train timetable before leaving. There’s a restroom on your left as you exit the station, along with some benches where you can eat lunch or organize your gear. From the station, walk straight on the paved road in front of you, turning left at the first intersection you come to (about 50 meters from the station). After passing by the elementary school, take your first left, following the signpost that says Kokumin-shukusha (国民宿舎). Cross over the railroad tracks and continue following the road straight towards the peak. Mt. Yura looks intimidating from this angle, as the peak rises abruptly directly above. Take it one step at a time and you should be fine. When you reach the Kokumin-shukusha (a tan building with a red tile roof), turn right on the road behind the building. Here you’ll find a small shelter and the start of the trail. The path is divided into 10 stages (or 6 stages if you follow the larger signposts). The path is blocked by a steel fence used to keep deer out of the village. Unlock the gate, enter the path, and don’t forget to relock the gate behind you. The first part of the route is extremely eroded, with deep head-high ruts riveted out of the sandstone. Follow the channel up for about 20 minutes until reaching a false ridge (it’s a secondary ridge that will lead you to the real climb). Your next landmark will be a spur trail with a signpost marked for water (水). There is a stream where you can get water, but you’ll need to descend down to a valley to get it. Anyway, unless you’re really thirsty, ignore this trail and continue the climb. A short time later, you will arrive at the 4th stagepoint (4合目), which is a great place to take a break. Just off the path on your left, you can see the remains of a charcoal kiln which was used to make charcoal in the old times. From here, the real start of the climb begins, as you’ll enter a cedar forest with steep switchbacks. You’ll cross a dirt forest road twice (be careful with the crossings – they’re not well-marked). The views towards the sea will start to open up behind you, so don’t forget to look back every once in a while to admire the scenery. Eventually you’ll reach another water source labeled Ippai-mizu (一杯水). The water is a short walk to your left, but wasn’t much more than a trickle when I visited in March. Take another quick break here. You’re almost on the ridge, but the steepest part of the hike is yet to come. After leaving the water source, follow the switchbacks through the deciduous forest until popping out on the ridge. From here, the walk becomes much easier and more pleasant, as your walking on a stellar ridge with beautiful foliage. Turn right when you hit the junction, following the spine of the mountain to Nishi-mine (西峰), the highest point of Mt. Yura. It should take 10 to 20 minutes of gentle walking to reach the summit, where you’ll have amazing views of Amanohashidate and Kunda bay, with it’s wonderful crescent-shaped beach. You’ll also see a dubious-looking power plant run by Kansai Electric company. Apparently it’s an “energy research center”, but who knows what they’re doing at that place. I really hope they are properly disposing of their waste and not dumping it in the scenic bay. After soaking up the views, retrace your steps back to the junction, and continue on to Higashi-mine (東峰), which is a short but steep climb. The views from here are much better than from the other peak, with panoramic views of the sea, Mt. Aoba, Hakusan and the Japan Alps (clear days only), as well as just about every peak in Kyoto and Hyogo Prefectures. You’ll find a small shrine and jizo statue on the summit. This would be a pretty impressive place to camp if not for the lack of water and toilet facilities. When you’ve had enough of the views, simply retrace your steps all the way back to the train station. Be sure to time your descent to coincide with the train departure times. There’s not much to do in the town if you’ve got an hour to kill before the next train.

When to go: Due to the extreme heat of the Kansai region, this hike is best avoided in the summer months of July and August unless you want to die of heatstroke. Winter is also a challenge due to the generally poor weather, frigid winds, and deep snow drifts. The best time to hike is either spring (mid-March to late May) or autumn (mid-September to late November). A good way to break up the hike might be to stay at the Kokumin-shukusha at the trailhead, which costs ¥ 6700 with 2 meals. Here is the website.

Access:  Although a bit tricky to access, it can be done as a day hike from Osaka if you get an early start. The best (and cheapest) way is to take a highway bus from Hankyu bus terminal in Umeda to Nishi-Maizuru (西舞鶴) station. From there, change to a train on the Kitakinki Tango railway (located in the main JR station on the first floor) bound for Miyazu (宮津) or Toyooka (豊岡) and get off at Tangoyura (丹後由良) station. The train takes about 15 minutes and costs 310 yen. The bus takes about 2 hours, depending on traffic. There are also buses from Sannomiya in Kobe and from Kyoto station. Click here for the bus schedule and here for information on the train line. You can also access Nishi-Maizuru by train from Kyoto (90 minutes by limited express train).

Map: Click here

Live web cam: Click here

Level of difficulty: 4 out of 5 (elevation change 640 meters)

Distance: 8km (3-1/3 to 5 hours)

This slideshow requires JavaScript.

Mt. Minago (皆子山)

September 17, 2011

Special Note: The ascent trail described below is currently closed to hikers because of a landslide. If climbing the mountain, please go up via the trail outlined for the descent below. (June 2017)

Mt. Minago is the tallest peak in Kyoto Prefecture and one of the most secluded mountains in the Kitayama range. The views of Buna-ga-take and Mt. Horai as well as the lack of people make this a great getaway from the nearby urban Kyoto chaos.

The hike: From the bus stop, walk back up the road the bus just came down. You’ll see an old Japanese house on your right with a rather interesting cherry tree, which is a cross breed between two different species. The river will be on your left and soon you’ll reach the crest of the hill which intersects the main road. Cross the main road (watch out for traffic coming out of the tunnel). Don’t enter the tunnel, but continue on the small paved road on the other side of the road. Soon you’ll reach a concrete bridge. Look for the sign that says “あしびだにはし” on a concrete pedestal just on the right-hand side of the bridge. You’ll see a gravel road branching off to the right just before your cross the bridge. If you look on the electrical pole, you’ll see a sign for “Mt. Minago” spray-painted in red. This is your clue to follow the gravel road and not cross the concrete bridge. The old road follows the river before eventually turning into the trail, where you’ll reach your first set of river crossings. There are wooden planks built across the river to help aid in crossing, but please be careful in wet weather. All of the crossings are clearly marked and some of them have rope to assist you in the traverse. Continue following the river up the valley, paying attention to the blue arrows on the signposts and tape in the trees. Eventually the path will cut off towards the left, following a small mountain stream to its source. The path suddenly becomes quite steep, and your shins and calf muscles will get an unexpected workout. The forest here is really beautiful, and after a half an hour of sweaty climbing you’ll pop on directly on the summit! There’s no ridge hike in this no-nonsense approach. Take a break on top of Kyoto’s highest peak and admire the views across the valley. Buna-ga-take is the peak on the left, followed by Mt. Horai to the right of that. From the summit, the trail becomes a bit tricky to find. Continue on the path for about 20 meters and you’ll see a signpost and arrow for ヒノコ. This is not the trail you want to take, so be careful. Instead, look towards the left and you’ll see a sign marked 寺谷 on a tree. Just beyond this sign the trail will split. You can either go towards the left and descend through the cedar forest, or continue straight ahead on an unmarked trail with a piece of yellow tape. I’m told that the trail to the left is difficult to find and easy to get lost, so take the trail straight ahead. Soon you’ll enter a cedar forest with some really steep switchbacks and colored tape wrapped around most of the trees. This is the 寺谷 course, but you won’t see any signposts. Soon you will drop down to a stream and follow it for around 40 minutes or so, passing by an abandoned mountain hut. The trail will leave the forest, crossing a long wooden bridge made from an old cedar tree, where it meets up with a forest road. Turn left on the road and follow it out to the main road and bus stop at Taira (平). If you’ve got time to kill before the next bus, then there’s a really neat old farmhouse/cafe/shop that sells some organic tea and has light meals. If you don’t want to wait for the bus, then hitching is definitely an option, as I easily flagged down a ride back to Kyoto.

When to go: This hike can be done from March to early December, when most of the snow is gone. A winter hiking is also possible with snowshoes and a GPS device. Watch out for avalanches on the final summit approach. Also, beware of leeches between early June and early August.

Access: From Katata (堅田) station, take bus #50 bound for Hosokawa (細川) and get off at Sakashita (坂下) bus stop. The only convenient bus leaves Katata at 8:45am. Click here for the schedule. Katata is about 25 minutes by local train on the JR Kosei line from Kyoto station.

Level of difficulty: 4 out of 5 (elevation change ~600m)

Distance: 8km (5 to 7 hours)

This slideshow requires JavaScript.