Posted tagged ‘Tohoku’

Oirase Stream (奥入瀬渓流)

October 23, 2013

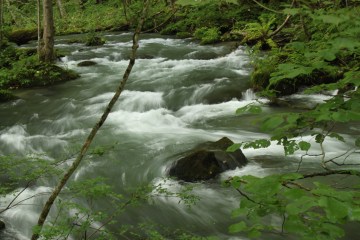
Oirase stream is one of the most popular places in Japan to view autumn foliage. The flat 14km walk along the entire gorge is filled with soothing rapids and a couple of majestic waterfalls. The only downside is the paved road, which runs the entire length of the walk.
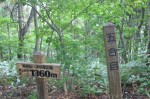
oirase1

The hike: From Yakeyama bus stop, walk out to the main road and walk away from the post office and gas station towards the gorge. Walk past Oirase Keiryu hotel and you’ll see a big signpost for 奥入瀬湧水館. The trail starts just to the left of this signpost. Your first target on the long walk will be Ishigedo (石ヶ戸), about 4.6km away on a well-marked path. The trail soon reaches a paved road, where you should turn right and walk towards  Deai-bashi. Before crossing the metal bridge over the river, you’ll see the path dive back into the forest on your left. About 2km in, you’ll reach a small hut that houses a public toilet. Use the facilities now, because the next toilet isn’t until Ishigedo. The path alternates between the beautiful forest and the ugly paved road. This is one hike where you really need to worry about being hit by a car or tour bus! At the 4km mark you’ll reach a paved road. Cross the road and duck back into the forest, following the wonderful rapids of the swiftly moving stream. Eventually you’ll reach Ishigedo, which is marked by a toilet hut and small restaurant. It should take about 90 minutes from Yakeyama to this point. This is where the majority of people start the hike, so be prepared for a large increase in numbers of tourists. If you’re short of time then you can consider starting from here and skipping the section from Yakeyama, but the first part is a nice warm-up and you’ll appreciate the lack of people. 
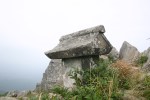
The next signposted landmark is Kumoi falls, which should take about 45 minutes or so to reach. The trail passes through some areas of photogenic swift-moving rapids before passing by some rock formations known as Makadoiwa (馬門岩). There’s a bus stop here if you’re feeling lazy or the legs are starting to give out. Soon after passing by the rocks, you’ll cross over the stream on the concrete bridge and follow the right bank of the river for a while. (up to this time you will have been on the left bank the entire time)  You’ll pass through another area of rapids (signposted as 飛金の流れ) before reaching a small waterfall marked 千筋の滝, which is little more than a trickle. Soon you’ll cross over the road and be back on the left bank of the stream, arriving at Kumoi falls after about 100 meters. Take the path on the left that crosses the main road and leads up to the falls. It’s definitely worth the short side trip, as this is the biggest waterfall in the entire gorge. After sufficient photos snapped, retrace your steps back to the main trail and turn left, where you’ll soon reach another waterfall named 白布の滝. This is a nice waterfall on the other side of the river on your right that drops straight off a cliff. After passing through another area of rapids, you’ll see your first signposts indicating the distance to Tamadare falls. After passing by the bus stop for Kumoi no nagare, you’ll reach a public toilet at Tamadare falls. The waterfall itself is on the opposite side of the road and is nothing more than an unimpressive trickle, so don’t waste your time climbing up to the main road to see it. Stay on the main path and you’ll pass by another trickle of a waterfall (白絹の滝) before reaching Shiraito no taki (白糸の滝), which is very impressive but unfortunately on the other side of the river. Soon after you’ll reach Furou falls (不老の滝), which is also nice but kind of difficult to see through the trees on the right bank of the stream. After passing by more rapids, you’ll reach another unimpressive trickle of a fall called 姉妹の滝, before crossing over the river on a wooden bridge. A few minutes after crossing, you’ll see a signpost for 九段の滝, which is accessible via a spur trail on your right. This waterfall is really nice since you can get relatively close to it. Retreat back to the main route and turn right.  After crossing over the river again, you’ll reach the largest and most popular waterfall in the entire park (Choshi falls).

The waterfall is actually reminiscent of a concrete fall, but I’ve been told that it is completely natural. Climb the stairs just to the left of the fall and continue walking upstream. The next part of the route is closed, which means you’ll have to walk on the main road for a little while. On the right side of the road, you’ll see a signpost for 五両の滝, accessible via a small trail that dives into the forest on your right. After checking out the fall, retrace your steps and continue on the main road for a short time until reaching the continuation of the trail on your right. From here to the end you’ll stay in the forest, where you’ll soon pass by a concrete dam! This is used for hydroelectric power and flood control, and the water just behind the dam is incredibly clear and beautiful. From here it’s a straight shot to the main road, where you should turn right and cross over the concrete bridge and arrive at the bus station and ferry terminal of Nenokuchi (子の口). There’s a restaurant here that serves tasty food on the 2nd floor, with a souvenir shop below. You can either catch a bus out to Aomori, Hachinohe, or to Lake Towada. A more scenic option for those heading to the lake is to take the sightseeing boat, which takes 50 minutes (1400 yen) to reach Yasumiya, the main tourist village of the lake. The boat is great because you can see scenery that you would otherwise miss.

When to go:  As this is an extremely popular walk, aim to go on weekdays between early June and late September. Oirase is one of the most popular places in Japan for autumn leaves, so avoid the peak season in October at all costs (unless you want to share the the trail with hundreds of other people). Winter is also an option if you’ve got snowshoes.

Access: From either Aomori or Hachinohe stations, take a JR bus bound for Lake Towada and get off at Yakeyama (焼山) bus stop. The bus from Hachinohe takes about an hour and a half. Another option would be to base yourself at Lake Towada (staying at Lake Towada Backpackers) and take a bus from Lake Towada (40 minutes, 1210 yen).  Click here for the bus schedule

Level of difficulty: 1 out of 5 (elevation change ~100m)

Distance: 14km ( 4 to 5 hours)

This slideshow requires JavaScript.


Mt. Himekami (姫神山)

September 25, 2010

Mt. Himekami is a inverted wedge-shaped peak situated roughly 20km north of Morioka city in Iwate Prefecture. The views of Mt. Iwate and the alpine flora make this area a hit with locals throughout the year.

The hike: From the parking lot, head up the trail past the toilet block of the small campground. After around 5 minutes you’ll enter the forest and cross the dirt forest road. This is where the trailhead proper starts and where the taxi driver will drop you off unless you say otherwise. The path is well-trodden and easy to follow. Meander through the cedar forest for a few minutes or so and you’ll come to a large cedar tree and a water source on your right. Please note that as of August 2010 this water is unsafe to drink, and there are signs in Japanese warning hikers not to do so. This is the only water source on the mountain, so make sure you fill up at the parking lot before you start the hike! Anyway, from here the trail parallels the stream, traversing a steep area with lots of wooden steps built to help prevent erosion. Eventually you’ll reach the 5th stagepoint (五合目), a good place to take a break. The path continues its steep ascent with even more steps (reinforced with concrete, no less) to assist in your effort. After 10 minutes of sweaty climbing, the route abruptly turns right, traversing the side of the mountain until reaching the 8th stagepoint (八合目). Be careful of this traverse in the winter/spring if the snow is unstable. From the 8th stagepoint, the best part of the hike awaits, as the alpine flowers will now start appearing in the rock formations around the trail. Although steeper than before, this really is very pleasant hiking, especially due to the lack of boring wooden steps! You’ll still be in the treeline, so it’s difficult to gauge how far you need to go, but don’t give up. In around 20 minutes you’ll reach a junction. Either path will lead you to the summit, but I highly recommend taking the right fork, as there’s a fantastic section of boulder-hopping that awaits. The forest turns into brush pine as the views really start to open up. Mt. Iwate towers over everything else around, and if visibility is good you can even see Mt. Chokai way off in the distance. Mt. Hayachine will be due east as well. Keep hopping over the rocks for about 5 minutes, turning left to reach the summit. Take a break here and admire the spectacular scenery. If you’re hiking in the winter you might want to avoid the right fork and just stay left for the easy zig-zag route to the top. You can take this trail on your way back down if you like as well. All in all, it should take around 90 minutes to reach the summit from where the taxi dropped you off. From the summit, simply retrace your steps back to the parking lot. There’s also another trail called the kowazaka route (こわ坂コース) that’ll also take you back to where you started, but it involves a long walk on a forest road to get you back to the parking lot. There’s also another trail that heads southwest from the summit that leads to the Shironai (城内) trailhead, a longer, less popular approach. I personally haven’t used that route so I unfortunately can’t offer any advice on that approach.

When to go: This hike can be done from April to November without too much trouble or effort. Bring a pair of crampons/snowshoes and watch out for the boulders on the summit if attempting this hike in the winter. Click here to see the beautiful winter scenery.

Access: Please note that there is no public transportation to the trailhead, but you can affordably take a taxi. From Morioka station, take a train on the exotic-sounding Iwate Galaxy Railway (Iwate Ginga Tetsudo in Japanese) bound for Metoki (目時) and get off at Koma (好摩) station. The train takes around 25 minutes. From there, tell the taxi driver to let you off at Ipponsugi Tozan Guchi (Ipponsugi trailhead). The driver will probably try to take you up the forest road to the actual start of the hike, but ask him/her to let you off at the shuushajou (parking lot) because there’s a toilet and water source there. The taxi should cost around 3000 yen. If there’s no taxi waiting at the station, then call 019-683-2311 in Japanese and tell them you are at Koma station and want to go to Himekami san.

Map: Click here

Level of difficulty: 2 out of 5 (elevation change ~600m)

Mt. Adatara (安達太良山)

February 14, 2008

Mt. Adatara is an active volcano located across the valley from Mt. Bandai and is just a stone’s throw from Fukushima city. Beautiful rock formations and a lovely hut to boot.

adatop

The hike: From the ski resort parking lot, head toward the right hand group of buildings and start walking up the far right ski slope. The trail will branch off to the right and follow the ski resort for a short time before reaching a forest road. The trail crosses the road several times before heading up to a ridge and flattening out somewhat. All of this should take about 45 minutes or so. Continue following the gentle trail for another 15 or 20 minutes until you come to a junction. If you head left you follow a different ridge, but instead continue straight ahead for another half hour and you’ll come to the Kurogane Hut (くろがね小屋)This hut is open all year round and is an amazing place to stay in the winter. Plus, it has a hot spring bath! If you’re only coming for a day trip then take a quick break at the hut before starting the real climb to the summit. From the hut, the trail starts climbing rather steeply through rugged volcanic tundra. It should take anywhere from 45 minutes to an hour to reach the summit. If the fog is in then keep an eye out for all of the paint marks on the rocks. Whiteout conditions in winter can be quite dangerous, so go with a group and bring bamboo poles to mark your path. The rocky summit offers spectacular views of the surrounding scenery: Mt. Bandai directly in front of you, Mt. Iide to the northeast, and Mt. Azuma, which is connected to this mountain by a long trail. (It could make for an interesting trek). Anyway, enjoy your lunch with hoards of other hikers who probably came up from the ski gondola on the other side of the mountain. If the weather is good and you’ve got time, you can hike to Mt. Tetsuzan, the true high point of the volcano, and there is a free emergency hut just beyond the summit of Tetsuzan. From the summit, follow the signs to Mt. Yakushi (薬師岳)and the ski resort. This side of the mountain is much easier (and more popular) than the route mentioned here, but makes for a nice look hike. You should reach the top of the ski resort in about 45 minutes from the top. If you’re too tired, then take the gondola down, but otherwise follow the path down back to the parking lot. In winter, you can glissade down the slopes in record time. This hike can also be done in reverse, and you could also use the gondola to cut out 400m of elevation gain.

When to go: This hike can be done year round, but be prepared for meters of snow in the winter (bring snowshoes or crampons). The fall colors in mid to late September bring the crowds.

Access: From Fukushima station, take a local JR train and get off at Nihonmatsu (二本松) station. From there take a bus to Adatara Kogen Ski Resort. Be sure to check the bus schedule (call 0243-23-0123 in Japanese), as some buses only go part of the way to Dake Onsen. It’s a quick 20 minute taxi ride or possible hitch from the Onsen, or you could shell out about 5000 yen for a taxi ride from Nihonmatsu all the way to the trailhead. It also appears that there is a shuttle bus from Koriyama station as well, but service has been suspended because of the 2011 Tohoku earthquake. Click here for more information.

Level of difficulty: 2 out of 5 (elevation change: 760m)