Posted tagged ‘NIhyakumeizan’

Mt. Ashitaka (愛鷹山)

February 27, 2016

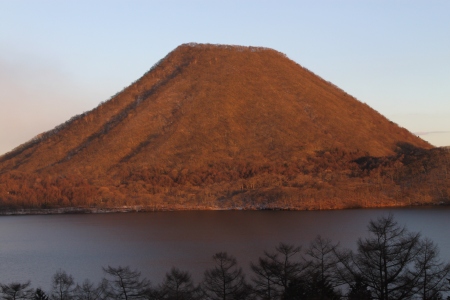
The Ashitaka mountain range sits on the edge of Fuji city just a short distance south of Mt. Fuji itself. The route described here offers the best unobstructed southernly views of Mt. Fuji from any mountain in Japan, as well as allows hikers to experience a taste of the deciduous hardwood forests that once covered the entire land.

IMG_8570

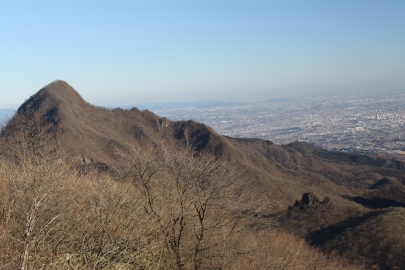
The hike: The bus stop is just off route 469, so after exiting the bus, walk out to the main road and turn right (in the opposite direction from which you just came). You’ll soon see a soba noodle shop on your left (on the opposite side of the road). Walk down the paved, 2-lane road for about 10 minutes and you’ll reach the trailhead on the left side of the road. It’s marked by a large parking lot and wooden shelter housing the toilets. There’s a large grassy area here as well, which is a good landmark that you’ve reached the right place. Just to the right of the toilets you’ll see the trailhead marked by a wide trail with wooden log steps built into the hillside. The trail pretty much goes straight up, with very few switchbacks in sight. You’ll see a large TV antenna at the top of the hill in front of you. The trail will go right past that, so you can use that as a visual indicator (though it’s nearly impossible to get lost, as there’s only one way to go, and that’s up!) If the weather is good you’ll have an amazing view of Mt. Fuji directly behind you. At the top of the hill just below the antenna you’ll find a small observation deck which makes a great place for a short break. The grassy area just below this lookout point makes for a great picnic area. In fact, if you’re nursing a hangover or just don’t feel up for a big hike, it’d be a great place to kick back and relax for the afternoon before descending back the way you came in time for the last bus. Anyway, if you’re still keen on hiking then continue up the trail past the antenna and helipad and you’ll pass through an area of bamboo grass with excellent views of the Minami Alps if the weather is good. A few minutes on, you’ll pass by another antenna (this one sits on top of a green building) before entering the forest and commencing the steep climb towards the ridgline. It should take about 10 minutes to reach Umanose Miharashidai (馬ノ背見晴台), which is the halfway point in terms of horizontal distance. You’ve still got quite a lot of vertical elevation change ahead of you though. There are a couple of picnic benches here if you feel inclined to take a break. Just don’t rest too long, as the last bus back to Gotemba is at 6:09pm. From here, you’ll enter a root-infested trail that is suffering from a nasty bout of overuse. There are several different paths to follow, each in varying states of erosion. Take your pick and enjoy the moss-covered volcanic scenery of the hardwood forest. If the winds are blowing from the north, then don’t be alarmed if you hear the sound of elephants and lions. No, your mind isn’t playing tricks on you: there is a safari park located at the base of the mountain. Likewise, if you hear artillery fire, then rest assured that you’re not under attack, as there’s a military firing range also at the foot of the mountain. Anyway, the trail really starts to steepen here, and it should take about 40 minutes of continuous climbing before reaching another small viewpoint called Heitanchi (平坦地). This is your last chance for unobstructed views of Mt. Fuji, so be sure to take plenty of photos (or use your imagination if the cloud is in). The final part of the climb is ahead, so brace yourself for the relentless 200-vertical meter push to the summit. The path steepens once again, as the forest grows thicker and more beautiful with each advancing step. In the winter you can get nice views of Mt. Fuji between the bare tree branches, which can make for some really artistic shots. Once again there are two or three different heavily-eroded paths to choose from, so take your pick and keep up the vertical elevation gains. After a heavy rain the trail will likely be one giant mud pit, so bring gaiters if you want to keep your hiking pants from getting muddy. It should take around a half an hour to reach a trail junction for Sekotsuji (勢子辻). Ignore this trail and push on to the summit of Mt. Echizen (越前岳), the highest point of the Ashitaka range. Although the views of Mt. Fuji are obscured by tree cover, you’ll have mouth-watering vistas of Tsuruga bay and Fuji city directly below you. Take a break here on one of the picnic benches dotted on the summit plateau.  You’ve got a couple of choices from here. If you’re running short of time, then consider retracing your steps back to the bus stop, as it’s the fastest and shortest way off the mountain. If you’ve still got the time and energy, however, you can traverse over to Kuro-dake and down to Yama Jinja Shrine, which will take about 2 hours to reach. Keep in mind that the last bus is 6:09pm from Ashitaka tozanguchi bus stop, which is a 10-minute walk from Yama Jinja. To reach this trail, find the small red-bibbed Jizo statue on the far side of the summit (just behind the picnic tables) and follow the path that leads away from the top (with Mt. Fuji on your left).  Don’t take the trail marked for Yobiko Dake, as it’s in the wrong direction. The path to Kurodake a lovely ridge walk with a relatively gentle descent through a tranquil forest. The route is signposted in a couple of places with the kanji for  黒岳・大沢, so just stick to the ridge with Mt. Fuji on your left. Your first landmark will be Fujimidai (富士見台), which has a nice view of Mt. Fuji. There’s a strange 2-meter tall aluminum tripod here that is incredibly unstable. Apparently it has been set up so that photographers can climb up and set their cameras there to capture the view above the trees. This spot was is known as the location for the photo that once graced the back of the 5000 yen bill in the pre-war years of the Taisho era. The trail continues to the left of this tripod and will traverse along the ridge past a couple of precarious drops on your right that are marked with Caution signs. Stay away from the edge of the crumbly ridge on your right, as at least one person has tumbled from there. Push on for another half hour or so until reaching Nokogiri Dake Tenboudai Viewpoint (鋸岳展望台) on your right just off the main trail. There’s a wonderful vista of a jagged, insanely-precarious sabertooth ridge that is currently off-limits to hikers, and for good reason, as parts of the ridge have completely eroded away. From here, the trail will drop through some bamboo grass and reach a deep trench that also doubles as the hiking trail. A detour route has recently been created that parallels the gully, so take your pick as they both meet up further down the ridge. There’s one tricky point at the end of the gully where the path appears to verge to the right on a wide path that appears to be a road. Stay left here and keep following whichever trail has the most erosion and you’ll be ok. You’ll really start to lose altitude now, and the native hardwoods will give way to a farmed cedar plantation that will block out most of the natural light. It’ll take another 15 to 20 minutes to reach a junction called Fujimi Touge Path (富士見峠), where a decision will have to be made. There’s a bus leaving at 4:49pm and the last bus is a 6:09pm. You can make it to the bus stop in about 45 minutes from here if you really push it (and ignore the side trip to Kurodake). If you have the time and energy, however, and want to get one final look at Mt. Fuji, drop your pack here and head up to the summit of Mt. Kuro, which reputedly has a pleasant vista of everyone’s favorite stratovolcano. Allow yourself about one hour for the return trip. I did not have time for this side trip, so if anyone does venture up there please let me know about the trail conditions and if the vistas make it worth it. From Fujimi Touge , the trail finally leaves the ridge for the steep descent to the bus stop. The path drops steeply for a couple of minutes before reaching a free, unstaffed mountain hut that looks more like an abandoned shack than a place to stay. There’s a small water source in the gully just below the shelter that was little more than a trickle in the winter. The hut has room for about 3 people comfortably, but it would make for a nice place to stay if you wanted to climb up for the sunrise from Mt. Kuro. Cross over the gully to the toilet shack on the other side, where the path continues its traverse. After a gentle climb you’ll reach the base of two short ladders that can be slippery in wet weather, so use caution. From here, the trail traverses through an area of rockfall (marked with a sign in Japanese reading 落石) before descending into a moss-covered cedar forest that wouldn’t look too out of place on Yakushima. Continue climbing down until reaching a moss-covered concrete dam. Cross the gully below the dam and the trail will continue on the other side and after a few more minutes you’ll reach a small shrine and a paved forest road with a small parking lot. Turn left here and it’s a 10-minute, 1km walk along the road to the bus stop. When you reach the main road, you’ll see the bus stop on your right but be careful – this is the bus stop in the opposite direction. Cross the road and walk down a little towards your right and you’ll see a sign with a cute little “Q” in white letters on top of a red illustration of Mt. Fuji. You can either take a bus back to Gotemba or Mishima station (though there’s only one bus to Mishima in the afternoons, leaving at 4:59pm). You could also try your luck hitching, as the road gets steady traffic on weekends. The entire hike should take between 4 to 6 hours, depending on your speed. If Mt. Fuji is visible then it’ll probably take closer to 6 hours for the hike, as you’ll be stopping every 50 meters or so to snap another photo of the iconic cone.

 When to go: This hike can be done year-round, but you’ll need crampons anytime there is snow on the mountain, as it can get quite icy. Winter provides your best chance of seeing snow-capped Mt. Fuji. The autumn colors are also splendid on the mountain, so aim to go in late October if you can. Summer can be incredibly humid and downright miserable, so it’s better to do it before June when the humidity really starts to settle.

Access: From Tokyo, take a train on the Tokaido line to Kozu (国府津) and change to the Gotemba line. Get off at Gotemba (御殿場) station. Go out the ticket gates and turn left, going down the stairs on the “Mt. Fuji side” of the station. The stairway splits at the landing halfway down, so turn left and go to the bus rotary in front of you. The bus for the trailhead leaves from bus stop #4 (it’s the bus stop on the island in the middle of the rotary). Take a bus bound for Jūrigi (十里木) and get off at the final stop. It takes several hours to reach Gotemba station by train, so make sure you’re in time for the 10:50am bus or you won’t have time to do the hike before nightfall. You could also get to Gotemba by bus from Tokyo or by the Odakyu line from Shinjuku (get off at Shin-matsuda station and then walk to Matsuda station on the Gotemba line and continue by train to Gotemba). Alternatively, you could take the Shinkansen to Odawara station and then a local train to Kozu and then to Gotemba.  Click here for the bus schedule.

Level of difficulty:  3 out of 5 (elevation change ~700 meters)

Total round-trip distance: 7.6km (4 to 6 hours)

This slideshow requires JavaScript.

Mt. Haruna-fuji (榛名富士山)

November 24, 2013

Just as the name implies, Haruna-fuji is a miniature version of Mt. Fuji, with views of the real Fuji from the summit on clear days. Although the top has been wrecked by the addition on a gondola and a TV antenna, the hike through the wonderful bamboo-grass lined deciduous forests is highly recommended.

030

The hike: From the bus stop, be on the lookout for the visitor’s center, a long, low rectilinear building that has basic information about the mountain. To the left of the visitor’s center is Haruna Lodge, a good place to grab some lunchtime noodles. The trailhead starts just to the right of the visitor’s center, across the paved road. Look for the sign that says 榛名富士登山口. If you got off the stop in front of the gondola, then walk on the paved road to your left (towards the lake), and you’ll find the trailhead on your right. The route is incredibly easy to follow, and if you’ve gone during the week, you’ll likely have the place to yourself. Though the maps say to allow 1 hour to reach the top, if you’re quick and don’t take any breaks, then you can make it in about 40 minutes. The trail is lined with bamboo-grass and verdant foliage. The lack of cedar trees is will be refreshing to those of you used to hiking around the rest of Kanto. The views really open up once you hit the summit plateau, but unfortunately you’ll be staring right at the large building housing the machinery for the gondola. There’s a restroom and vending machine here. Walk past the gondola and turn left, climbing the wooden steps towards Haruna shrine, which sits on the true summit of the mountain. You’ll have wonderful views from here, even if you have to share it with heel-toting tourists who took the easy way up. From the summit, head down the path just to the left of the shrine.  The path is marked as Yusuge Motoyu (ゆうすげ・元湯. The route is incredibly steep, so be careful during the cooler months when there is ice and snow on the path. Despite the gradient, the trail is easy to follow, and it will spit you out behind Hotel Yuusuge in about 30 minutes or so. If you’re based at this hotel, then it’s a great place to end. If you’re heading back to Tokyo, then you can loop back around to where you started (or to the bus stop to Takasaki) by turning left when you hit pavement and turning left again. Descend to the lake and follow it clockwise. The trail follows the edge of the lake before skirting the edge of a small side vent emerging from Haruna’s western flank. All in all it should take about 3 hours to complete the entire loop, depending on how many breaks you have taken. You can also combine this hike with Mt. Eboshi if you’re looking for a bit more exercise. 

When to go: This hike can be done year round, but you’ll need some 6-point crampons if hiking in January or February. Try to go on a sunny day with clean air and good visibility, as the views are superb. If you visit in mid-December, then you can see the lakeside illumination and fireworks. This is the only time of year where the gondola runs at night. It’s a cheeky way to get to the summit, but it’s really beautiful if you can stand the arctic temperatures. Head up the gondola just before sunset and watch the lights come on from the summit. The night view of Kanto is eye-popping as well.

Access: From Tokyo, take a train to Shibukawa (渋川), and transfer to a bus bound for either Ikaho hot spring (伊香保温泉) or Ikaho-Harunaguchi (伊香保榛名口) and get off at Ikaho Bus Terminal. From here, you can catch a bus bound for Haruna-ko Onsen Yuusuge (榛名湖温泉ゆうすげ). Get off at either in front of the Ropeway (ロップウェイ前) or Lojji Mae (ロッヂ), the next stop.  The buses are poorly-timed, so double-check both schedules before you set off, or consider breaking up the trip by staying at the hot spring. Click here for the bus from Shibukawa, and here for the bus that runs between Lake Haruna and Ikaho hot spring. Alternatively, if you’re staying in the area for a few days, then you can simply just stay at the Kokumin-shukusha (recommended), or the more expensive Hotel Yuusuge, which is more convenient for the hike. Either place will pick you up from the bus stop if you’ve taken the bus from Takasaki (see Mt. Kamon hike for a description of that bus route). From the Kokumin-shukusha, you’ll need to walk clockwise around half of the lake to reach the trailhead.

Map: Click here

Live web cam: Click here

Level of difficulty: 3 out of 5 (elevation change ~300 meters)

Distance: 3.5km (2 to 3 hours)

This slideshow requires JavaScript.

Mt. Kurikoma (栗駒山)

November 8, 2013

Mt. Kurikoma is an active volcano straddling the border of Iwate and Akita Prefectures in northeastern Honshu. The views of Mt. Chokai, the spectacular volcanic scenery, and the soothing hot springs make it a great place for a weekend getaway.

IMG_8426

The hike: When you get off the bus, walk a few meters to the hot spring river that runs between the red-roofed hotel and the outdoor bath (露天風呂). Believe it or not, the path actually runs right by this steaming water source. As you walk up the path, you’ll see a small shrine on your right, across the small steam. Since this is an active volcano, it might be a good idea to pay your respects to the mountain gods before commencing the hike. Follow the concrete path past the stream and into the forest. You’ll soon find a path on your right. Ignore this and continue on the concrete trail, climbing to a small series of rock formations. If the weather is good then you can climb these rocks for a good view of the hot spring hotel.  Soon after, you’ll reach another junction with a trail heading off to the left. Ignore this spur trail and continue on, past a small hut and the ruins of an old bathhouse.  After a short climb, you’ll drop down to a meadow and reach yet another junction. Turn left here and follow the wooden boardwalk across a scenic, grassy area of the volcano. At the next junction, you’ll see a huge wooden signboard with a giant map of the mountain. Turn right here and climb a short distance to Taikadai (苔花台), where you’ll find a trail heading off to the left. Ignore this path, as you’ll use this route on the descent, creating a really nice loop hike. Continue straight on, being careful not to stray into the hot spring river running along the left side of the trail. Although tempting, the area is full of poisonous gases, so stay on the path. The route runs parallel to the river, climbing higher and higher towards the summit plateau before flattening out and reaching a beautiful lime-colored caldera lake named Showako (昭和湖). Just before the lake, the trail will split to the left. You can take either trail, since they meet up a short distance later at the shores of the lake. Here you’ll find a toilet hut on your right, which is well worth checking out for the foot pump flushing mechanism. Take a break on the benches in front of the lake, as the steepest part of the climb awaits. On the left side of the lake, the stair-infested trail once again darts back into the forest, increasing in steepness the higher you climb. Hang in there because the views awaiting you are well worth the sweat-inducing effort. It should take about 45 minutes of steady hoofing to reach the ridgeline at Tengu Daira (天狗平), where the panoramic views will start to emerge. You should see all of the mountains of southern Tohoku rising out in front of you. On a clear day, you can see Mt. Chokai as well. Turn left once you reach this lookout point, and you will reach the high point in about 15 minutes or so. Besides the giantic signpost, you’ll find a small shrine which makes a great backdrop for photos. There is a flat area just before the summit which would make an incredible place for a bivy (you just need to bring enough water and pack out your fecal waste). Sunrise from the summit on a clear day may very well be one of your highlights in Japan if you can time it correctly. Anyway, to complete the loop, take the trail from the top marked for Ubunuma (産沼). The path is easy to follow and lined with a plethora of wildflowers in bloom. When you reach the small pond, you’ll find a path on your right leading to 笊森. This route was only recently reopened after being damaged in the 2008 Iwate earthquake. Ignore this path and follow the signs towards Sukawa Onsen (須川温泉). The trail meanders through the forest before crossing a small stream, followed by a bigger river. This river can be tricky to ford when the river is swollen due to heavy rain or snowmelt, so take care. There’s a signpost here marking the way back to Taikadai (苔花台). Just before you reach that point, you’ll drop down to yet another river that needs to be crossed. Just after crossing, you’l reach the junction. Turn right here and retrace your steps back to the next junction. Instead of turning left here, keep heading straight through a scenic marshland comparable to what you would find at Oze National Park. At your next junction, you can take your pick of trails, as both lead back to the starting point. I headed left, following the easy-to-follow path until it reached the back of the hot spring hotel. From there, navigate your way through the hot spring river maze to the bus stop. Be sure to allow enough time to have a bath at the hot spring there. The outdoor bath (露天風呂) costs 650 yen and is worth every penny.

When to go: This hike can be done from early May  to early November, when the road to the trailhead is open. The mountain is famous for fall colors, so expect crowds if you go in October. Bring light crampons if you’re hiking anytime before July.

Access: From Tokyo, take a Shinkansen train bound for Hachinohe or Morioka and get off at Ichinoseki (一ノ関). Not all trains stop at this station, so double-check before boarding. From there, take a bus from bus stop #9 bound for Sukawa Onsen (須川温泉) and get off at the final stop. Please note that there are only two buses per day, (leaving at 9am and 2:30pm) making it tricky to do as a day hike. You can either stay at a hotel near Ishinoseki station, or stay at Kurikoma Sansou (highly recommended) at the trailhead. This hotel has an incredible outdoor bath with views of Mt. Chokai. Click here for the bus schedule.

Map: You can pick up a free full-color map from the tourist information center at Ishinoseki station. The office is directly in front of Bus stop #9 (the bus stop you’ll use to get to the trailhead)

Level of difficulty: 2 out of 5 (elevation change ~500m)

Distance: 〜9km (3-1/2 to 5 hours)

This slideshow requires JavaScript.

Mt. Souma (相馬山)

February 1, 2013

Mt. Souma is the second highest summit in the Lake Haruna area. The knobby peak is a steep, challenging climb with fantastic views of the entire Kanto Plain.

souma13

The hike: At the bus stop, look for the red shrine torii which marks the entrance to the trail. If you took the bus from Lake Haruna, you’ll need to backtrack about 50 meters to see it on the left side of route 33. If coming from Ikaho hot spring, then walk along the road away from the direction you came. Go through the series of shrine gates and follow the well-worn path through a forest of bamboo grass and deciduous trees for about 20 minutes until reaching a junction marked with yet another red torii. After climbing a small set of steps, the path takes a 90-degree turn to the right, but you’ll want to head left here, up the incredibly steep rock formations imbedded with rusty metal ladders and chains. This is the route to the summit of Mt. Souma, and it’s anything but gentle. Follow the tape marks up, over, and around the collection of boulders for about half an hour before reaching the summit, marked by a shrine building and Buddhist statues. The views to the east are outstanding, with the buildings of downtown Shinjuku visible on a clear day. You can also see most of the peaks of the Kanto region laid out before you (Mt. Tanzawa, Kumotori, Myogi, Fuji, Kobushi, Kinpu, Yatsugatake, The Minami Alps, Tateshina, and Asama just to name a few). After taking in the views, retrace your steps back to the junction and continue along the ridge towards Surusu-toge (スルス峠) and Haruna shrine (榛名神社). The trail drops to a saddle where you’ll have two options. You can either take the unmarked trail directly ahead, which sticks to the ridge, or you can veer to the right and follow the real path which bypasses the hills. The ridge course offers better views, but both paths meet up a little further on, so take your pick. After this, your next landmark is an roofed-shelter with open walls, which makes a good place to take a break. Just beyond this, you’ll find a trail breaking off the main ridge towards the right. This is the way off the mountain, but continue to the left for now until reaching the base of Surusu Rock. Here you’ll find a side trail on your left with a sign in Japanese reading “スルス岩行人洞3分”. Follow this path for 3 minutes and you’ll find a small cave lined with Buddhist statues and Chinese characters carved into the rock. After some quick photos, retrace your steps to the junction, turn left, and continue on the main trail for about 50 meters or so. Here you’ll find an unmarked trail on your left that leads steeply up to the rock formations. The path banks hard to the right until ending at the base of a metal ladder. Climb the ladder and you’ll find yourself on top of Surusu Rock. Be careful not to slip here, because the fall will likely kill you. The views towards Haruna-Fuji are stellar, and it’s a good place to contemplate life for a while (as long as you don’t suffer from vertigo) When you’ve had your fill, simply retrace your steps back to the unmarked junction. If you’re still fit and it’s early in the day, you can continue along the ridge for another 4-1/2 km or so to the lake. The route is relatively flat and will cross two hard-surfaced roads before climbing up to Mt. Tenmoku (天目山) and Mt. Himuro (氷室山) before ending at the main road at Tenjin-toge (天神峠). From here, turn right on the road and follow it for 10 minutes to Lake Haruna. You could also take a trail from the Tenjin down to Haruna Shrine, where you can catch a bus back to Lake Haruna or out to Takasaki. You’ll need to allocate around 4 hours from Surusu Rock to Tenji-toge. If you’re short on time, then retrace your steps to the junction between the Surusu Rock and the rest shelter and follow the spur trail as it descends to a vast meadow. From here you can walk out to route 33 and turn left to reach the lake, or right to return back to Yaseone-toge. The trail meets route 33 at an interesting area with a series of grooves cut into the asphalt. Wait for a car to head west and you’ll hear a song resembling Eensy Weensy Spider played out on the musical road.

When to go: This hike can be done year round, but you’ll need some 6-point crampons if hiking in January or February. Winter offers the best chance to see the smog-free skyscrapers of Tokyo, as well as clear views of Japan’s highest peak.

Access:  The trailhead is a 6km walk along route 33 from the lake. If you’re staying at the lake, then you can catch a local bus bound for Ikaho Bus Terminal (伊香保バスターミナル) and get off at Yaseone-toge (ヤセオネ峠). If you’re coming from Tokyo, then take a train to Shibukawa (渋川), and transfer to a bus bound for either Ikaho hot spring (伊香保温泉) or Ikaho-Harunaguchi (伊香保榛名口) and get off at Ikaho Bus Terminal. From here, you can catch a bus bound for Haruna-ko Onsen Yuusuge (榛名湖温泉ゆうすげ), which stops at Yaseon-toge.  The buses are poorly-timed, so double-check both schedules before you set off, or consider breaking up the trip by staying at the hot spring. Click here for the bus from Shibukawa, and here for the bus that runs between Lake Haruna and Ikaho hot spring.

Map: Click here

Live web cam: Click here

Level of difficulty: 4 out of 5 (elevation change ~300 meters)

Distance: 4km (2 to 3 hours)

This slideshow requires JavaScript.

Mt. Sanbe (三瓶山)

November 4, 2012

Sitting on the edge of the Chugoku mountain range in northern Shimane Prefecture, Mt. Sanbe is a  glorious collection of 4 rounded conical peaks surrounding a large ancient volcanic caldera. It makes for a wonderful alternative to the more popular destination of Mt. Daisen to the east.

Options: There are no shortage of routes up the mountain. The quickest approach is via the northern face, starting at 青少年の家. From here it’s a 2-hour hike directly to the summit. Another option is to start at Sanbe Onsen and climb via Ko-Sanbe (子三瓶山). This route is tough and challenging, taking anywhere from 3 to 5 hours to reach the summit. The other option is to approach from the south via J0-Sanbe (女三瓶) and the ski resort. This is the most developed part of the mountain, with the top of Jo-Sanbe covered with antenna. Avoid this part of  Sanbe unless you want to be disappointed. The other approach is from the west, and this route is described below.

The hike: There’s a restaurant at the bus stop that sells noodles and other food. It’s a good place to kill some time if the weather is bad or to fill your tummy after the long train and bus ride. There’s no official water source here, but I’m sure you can ask them to fill up your water bottles there. There’s also a supermarket a block from Oda station, so you can buy water and other food there. Anyway, cross the main road and enter the vast meadow that spreads out towards Mt. Sanbe. You’ll see two peaks hovering above. The right peak is Ko-Sanbe (小三瓶), the child, while the peak on the left is Dan-Sanbe (男三瓶), the father. In the autumn, this meadow is filled with beautiful pampas grass (susuki in Japanese). Follow the plowed path towards the mountain until it enters the forest, where you’ll soon reach a junction. You have two choices here, but the path on the right is much more challenging and takes longer. My advice is to take this path on the descent, making the hike a wonderful loop. At the junction, turn left and follow the sign that says 男三瓶山90分. The trail climbs steadily through the forest for about 30 minutes until reaching the first of many switchbacks. Just like all volcanoes, the route steepens the closer it gets to the top, with the views opening up above the tree line towards the west. It should take an hour or so to the edge of the treeline, where the path becomes much rockier and steeper. Keep pushing on for about 10 more minutes and you’ll reach the top of the first false peak. From here the path flattens out, traversing over a series of rolling hills until reaching the summit. Again in the autumn this area is covered in pampas grass. It should take about 2 hours or so from the bus stop to the summit of Mt. Sanbe, where you have several options. The shortest way off the mountain is to the north, which is marked by a path that reads 姫逃コース下山口. From here it’s an hour to the bus stop and a Sanbe Burger! The best option would be to stay in the free mountain hut in a saddle just below the high point, where you can catch the sunrise and sunset. There’s no toilet or water source, so you’ll need to bring a sleeping bag, food, and plenty of water. The hut is new and really clean, with two floors of sleeping space. If you’re just up for the day, however, then head down the stairs away from the direction of the mountain hut, following the sign that says 西の原85分. At the bottom of the stairs turn left, following the summit plateau towards the southwest before dropping off the southern face of the peak. The path is steep and incredibly slippery in wet weather. You’ll see the summit of the child peak directly in front of you, and it should take about 30 minutes of tough descending to reach the saddle between the two peaks. Here you’ll reach a junction, where a decision will have to be made. If you want to get off the mountain quickly, then turn right and descend back to Sada-n0-matsu bus stop in about 30 minutes. If you want a hot bath, then continue on the ridge another 30 minutes or so to the summit of Ko-Sanbe, and then down the other side to Kei-Sanbe (系三瓶) and then down to Sanbe Onsen. Another option would be to head left at the junction to check out the caldera lake called Muro-no-uchi (室の内池). After reaching the lake, turn right and climb up to Kei-Sanbe and then a left down to the onsen. With so many options, you could easily spend a couple of days exploring the different peaks and paths. The path from the ridge junction back to Sada-no-matsu bus stop is easy, through a bit of cedar forest before crossing over a concrete dam. A short distance after the dam the trail meets back up with the original junction that you saw just after you entered the forest. From here, turn left and retrace your steps back to the bus stop.

When to go: This hike can be done anytime from late April to late November, when the snow is gone. A winter hike is also possible if you’ve got winter hiking experience and equipment. November is the most scenic time, with fields of pampas grass and stunning fall colors. If you want to avoid the crowds, then head mid-week and you’ll probably have the entire mountain to yourself.

Access: Since it’s a long way from anywhere, it’s almost impossible to do this as a day hike if coming from Osaka. Plan on staying overnight in either Oda city, Sanbe hot spring, or at the emergency hut on the summit. From Okayama (岡山) station, take the JR Yakumo limited express train bound for Izumoshi (出雲市) and get off at the last stop. At Izumo, change to a local train on the San-in line (head towards Hamada and not back to Matsue)  and get off at Odashi (大田市) station. You can also take a limited express train from Izumo but it will cost you more. The connections are usually timed, so take whatever train is waiting on the other platform. The connections are sometimes tight, so run if you have to because trains are few and far between. From Odashi, take a bus either bound for Sanbe Onsen (三瓶温泉) or Seishounenkouryuu-no-ie (青少年交流の家) and get off at Sada-n0-matsu (定の松) bus stop. There are only 3 buses in the morning, so plan your trip accordingly. Click here for the bus schedule. It takes close to 5 hours from Okayama station to the trailhead.

Map: Click here

Live Web Cam: Click here

Level of difficulty: 3 out of 5 (elevation change ~700 meters)

Distance: 6km to 12km depending on the route (4 to 7 hours)

This slideshow requires JavaScript.

Mt. Odake (大岳)

November 7, 2011

Mt. Odake, which translates as Big Peak, is a rocky outcrop perched high on the ridge in the Okutama region of Tokyo. The views of Tokyo on a clear winter night from neighboring Mitake are a must-see and the views of Fuji are impressive when the cloud isn’t in.

The hike: From the top of the cable car, head left on the concrete path through an archway that says “御岳山へようこそ”. The route starts out quite flat before arriving at the small village, where it meanders a bit past a thatched-roof house and a youth hostel. Make sure you follow the signs that point towards 御岳山 and you should be ok. A little further on, the road will split in half, with an insanely steep slope branching off to the right. You’ll see a sign posted in English for “Rock Garden”, so kick-step your way up the muscle-burning road to the main gate of the temple. Along the way, you’ll pass by a couple of restaurants and souvenir shops. The udon noodles here are famous for their unique texture and green color, so consider having an early lunch if you’re in the mood. (I had no problems being served at 10:30 in the morning). Climb the stairs, go through the main gate of the shrine, and turn left, following the signs for 長尾平. At the time of writing, the path to the shrine was under construction, so you’ll be detoured to the right up an incredibly steep concrete road, where you’ll pop out just in front of the main shrine building. There’s a statue of a warrior on a white horse here, and that’s the landmark you want to search for. After a quick prayer, descend the staircase just to the right of the statue (if facing the statue that is), and you’ll see a toilet and concrete forest road, as well as a path signposted for 長尾平. The steep path was under repair during the autumn of 2011, but the short drop will connect with the main forest road/path after a couple of minutes. Turn right as soon as you hit this forest road and you’ll soon see a rest area on your left with some drink machines, picnic tables, and a shop selling snacks. If you walk down along this path for about 50 meters you’ll find some toilets and a nice view of Mt. Odake on your right and Tokyo on your left. Anyway, keep walking on the forest road and, for now, ignore the trail that branches off towards the left towards Rock Garden. A little further on you’ll find another trail junction, but instead of turning left, head on the upper path on your right towards Oku-no-in (奥ノ院). The trail will more than likely be deserted if you’re hiking during the week, as the majority of people stick to the gorge at Rock Garden. The cedar trees here are all mysteriously labeled with numbers, but the path is really easy to follow and the ground cover thin, exposing a vast network of tree roots. Keep clambering over the roots, past an exposed area with chains, and soon you’ll reach a trail junction marked 奥ノ院・鍋割山. You can either turn right here past the small shrine, or continue going straight and making a sharp right turn after about 5 meters. Whatever you do, don’t turn left and start descending steeply into the valley! The path is a bit difficult to pick up, so make sure you’re climbing instead of descending. A little past this tricky area you’ll reach another junction, with a trail on your left marked 大岳(巻道). You can take either path here, as they both meet a little further on. The  巻道 is much easier, as it skirts the base of 鍋割山 before descending back to the main forest road you left earlier in the hike. When you reconnect with this road, turn right and start the steep climb towards the mountain hut. There are a few exposed areas with chains and the path becomes much rockier, so take care of your footing. Eventually you’ll reach a mountain hut on your left and a rustic shrine on your right. There’s a toilet here, and this is a good place for a break before the final push to the summit. Walk up to the shrine and take the path just to the left (marked 大岳山頂) which zigzags its way up to another really rocky area. Take extreme care in rainy or misty weather, as the boulders can become quite slippery. After a tough 10-minute scramble, you’ll pop out on the summit of Mt. Odake, where the conical shape of Mt. Fuji will float above the clouds on the horizon. Or not, depending on what kind of mood she’s in. I caught a glimpse of Japan’s highest peak just before she hid behind the cloud. From the summit, you can continue on the ridge down to Oku-tama, but be warned that it’s a long, 3-4 hour hike. A better option would be to head back to Mitake via the Rock Garden path. Retrace your steps back to where you came, and turn right at the junction marked 御岳・岩石園. The trail will descend to a scenic valley with a couple of spectacular waterfalls. At the first shelter you come to, follow the sign written in English to Ayahiro waterfall. It’s a short, quick drop to an awe-inspiring cove of eerie rock formations and tumbling water. This is a great place to while away a few hours contemplating life (if you haven’t come here on the weekend with half of Tokyo that is). Continue descending through the gorge, taking care on the numerous river crossings. About halfway down you’ll come across a rest area with a toilet. Several minutes past this, the route will climb up towards an immense rock formation called Tengu-Iwa, where you’ll find a junction. Drop the pack here, and prepare for the adrenaline rush. First, take the path marked for Nanayo waterfall. The no-nonsense trail plummets down the valley via a never-ending array of metal stairs. Descend carefully, and after a few minutes you’ll reach the first waterfall. This area is extremely slippery even with a good pair of hiking boots on, and if you’re not careful you could tumble over the waterfall. You’re actually in the middle of a tiered waterfall, but you’ll have a great view of the tumbling water if you make your way over to the right. The path continues down from here (not sure if you’ll get a full view of the falls, however, as I was running out of time and daylight). After a sufficient look, climb the stairs back up to the junction (and your waiting backpack). If you stare up at Tengu rock, you’ll see a metal chain dangling on the left-hand side of the rock. Grab ahold and pull yourself up to the top of the rock formation, where you’ll find 2 different statues of the mythical long-nosed goblin Tengu. If you’re acrophobic then please don’t attempt this ascent. After scaling the rock, return back to the junction and take the path marked for Mitake and the cable car. It’s a gentle climb back up to the main forest road, where you can retrace your steps back to Mitake shrine and the cable car. If you don’t want to shell out the money for the cable car, there’s a road on your right you can take just after you pass through the village. Be warned that it’s another 3km or so until you reach the bottom of the cable car. If you’ve got the time, then I recommend spending the night in the village. There’s plenty of accommodation and you’ll be able to enjoy the hike at a more leisurely pace.

When to go: This hike can be done year round, but you should bring a pair of light crampons in the winter months, as ice/snow tends to linger on the rock faces. Avoid the weekends if you don’t want to share the peak with half of Tokyo. Autumn is impressive with the fall foliage, but winter usually has the best visibility.

Access: From Shinjuku (新宿) station in Tokyo, take a rapid (快速) train on the Chuo line bound for Okutama (奥多摩) and get off at Mitake (御嶽) station. Direct trains are few and far between, so you’re better off taking a train to Tachikawa (立川) or Ome (青梅) and changing to an Okutama train from there. At Mitake station, change to a bus bound for Mitake Cable Car (ケーブル下). The bus is timed with the train arrival, but the bus stop is tricky to find. Go out the ticket gates, down the stairs to the main road, and turn left. You’ll see the bus stop on your left. Click here for the bus website (in Japanese). Get off the bus at the final stop, climb the steep paved road in front of you for about 5 minutes, and you’ll see the cable car station on your right. Taking the cable car saves about an hour of walking on a paved road through a rather uninteresting forest.

Level of difficulty: 3 out of 5 (elevation change 430m)

Distance: 10km (4 to 6 hours)

This slideshow requires JavaScript.


Mt. Shirakami (白神岳)

October 22, 2011

Situated on the edge of a UNESCO World Heritage forest, Mt. Shirakami offers a glimpse into the ecosystem of yesteryear, with ancient beech trees, untamed wildlife, and jaw-dropping oceanic views.

The hike: If you’ve come by train, you’ve got an awful lot of walking just before reaching the trailhead, so make sure you start early unless staying in the emergency hut on the summit. Go out the exit of the unmanned station and walk to the main road (route 101). Turn right and walk along the road for about a half a kilometer until you see a road on your left. There’s a sign here pointing towards Shirakami-dake trailhead. The road skirts past an unmanned rest house on your right before passing by Shirakami-Sanso, an alternative place to stay if you’re short on daylight. Continue climbing past the hut on the forest road, and after about 30 minutes you’ll reach the parking lot and toilet block. There’s also an unmanned hut just adjacent to the toilets. If you’re just going up for the day, then it’s a good place to stash the gear. Take the path just to the left of this hut and soon you’ll reach a paved forest road. Turn left and stroll for about 10 minutes until reaching the real trailhead. From here, the path shoots into the forest, meandering a bit before starting the long climb towards the main ridge. There’s been a bit of cedar tree planting, but the farther you push, the more native the flora becomes. After all, you’re sitting on the edge of a World Heritage forest. Your first big landmark comes after 1.5km in the form of a trail junction. Here you’ll find a rather large signboard (案内図) declaring the path towards the right for experienced hikers only. I recommend staying towards the left here and returning from the summit via this “expert” route, which is known as the futamata course in Japanese (二股コース).  From this junction, the trail becomes predominately steeper, with long switchbacks and wooden stairs in places. You’ll find signposts placed regularly throughout the entire route, which you can use as a judge for your timing and pace. It’ll take around an hour or so from the junction to the ridge, where you’ll see an unmarked trail towards your left. Apparently this leads to the summit of Mt. Mate (蟶山), but you can ignore this since you’ll be getting panoramic views soon enough. Turn right and start the up-and-down climbing on the main spine of the long mountain. It’s pretty steady going until you reach the signpost that reads “白神岳山頂へ1.5km”. As soon as you see this sign, take a long break and stuff your face with peanuts, as things are about to become pretty tough. It’s an uninterrupted 800 meter climb to the summit ridge. Take it one step and a time and don’t forget to look behind you for views of the Sea of Japan far far below. The alpine flowers in this section are stunning, and before you know it you’ll reach the junction drenched in sweat. Congratulate yourself, as the hard climb is pretty much over. You’ll see a trail branching off to the left towards Juniko (十二湖), but disregard this approach and turn right for the short 15-minute climb to the summit. The Juniko course is long and tough, but could be an alternative way of getting off the peak if you’re staying on the summit. The path is rarely used, so you’ll need to be extremely careful of black bear encounters, as a man was attacked there in 2010. From this junction to the peak it really is a pleasant stroll, with panoramic views towards Mt. Iwaki on your left. You’ll soon reach an emergency hut and toilet, which would make for a great place to stay if not for the lack of water. If you’re overnighting here, bring plenty of water from the valley below. Once on the top, take a well-deserved break and admire the stellar views. You’ve got 2 choices from the top. You can either retrace your steps all the way back on the trail you came up, or opt for the Futama course. I did the loop, and boy is it not for the faint of heart. To start, it’s a sheet drop off the side of the peak, with about 1km of continuous rope. Whoever built this trail must’ve been completely insane or just incredibly lazy not to bother with putting in switchbacks. Your knees will surely take a beating on this no-nonsense route. Bring gloves to prevent rope chafing on the impromptu rappel. Once the ropes end, it becomes a much more manageable descent until you reach the river below. You’ve got 2 river crossings, so proceed with caution if the river is swollen. Both are marked with tape, and once you get past those the path turns into a long traverse over several smaller ridges before arriving back at the junction you saw near the start of your climb. All in all it should take anywhere from 6 to 8 hours to complete the entire hike.

When to go: This hike can be done from June to October, when most of the snow is gone. A winter hike is pretty much impossible with the insane snow depth and huge avalanche risk. Bear sightings are a real possibility on this hike, as the area has the highest concentration of black bears on Honshu.

Access: From Hirosaki (弘前) station, take a train on the JR Gono Line and get off at Shirakamidaketozanguchi (白神岳登山口). You’ll need to change trains at either Fukaura or Higashi-Noshiro, depending on which train you take.  A faster approach might be to take a Resort Shirakami express train and change to a local train at Juniko (十二湖) station, or perhaps try approaching from Akita city in the south.  A better option might be to stay the night at either Moriyama Sou (森山荘) near Juniko station or at Shirakami Sansou near the trailhead.

Level of difficulty: 5 out of 5 (elevation change 1225m)

Distance: 19km (6 to 8 hours)

This slideshow requires JavaScript.

Mt. Hiko (英彦山)

July 26, 2011

Hikosan is a sacred peak nestled on the border of Fukuoka and Oita Prefectures in northern Kyushu. Unlike its volcanic neighbors, the peak is known for old growth cedar trees, rustic shrines carved into cliffs, and an ambiance you’d expect to find in the hills of Kansai.

The hike: Please note that you can also start this hike from the back side of the mountain at Buzenbou, but you’ll miss out on the impressive shrine at the top of the slope car. From the bus stop, walk a few meters in front of the bus and on your right you’ll see a huge bronze shrine gate with the characters “英彦山” carved on the front. Follow this stepped-stone path all the way to the terminus. It should take about 20 minutes of steep climbing to reach the top of the stairs. Here you’ll find the immense, bark-roofed shrine of Hikosan-Jingu. On the stone path to the shrine you’ll find plenty of stone lanterns and a rather rustic thatched teahouse on your left. It all reminds me a bit of the scenery in Kyoto, somehow magically transformed to the hills of northern Kyushu. If you’re feeling really lazy, then you could just skip this first step and board the futuristic slope car up to the shrine, but it’ll set you back 500 yen. Anyway, once at the shrine, you’ll find a path leading towards Nakadake (中岳) just in front of you. The path is very well worn and it’s just about impossible to get lost. You’ll start by meandering through the forest via a series of switchbacks until reaching Chuuguu shrine (中宮). After this, the path starts to flatten out a bit, and it really starts to open up just before Musubi shrine (産霊神社). Here you’ll once again start following the stone steps through a grassy area with lots of dead trees. At the top of the stairs you’ll reach the summit of Nakadake (中岳), where you’ll find a large, weather-beaten shrine building. Take a quick break here and admire the views down the valley. There’s a junction here, so turn left if you want to climb to Kita-dake and descend to the bus stop at Buzenbou. Otherwise, turn right and drop steeply to a saddle before climbing up to Minami-dake (南岳), Hikosan’s highest point. There’s not much of a view here, unless you climb the rusty metal lookout tower that is officially off-limits. I wouldn’t trust that thing with my weight and I really wish the prefecture would spend some money to remove that thing. Make sure you rest the knees here, as things are about to become a bit tricky. If you’ve got vertigo, then definitely skip this next section and retrace your steps back to the shrine. The path drops steeply off of Minami-dake’s rocky face. There are plenty of metal chains to help you through the gnarly sections, but this is definitely not a place you’d want to fall. Take your time and definitely make sure you go down the chains backwards, as it’ll help you with balance. Luckily the chain section is relatively short, and you’ll find yourself back in the forest soon enough. Now, at your first junction you’ve got a decision to make. If you take the path to the left through the downed trees, then you’ll reach an 1200-year old cedar tree. If you ignore this path and continue straight and take your first left, then you’ll reach Daiminami Shrine (大南神社). From the shrine you can take a path down to the cedar tree. I must admit that I took the initial left and ended up missing Daiminami Shrine completely. It helps to have a detailed map in this place. Anyway, the name of the tree is called Onisugi (鬼杉) and it’s a sight to behold. Just to the left of the tree you’ll find a large rock outcrop, and this is the path you want to take. Don’t take the trail leading away from the tree towards the south or you’ll end up on a forest road. The path skirts the edge of the rock cliff before climbing up towards Tamaya shine (玉屋神社). Just before the shrine, you’ll find an unmarked junction. Turn right and you’ll climb a set of stone stairs to the front of the shrine. If you’re staying at Shakunage-sou (しゃくなげ荘), then take this unmarked path down to the forest road and turn right for the easy walk to the lodge. Shakunage-sou is highly recommended, with spacious rooms, tasty meals, and a wonderful hot spring bath. If you’re just visiting Hikosan for the day, then continue to Tamaya shrine and take the path passing in front of the building. This route will take you all the way back to Houheiden (奉幣殿) at the top of the slope car. All in all, it should take about 4-1/2 hours to complete the entire loop.

When to go: This hike can be done year round, but you’ll need to be prepared for ice and snow during the winter months. The autumn foliage is spectacular, but so are the crowds.

Access: From Kokura (小倉) station, take a train on the JR Hitahikosan Line and get off at Hikosan (彦山) station. From there, change to a bus bound for Buzenbou (豊前坊) and get off at Kane-no-torii (銅の鳥居). The front of the bus usually just says Hikosan (英彦山) and it’s usually timed to meet up with the infrequent trains. Click here for the bus schedule.

 Live web cam: Click here

Map: For once there’s no shortage of decent maps! Click here for an printer-friendly illustrated color map, and here for a more detailed topo map.

Level of difficulty: 4 out of 5 (elevation change 570m)

This slideshow requires JavaScript.

Mt. Yufu (由布岳)

January 30, 2011

Mt. Yufu is a massive volcano towering over the idyllic hot spring town of Yufuin. The views from the summit are impressive on the rare day when the cloud isn’t in.

The hike: After exiting the bus, turn left and walk along the road a few meters, and you’ll see the entrance to the trail on your right. The first part is a vast meadow with views of Mt. Yufu towering above. There are several trails in this area. Take whichever you like, but make sure you head towards the forest under Mt. Yufu and not up the bald conical peak to your left. You should reach the edge of the forest in about 10 minutes or so. There’s a trail branching off to the right, but ignore this trail and head straight ahead. The woods are quite beautiful and surprisingly quiet, and the path meanders a bit before shooting off towards the left and up to the ridge line. At the junction, you’ll find a couple of places to sit down. This junction is marked on the maps as 合野越, but I don’t recall any signposts indicating this name. Take a breather because the real climb is about to begin. Take the trail to the right, where you’ll soon start the first of many switchbacks. How many, you ask? Well, I basically stopped counting after 40! The route is well-trodden and impossible to get lost as long as you follow the switchbacks. The views will gradually start to open up as you climb higher above the valley. In no time you’ll have a view directly down into the grassy crater of Mt. Iimorigajou, with the town of Yufuin beyond that. As you reach the saddle below the peak, the switchbacks become shorter and steeper, with the last few meters up a series of large steps built to keep erosion at bay. Once at the junction, you have two options. You can either turn right and climb to the summit of Higashi-mine (東峰) or turn left for the treacherous ascent of Nishi-mine (西峰), the higher of the two. If you have any fear or heights or no confidence using metal chains, then I recommend opting for the safety of Higashi-mine. Otherwise, turn left at the junction. Immediately after climbing, you’ll reach your first set of chains. If the cloud is in, then it could easily be mistaken for one of the trickier sections of the Japan Alps. There’s a fair amount of up-and-down between here and the summit, so follow the paint marks, chains, and crowds if there are any. After around 15 minutes you’ll reach the summit of Nishi-mine, where the views are supposedly spectacular. I spent the entire climb in the clouds, so hopefully you’ll be luckier that I was. If you’ve got time, then you can actually do an entire loop of the crater, taking in Higashi-mine before descending back down to the saddle. Just continue on the path you haven’t taken from the summit. The maps recommend one hour for the loop, but I wouldn’t recommend doing it if visibility is poor. If you’re short on time, then simply retrace your steps back through the danger zone of the chains and back down to the saddle. Descend down the same switchbacks you used to climb the mountain, and amuse yourself by trying to determine the precise number of switchbacks. Once you’re back at the junction of 合野越, instead of turning left to head back to the parking lot where you started, take the faint, overgrown straight ahead that leads towards Iimorigajou (飯盛ヶ城). Follow the path for about 50 meters before reaching a rather large clearing. This is actually an old forest road, and you’ll see an unmarked and incredibly steep trail directly in front of you that leads to the summit of Iimorigajou. It only takes about 5 minutes to reach the summit, and the views are totally worth it. With all of the lush greenery, it’s a splendid place to take a break and admire both the view of Yufuin and of the towering volcano you just finished climbing. After admiring the views, retrace your steps back to the forest road and turn left. After a few minutes of descending, you’ll see a white sign that says 湯布院町に至る、西登山道、岳本. The trail branches off towards the left and, honestly speaking, is a bit difficult to follow. Scattered throughout the grasslands are red signs reading 西登山道 and the grass is greatly overgrown. If you’re not up for the adventure, then never fear, because if you stay on the forest road then it’ll lead you to the junction. Whichever route you decide to take, once the trail intersects the forest road again, you’ll see a path heading into a cedar forest with a signpost marked for Takemoto (岳本). Follow the path through the forest and watch out for spider webs. Eventually, the path will end behind a series of greenhouses. Turn right when you hit the paved road and then a left at the first junction and you’ll descend to a larger road with a Lawson convenience store. Walk over to the Lawson and take the road next to it that descends towards the town of Yufuin. Take your first left and you’ll arrive at a small lake and the wonderful thatched-roof bath of 下ん湯. Drop 200 yen in the honesty box and enjoy the angelic hot-spring waters. After a soak, you can walk through the touristy town back to the station in about 25 minutes.

When to go: This hike can be done year round if you bring crampons and an ice axe in the winter. The final climb to Nishi-dake should not be attempted in icy conditions. November is the best time to see the autumn colors.

Access: From Yufuin bus center, there are regular buses to Beppu that stop at Yufuin Tozanguchi (由布岳登山口). The bus takes about 15 minutes and costs 360 yen. Yufuin bus center is about 20 meters east of JR Yufuin (由布院) station. Go out the main exit and walk down the main street running perpendicular to the station. The bus center is on your left. Click here for the bus schedule.

Map: Click here

Live web cam: Click here and select ライブカメラ

Level of difficulty: 4 out of 5 (elevation change 813m).

This slideshow requires JavaScript.

Mt. Akita-Komagatake (秋田駒ヶ岳)

December 20, 2010

Mt. Akita-komagatake is the highest mountain in Akita Prefecture and easily one of the most picturesque. The views down towards Lake Towada are incredible on a clear day, and the wildflowers are some of the best in the Tohoku region.

The hike: From the bus stop, head past the entrance of the souvenir shop to the fountain that doubles as a water source. Fill up your bottles here, as there are no other reliable water sources on the hike. The trail starts to the right of the water. After 5 meters of walking, you’ll see a trail on your left, but ignore this and head straight. The path will curve off to the right, climbing a gentle spur towards the summit plateau. The path looks a bit like a volcanic forest road, with colorful lava rocks and an immense collection of wildflowers. After about 15 minutes of climbing, the mound-shaped peak of Mt. Oname (男女岳) will come into your view. The trail wraps around the northern flank of the peak before flattening out at a splendid volcanic lake. The reflections of the peak in the water are phenomenal when the weather is clear. At the far side of the lake is a mountain hut, so follow the wooden planks and drop your gear out front. This hut was locked when I climbed in August 2010, so I’m not sure whether you’re allowed to stay here or not. It should have taken anywhere from 30 to 50 minutes to reach this hut, depending on your speed. Follow the steps (and the crowds) up to the summit of Mt. Oname, the highest peak in Akita prefecture. The peak overlooks Lake Tazawa, as well as the distant peaks of Mt. Iwate and Mt. Chokai. After a few obligatory snaps, retrace your steps back to the hut and walk back along the lake as if you were going to descend back down to the parking lot. On the left side of the lake you’ll find a trail branching off to the left with a signpost for Odake (男岳). In 5 minutes, you’ll reach the ridge line. Turn right and start the steep, rocky climb towards the twin peak of Akita-koma. This climb is a lot more strenuous than the ascent of Mt. Oname, but the views down towards the grassy crater of Ko-dake are well worth the extra effort. After reaching the top, retrace your steps back to the saddle. Instead of turning left back down to the lake, keep climbing straight ahead on a path labeled on the maps as the “horse’s back” (馬の背). The narrow path lives up to its name, with steep drops on both sides and a panoramic view of lush, verdant peaks all around. It should take about 10 minutes of sweaty climbing to reach Yoko-dake (横岳). Turn left here and follow the ridge up and over the scree fields of Yakemori (焼森). If you’re tired, then there’s a trail on your left that leads down to the parking lot of Hachigome in about 40 minutes. Otherwise, start the long descent and even longer climb towards Mt. Yumori (湯森山). At the bottom of the descent there’s a small stream marked as a water source on the map. I’d recommend bringing a water filter in you’re planning on relying on this water. It should take about 40 minutes from the water source to reach the summit, where the views back towards Mt. Oname are entrancing. Here you’ll have to make a decision. If you want to continue all the way to Nyuto-dake and down to Nyuto Onsen, then you’ve still got 4 to 5 hours of long hiking in front of you. I recommend turning left here for the 20 minute stroll to the peak of Sasamori (笹森山), which has one of the best alpine grasslands in the entire area, filled with a wide assortment of wildflowers. From here it’s a 30 minute descent back to Hachigome. The trail drops steeply to a mountain stream and then climbs up towards the bus stop. All in all, it should take between 4 to 6 hours to complete the entire loop.

When to go: This hike can be done from early June to late October, when the buses to Hachigome are running. Please note that private cars are not allowed at the trailhead, so you’ll have to park at Arupa-Komakusa and take the bus along with everyone else. A winter ascent is also possible with the right gear and experience. Click here and here to see 2 different Japanese blogs.

Access: From Tazawako (田沢湖) station on the Akita Shinkansen, take a bus bound for Komagatake-Hachigome (駒ヶ岳八合目) and get off at the last stop. The bus takes about an hour and runs from June 1st to October 31st. Click here for the bus schedule. You can also take a bus bound for Nyuutou-Onsen (乳頭温泉) and change to the Hachigome bus at Arupa-Komakusa (アルパこまくさ) bus stop. Click here for the Onsen bus schedule.

Live web cam: Click here

Map: Click here

Level of difficulty: 2 out of 5 (elevation change 337m)

This slideshow requires JavaScript.