Mt. Yotei, otherwise known as Mt. Shiribeshi (後方羊蹄山), is a shy, Fuji-esque volcano dominating the Niseko skyline, attracting hikers from all over Japan.
The hike: If you’ve taken the bus, then you’ve got an annoying 30 minute hike on a paved road. Definitely try to hitch to the trailhead to save some energy. At the trailhead, there’s a toilet, small campground, and water source. Fill up your bottles, as this is the only place for water on the hike. The trail starts behind the toilets, not down the forest road in the parking lot. I attempted a night hike and got lost for hours by taking this deceptive looking path. In the daytime it’s a no-brainer, but at night take care. The trail starts off rather gentle and then starts climbing, with plenty of switchbacks and amazing views across the valley to Niseko ski resort. The mountain, like most volcanoes in Japan, is divided into 10 ‘stages’. You should reach the 6th stage (rokugoume-六合目) in around 2 hours after starting. From there, the trail continues to climb until eventually reaching the 9th stage (kyuugoume-九合目). You’ll reach a 3-way junction just before the crater rim. If you go right you’ll reach an emergency hut, but instead stay on the same trail you’ve been on and continue to the rim. The high point of Mt. Yotei is about halfway around the rim, marked by a small sign. It’s easy to find in sunny weather, but you might miss it if the cloud is in. Anyway, circumnavigate the crater, enjoying the abundance of wild flowers and spectacular views. Consider descending via the Makkari trail (真狩), a never-ending, knee-knocking decent that eventually ends in a huge campground. Or go back the same way you came.
When to go: This hike can be done from late April to early November, but the earlier you go, the more snow you’ll encounter. Some hardcore skiers & boarders climb in it in the winter, searching for fresh powder and clean runs. Yotei is notorious for nasty weather, so use caution on the decent if mother nature isn’t cooperating.
Access: There are 4 trails up the mountain, but I describe the one closest to Niseko. From Sapporo station, take a local train for about 90 minutes to Kucchan (倶知安) station. From there, take a bus to Yoteizan-tozanguchi (羊蹄山登山口). Click here for the bus schedule. Alternatively, you can take a taxi for about 3000 yen that’ll get you a little closer to the trailhead.
Level of difficulty: 4 out of 5 (elevation change: ~1600m)
Special note: Iwate is currently experiencing increased volcanic activity and is currently closed to hikers. Click here for more information.
Mt. Iwate is a conically shaped active volcano, towering over Morioka city and offers one of the best panoramic views in the entire Tohoku area.
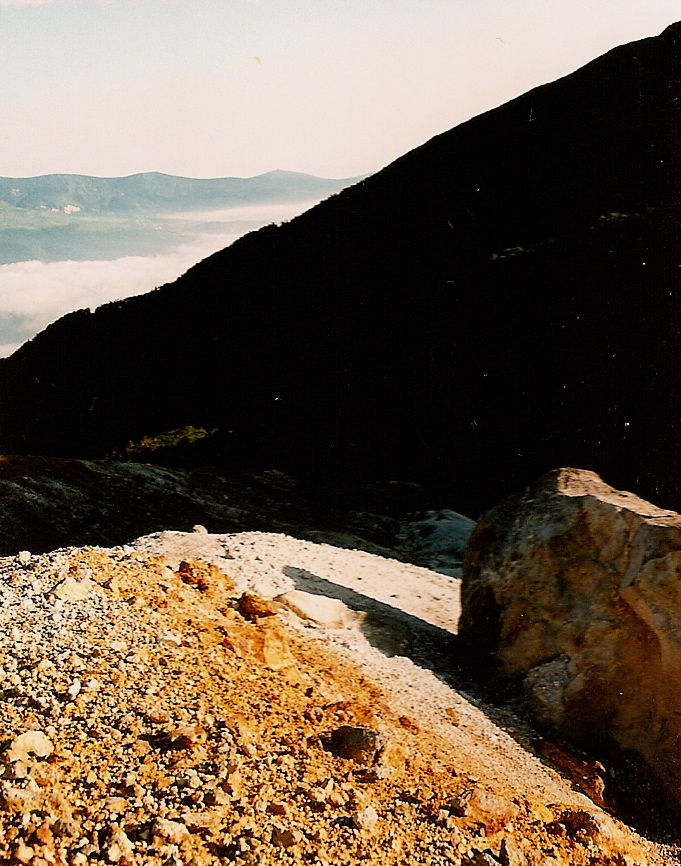
The hike: This is a long, long hike (about 21km round trip) so it’s imperative that you get an early start. Luckily there’s a incredible park near the trailhead at Kenmin no mori (県民の森). Officially camping is prohibited in the lush park but it’s much more inviting than the nearby campground, so just put up your tent behind the bushes or set up/break down at night. Anyway, the trailhead is NOT behind the park, so do not follow the dirt forest road toward Mt. Iwate or you’ll lose precious time like I did. Instead, walk down the hill a little to the right of the park (if facing the mountain) and walk up a paved road that leads to the trailhead. You should find it on your right-hand side after about 15 minutes or so. The maps in town are so confusing, so be careful. Anyway, this trail is called the nanataki course (七滝コース), and you’ll find the waterfall of the same name in about an hour. Now, this trail was officially closed to hikers in the summer of 2006 due to volcanic activity, but the trail is very clearly marked, so it looks like a lot of people ignore the signs and climb. After about 1-1/2 to 2 hours of hiking through the forest, the vegetation will start to thin out and you will find the first signs of volcanic activity. The ground will start to turn a lime green and you’ll notice a small, hot stream flowing down the mountain. Unfortunately the stream is too small to bath in, but you can soak your feet if you like. Follow this stream toward the right side and you’ll soon encounter steam vents puffing out volcanic gases. Make sure you stay on the trail and beware of loose rocks. Climbing is not much of a problem, but if you come back down this way be very careful on the decent. Anyway, as you climb higher, you’ll reach a junction where this trail meets the Matsukawa trail. You have two options. You can go right to take a ridge trail, or head left and follow a beautiful river. Take the left course and work your way toward the Mt. Iwate crater. The vegetation can be quite thick here, and if there’s any morning dew then you’ll get completely soaked from head to toe. After about 90 minutes of slogging, you’ll come to an emergency hut and a set of benches. This is at the base of the crater. Take a break and prepare yourself for the final ascent. If you’re running short of water then head down the trail away from the crater and there’s a second hut and water source there. The final climb is tough. You’ve just spent the last 4 or 5 hours climbing about 1400 vertical meters, and now the final 100m or so is on loose scree. For every step you take, you’ll lose about 2 or 3. Don’t give up yet though, because once you make it to the crater rim things become much easier. The high point is to your left, but consider walking all the way around the rim if the weather is good. The crater itself has stopped hissing and steaming, but the rock formations and gradation are wonderful. Take plenty of pictures and if you’re lucky, take in the panorama. On a clear day you can see Mt. Hayachine, Mt. Chokai, Gassan, Mt. Hachimantai, and Mt. Akita Koma ga Take. If you’re feeling exhausted, then you have two free emergency huts to choose from, as well as two alternate ways off the mountain. I went back exactly the way I came, because I left my huge backpack at the trailhead and carried only a small bum bag, water, and a camera on the hike.
When to go: This hike can be done from late April to early November, but the earlier you go, the more snow you’ll encounter. Because of the distance involved, summer is probably the best season because you’ll be blessed with plenty of daylight hours.
Access: There are only 2 trails accessible by public transport. If you’ve got a car, then you can consider approaching from the other, more popular side of the mountain. I hitchhiked from neighboring Mt. Hachimantai and ended up at Hachimantai Onsen (八幡平温泉郷). The Matsukawa trail from Matsukawa Onsen also looks promising. Both hot springs are accessible by bus from Morioka station. The most popular trail is called the Yakebashiri (焼走り) trail, reachable by taxi from Oobuke (大更) station near Morioka. Click here for the bus schedule to Matsukawa Onsen.
Mt. Kashimayari is arguably one of the toughest day hikes around, and the hike described here is a shorter (and more scenic?) route than the Ogisawa (扇沢) approach.
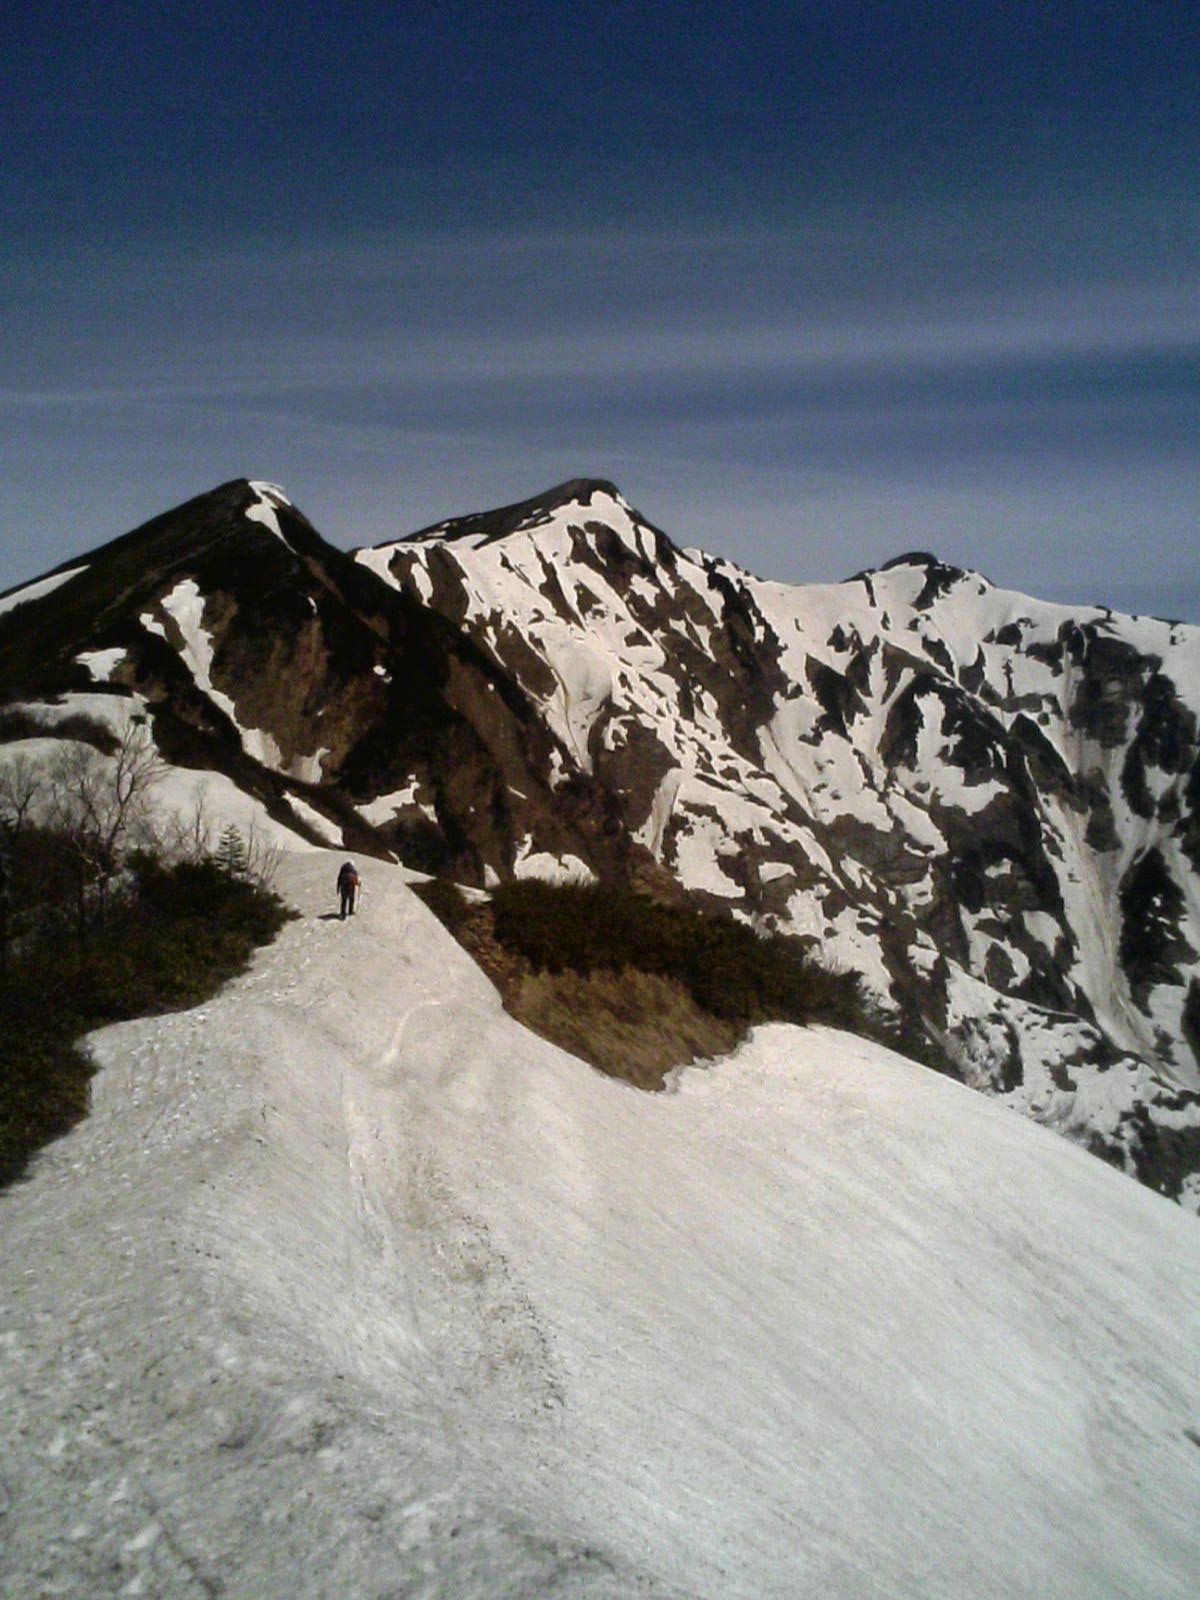
The hike: The trailhead is at the end of a long, dirt, forest road that is, unfortunately, closed to vehicular traffic. That means you’ve got a 4km warm-up at the beginning of the day. The forest road follows a beautiful river, and you should reach the end in about an hour or so, depending on your pace. You know you’ve reached the end because there’s a giant concrete dam staring right at you! This dam is so big that a tunnel has been built to let hikers through to the other side. When I did this hike, it looked like they were preparing to build some kind of pedestrian bridge across the river, but if they haven’t then just use the tunnel. The trail wastes no time in gaining altitude, so fill your water bottles at the dam before setting off. The trail climbs up, up, and up some more. It’s not too difficult at first, thanks to the abundance of small log ladders built into the mountainside. After about 2-1/2 or 3 hours of climbing, you come to a flat spot known as the Takachihodai (高千穂台). This is a great place for a snack, as you’ve got the huge peak of Kashimayari rising directly in front of you. It’s difficult to believe that you’ll be sitting on the top in several hours. After adequate rest, head up the mountain some more. Depending on when you go, you’ll probably run into your first batches of snow in the next area. The trail definitely gets rockier and steeper, but if the weather is good you should have no trouble finding your way. The ridge line will come closer and closer, and eventually you’ll have to traverse to the right in order to hit the ridge. Everything is marked with paint and arrows, but be very careful if it’s raining or foggy. Once you reach the ridge, the trail splits. Left will take you to the top of Jii-ga-take in about an hour, but you’ll want to go right for about 30 minutes until reaching Tsumetaike Hut (冷池山荘). This is a good place to stay if you want to turn this into a 2-day hike. Otherwise, fill up on water and prepare to climb some more. It’ll probably take about 1-1/2 to 2 hours to reach the summit from the hut, as you’ve got a lot of up and down. If the weather is good the views will be phenomenal. If not, then race as quickly as you can so you can come back and rest at the hut! Kashimayari has 2 twin peaks, and the first one you come to, nanhou (南峰) is the higher of the two. The views are stunning to say the least. Mt. Tateyama and Mt. Tsurugi tower to the north, as Mt. Goyru and Shirouma flow gracefully to the east. Look westward, and you can just about count every peak in the Kita Alps. Mt. Fuji? Yep, it’s visible too (on a clear day, that is). Once you pat yourself on the back and pinch your to see if it’s a dream (and take some photos), head back to civilization the same way you came. Or, turn this into a multi-day trek by heading toward Mt. Goryu or the other way to Mt. Harinoki.
When to go: This hike can be done from late April to early November, but the earlier you go, the more snow you’ll encounter. I did this hike in early June, just before the rainy season, and you can see how much snow there still was!
Access: To do the hike described here, you really need your own car (or lots of money to hire a taxi). The trailhead is accessible on the road that goes past Jiigatake Ski Resort (爺が岳スキー場). If you can make it to Oomachi Hot Spring (大町温泉)by bus from Shinano-Omachi Station (信濃大町駅), then you can take a taxi from there or try your luck hitching. Because of the length and difficulty of the hike, you need to camp at the trailhead in order to make it off the mountain before dark!
Level of difficulty: 5 out of 5 (elevation change: ~1600m).
Mt. Makihata is a majestic, remote mountain located on the border of Niigata and Gunma Prefectures. The views are outstanding and it’s home to one of the cleanest emergency huts in all of Japan.
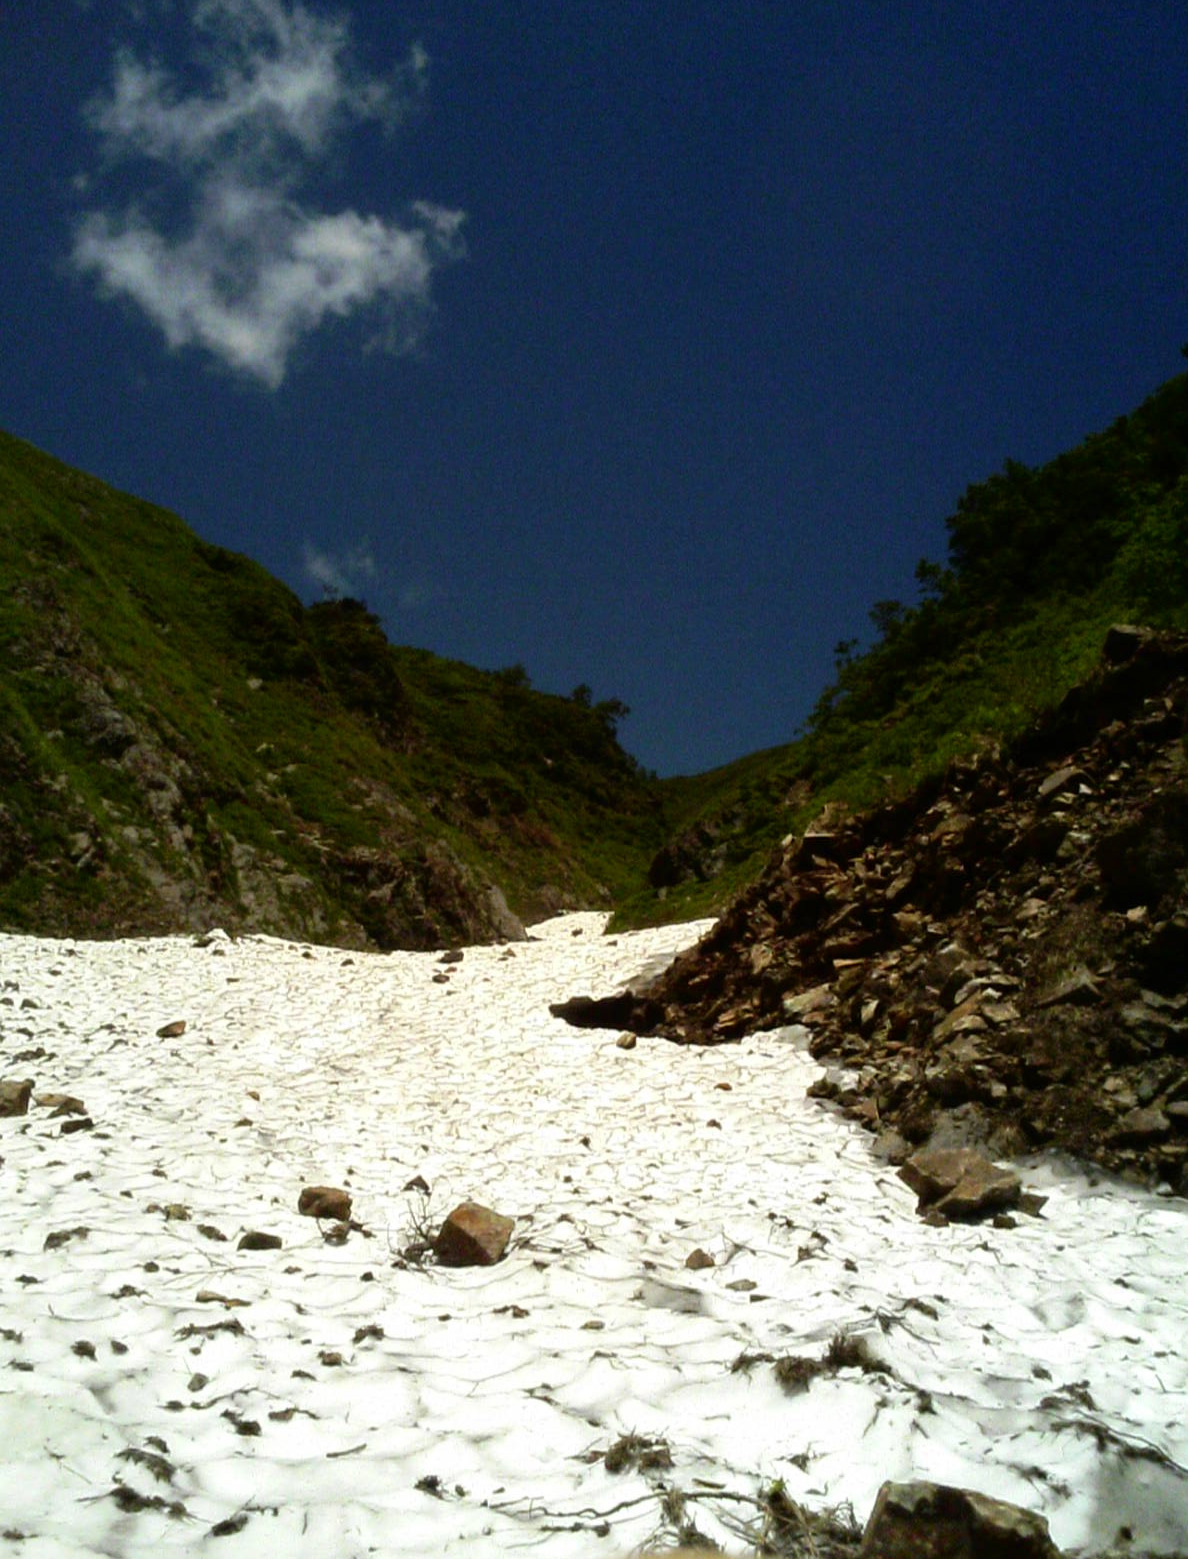
The hike: From the bus stop, hike up the small forest road directly in front of you. It winds its way toward the trailhead, passing a couple of huts along the way. It’s about 1km to the start so it should take you about a half hour or so. There’s a big parking lot at the trailhead, as well as a toilet and water source. After reaching the trailhead proper, hike about 2 or 3 minutes and you’ll come to an important junction. You have 2 choices. 1) Take the conservative route on the right or 2) Go left and take the ‘adventure course’. The hike described here is a loop, so you can make the decision based on your experience (and the weather). For the adventurous (and expereinced), take the left course. At first it’s easy going through some vegetable gardens and then you come to your first (of many) stream crossings. Basically, the trail follows a beautiful sawa (沢- mountain stream) all the way to the top. There are paint marks and arrows on all the rocks, and you’ll have to cross the stream about a half a dozen times before reaching another junction in about a half hour or so. Stay to the right, as the left trail isn’t well used. Both meet up again after about an hour or so. After crossing the stream yet again and climbing up some waterfalls, you’ll come to yet another junction. Basically, the stream splits in two, and you have the choice of going left or right. My advice is to go right, because I originally chose the left option but had to retreat because the course basically ran straight through the middle of the river! The right hand stream, otherwise known as the nukubi course (ヌクビ沢), is better marked and you won’t get as soaked crossing the stream. This section of the hike has a year round snow field, so you’ll spend most of your time sludging through the snow. Be careful of where you step because you’re basically walking on top of a river. You definitely don’t want to break through the snow! Anyway, depending on when you go will depend on how much snow there is. The trail climbs up and up, seemingly never-ending. After about 2-1/2 hours, you’ll reach the end of the stream (this is your last chance to get water, so fill up). The trail then climbs rather steeply, with lots of zig zags and some loose rock, but you’ll pop out on the ridge line in about 20 mintues or so. Once you hit the ridge, you can go left to reach the summit of Mt. Waremeki (割引岳). The views are wonderful, so take a well deserved snack break. Now, it’s time to reach the true summit of Mt. Makihata. Go back the way you came to the trail junction, but instead of descending the way you climbed up, continue straight ahead, passing scores of wonderful mountain flowers along the way. The signpost on the summit of Makihata can be reached in about 20 minutes or so. There are a couple of benches here, but the true summit is another 5 minutes away, on a completely unmarked set of rocks. Enjoy your lunch, and if the weather is good, you’ll have an excellent panorama of Mt. Tanigawa, Hotaka, Shibutsu, and even out to the peaks of Nikko. From the signpost, head down the only trail you haven’t taken yet, and you’ll reach an amazing mountain hut in about 20 minutes. There’s also a water source nearby. This hut is free, completely unmanned, and has one of the best toilets in all of Japan! After you do your business, sit on the adjacent exercise bike and start pedaling to flush the toilet! Anyway, if you want to stay here, then bring a sleeping bag and food. Otherwise, you’ve got a 3-1/2 to 4 hour knee knocking descent awaiting you. The trail back to civilization initially climbs steeply to Mt. Maemakihata (前巻機), and then briefly follows the ridge before shooting straight down the mountain. There are hundreds of wooden steps built into the mountainside and soon you’ll enter the forest. Keep climbing down, down, down until you eventually end up where you started. Oh, I must mention that it’s impossible to do this hike in reverse, because the nukubi course is designated for climbing only. Trying to descend on this trail will probably result in loss or life or serious injury. Also, if it’s been raining a lot and the rivers are swollen, DO NOT take the nukubi course. The river crossings are treacherous when the water level is normal!
When to go: This hike can be done from late April to November, but expect a lot of snow until at least the start of the rainy season. The fall colors are breathtaking.
Access: From Tokyo, take the Niigata Shinkansen and get off at Echigo-Yuzawa station. Transfer to a local train in the direction of Niigata (any train is ok, as long as it doesn’t go to Minakami). Go 2 or 3 stops and get off at Muikamachi. (六日町). From there, take a bus bound for Shimizu (清水) and get off at the last stop. The bus takes about 45 minutes and isn’t so frequent, so if you’re doing this as a day hike then consider taking a taxi to the trailhead. Click here for the bus schedule.
Level of difficulty: 4 out of 5 (elevation change: 1377m).
Note: The main trail up Mt Ibuki (as described below) is currently undergoing restoration work and is closed to hikers. It is expected to open sometime in 2025. If you would like to climb in 2024, consider taking the hiking bus from Maibara station.
Mt. Ibuki is a bald turtle-shell shaped peak located near the city of Maibara on the eastern shore of Lake Biwa, Japan’s largest fresh water lake. It’s famous for wildflowers, and the panoramic view from the summit is nothing short of spectacular, if you are lucky enough to have a cloud-free day.
The hike: From the bus stop, walk up the road past the shrine, and you’ll see the trail leading into the forest. The trail starts off steep for the first 20 minutes or so, and then flattens out as you approach the top of the first ski lift. There are lots of run down buildings here that function as restaurants and ski rental shops during the short ski season. There’s a public toilet a short distance up the ski field, which is open all-year round. The water in the sink is safe to drink, and it’s your last chance for water before the summit. This is where the real hike begins, as the trail heads straight up through the resort. No switchbacks here. If the weather is good you might share the resort with a few para-gliders. After about and hour of steep climbing, you’ll reach the mid-point of the ski resort (and the top of the gondola). The trail will probably start to become more crowded, as the majority of hikers skip this first step and start the hike from here. Take a quick break, because you’ve still got over 600 vertical meters to climb before reaching the summit plateau. At first the hiking is quite gentle to the end of the ski lifts, where you’ll reach a hut selling refreshments. This is the 5th station (五合目). A little further up, you’ll find an immaculate emergency hut at the 6th station (六合目), which is free to stay in (but has no toilet or drinking water). From here until the top, it’s a series of never-ending switchbacks, but it really is enjoyable if the weather cooperates. You’ll have a panoramic view of Lake Biwa, and the views keep opening up as you get higher and higher. After a seemingly endless ascent, you’ll finally come to the summit plateau, and you might be a bit disappointed depending on when you come. During the week it can be quite deserted, but on weekends in the spring the top fills with flower enthusiasts, many of which DROVE to the top! You see, there’s a toll road and parking lot only 20 minutes from the summit. Actually, it’s not nearly as bad as it sounds because the road is on the other side of the mountain and doesn’t spoil the view at all. The one thing that does spoil the view, however, is the row of souvenir shops and microwave relay tower. Auggghhh! Why can’t Japan just leave the mountains to their natural beauty?! I must say, however, it pails in comparison to what’s been done on top of Mt. Fuji. Anyway, if the weather is clear then you can forget about all of the ugly buildings and enjoy one of the greatest panoramic views in Japan! (No lie). All of Lake Biwa stretches out to the west, as Hakusan dominates the northern horizon. The endless stretch of the Japan Alps are visible to the east, and the skyscrapers of Nagoya glitter to the southeast. Due south, the rolling sea of mountain ranges in Mie Prefecture majestically overlap themselves. If you need a can of soda or a toilet break, then knock yourself out. Take in the views, or shelter in the shops if the cloud is in. If you do this hike in the winter, then you can find yourself in complete solitude. Plus, the decrepit buildings are transformed into a weird sci-fi movie set when the cloud and snow come in. Anyway, head back down the same way you came up and don’t forget to check the bus schedule before you start your hike. I missed the last bus and had to hike over an hour back to the station!
When to go: This hike can be done from March to November. A winter ascent is only recommended for those with winter climbing experience, avalanche training, and the right equipment. However, thanks to global warming, the summit doesn’t receive quite nearly as much snow as in decades past, so you should be ok with just a light pair or crampons, even in February. (The ski resort is permanently closed now, due to lack of snow).
Access: From Kyoto, take the JR Tokai line to Maibara station, changing to a local train bound for Ogaki. Get off at Omi-nagaoka (近江長岡) and change to a bus bound for Ibukiyamatozanguchi. (伊吹山登山口). You can also approach from Nagoya. Click here for the bus schedule. You can also reach the trailhead by bus from Nagahama (長浜) station, but it’ll take a bit longer than the other bus. Click here for that bus schedule.
Mt. Ryokami is an ancient, rocky peak sitting on the border of Gunma and Saitama Prefectures. The top offers wonderful panoramic views of the surrounding mountainous landscape and is a part of Chichibu-Tama-Kai National Park.
The hike: From the bus stop, climb the stairs across the street to Ryokami Hut (両神山荘). This hut features a real kotatsu (the heater is a fire pit in the floor) and is a great place to rest after the hike while waiting for the bus. The trail goes to the left of the hut and climbs steeply past vegetable fields and enters a dense forest. During the first half an hour or so keep your eyes peeled for Kamoshika (Japanese Mountain Serow), as there are a few in this area. I saw one on the way back to the bus stop after completing the hike. Soon you’ll come to a trail junction. Both trails meet up after a few hours, but the one on your right isn’t well used, so stay on the main, well-trodden path. From this junction, it’s a gradual climb for the next 90 minutes or so in a shaded valley following a stream. The trail starts to get steeper and steeper, but you’ll have a nice big hut (清滝小屋) staring you in the face in next to no time. This hut has water and is a lovely place to stay, costing 5000 for 2 meals, or 3000 yen for a place to sleep only. (the hut is only open from April to November) Alternatively, you can camp nearby. Take a break here, as things are about to get rocky. The trail continues past the hut and then gets really steep. Some of the rock formations have chains embedded for ease of climbing. In about an hour of sweating it out you’ll reach a shrine and the trail will start to get much easier. From here to the top it’s just a matter of traversing a few “false summits”. There’s quite a bit of up and down, but a piece of cake compared to what you’ve been through. Eventually you’ll reach the true summit, marked by a signpost and a huge rock formation. Enjoy the panoramic views, with Mt. Asama staring you in the eyes, the Minami Alps and Yatsu-ga-dake to the Northeast, and Mt. Fuji poking its shy head up above Mt. Kumotori. Take a well deserved lunch break and head back the way you came. If you’d like to turn this into a 2-day hike then consider staying at the hut along the way or at the hut at the bus stop.
When to go: This hike can be done year round, but bring crampons in the winter because it can get quite icy and the main trail sits in a shaded valley.
Access: From Ikebukuro station, take a train on the Seibu Line to Chichibu Station. From there, transfer to a bus bound for Hinata Ooya (日向大谷). You’ll more than likely have to change buses at Oganomachi Yakubamae (小鹿野役場前). The bus takes a little over an hour (about 15 minutes on the first bus, and then around 50 on the second). Click here for the bus schedule.
Map:
Level of difficulty: 3 out of 5 (elevation change: 1053m)
Mt. Adatara is an active volcano located across the valley from Mt. Bandai and is just a stone’s throw from Fukushima city. Beautiful rock formations and a lovely hut to boot.
The hike: From the ski resort parking lot, head toward the right hand group of buildings and start walking up the far right ski slope. The trail will branch off to the right and follow the ski resort for a short time before reaching a forest road. The trail crosses the road several times before heading up to a ridge and flattening out somewhat. All of this should take about 45 minutes or so. Continue following the gentle trail for another 15 or 20 minutes until you come to a junction. If you head left you follow a different ridge, but instead continue straight ahead for another half hour and you’ll come to the Kurogane Hut (くろがね小屋)This hut is open all year round and is an amazing place to stay in the winter. Plus, it has a hot spring bath! If you’re only coming for a day trip then take a quick break at the hut before starting the real climb to the summit. From the hut, the trail starts climbing rather steeply through rugged volcanic tundra. It should take anywhere from 45 minutes to an hour to reach the summit. If the fog is in then keep an eye out for all of the paint marks on the rocks. Whiteout conditions in winter can be quite dangerous, so go with a group and bring bamboo poles to mark your path. The rocky summit offers spectacular views of the surrounding scenery: Mt. Bandai directly in front of you, Mt. Iide to the northeast, and Mt. Azuma, which is connected to this mountain by a long trail. (It could make for an interesting trek). Anyway, enjoy your lunch with hoards of other hikers who probably came up from the ski gondola on the other side of the mountain. If the weather is good and you’ve got time, you can hike to Mt. Tetsuzan, the true high point of the volcano, and there is a free emergency hut just beyond the summit of Tetsuzan. From the summit, follow the signs to Mt. Yakushi (薬師岳)and the ski resort. This side of the mountain is much easier (and more popular) than the route mentioned here, but makes for a nice look hike. You should reach the top of the ski resort in about 45 minutes from the top. If you’re too tired, then take the gondola down, but otherwise follow the path down back to the parking lot. In winter, you can glissade down the slopes in record time. This hike can also be done in reverse, and you could also use the gondola to cut out 400m of elevation gain.
When to go: This hike can be done year round, but be prepared for meters of snow in the winter (bring snowshoes or crampons). The fall colors in mid to late September bring the crowds.
Access: From Fukushima station, take a local JR train and get off at Nihonmatsu (二本松) station. From there take a bus to Adatara Kogen Ski Resort. Be sure to check the bus schedule (call 0243-23-0123 in Japanese), as some buses only go part of the way to Dake Onsen. It’s a quick 20 minute taxi ride or possible hitch from the Onsen, or you could shell out about 5000 yen for a taxi ride from Nihonmatsu all the way to the trailhead. Click here for more information about the bus. In the summer of 2024, there was one bus a day to the trailhead, leaving from Nihonmatsu at 8:15am. Here is a flyer from last summer. The 2025 schedule hasn’t been released yet, so contact the bus company directly to inquire.
Mt. Kaimon is a perfectly conical dormant volcano rising straight from the sea on the southern point of Kagoshima prefecture, and features a unique trail devoid of a single switchback.
The hike: From the trailhead, follow the trail straight through a somewhat dense forest. The trail is well trodden and there’s only one way to the top, so it’s pretty difficult to get lost. You should reach the 5th stage (五合目) in about 30 to 45 minutes. From here the fun begins, as the trail follows the contour of the mountain in a full circle, without ever doing any switchbacks. There’s no other trail like it in Japan. You will have wonderful views of the surrounding coastline and the crystal clear waters. The trail is quite rocky, so make sure to wear a sturdy pair of shoes. Continue winding your way around the mountain for about 90 mintues or so until the exposed, rocky summit comes into view. In wet weather this final section can be very slippery, so take care. Once on the top, enjoy the amazing panoramic view. On a clear day you can see all the way to Yakushima! After a well deserved break, head back the way you came, and watch out for the crowds if you got an early start.
When to go: You can pretty much do this hike all year round, although it may be a little icy on top during the winter, so bring a light pair of crampons just in case.
Access: From Kagoshima station, take either a local or kaisoku train on the JR line to Yamakawa (山川)station. From there you can transfer to the IbusukiMakurazaki Line (指宿枕崎線) to Kaimon Station (開門駅). Be warned that trains are NOT frequent, so it might be better to either fork out 3000 yen for the 20 minute taxi ride or try your luck hitching. If you’re taking the train, the trailhead is a 30 minute walk due south of the station (just walk toward the towering peak in front of you).
Level of difficulty: 2 out of 5 (elevation change: 764m)
Mt. Takazuma, the tallest peak in the Togakushi (戸隠) range, offers amazing views of Mt. Myoko and the Northern Alps. It’s also one of the only peaks in Japan where cattle can be seen grazing in the foothills.
The hike:
From the bus stop, walk past the campground and through the cow pasture. The trail follows a small mountain stream and then climbs steeply up to the mountain ridge, where you will find an emergency hut in fairly good condition. It should take about 1-1/2 to 2 hours to reach this hut. From there, turn right and head toward Mt. Gojizo (五地蔵岳). The pyramid-shaped peak of Takazuma will come into view on your left. Follow the trail for about 40 minutes until you reach 八丁ダルミ。There is a lot of up and down before reaching this point. Takazuma will be directly in front of you, and it’s a steep, relentless climb for about an hour, but you’ll be rewarded with outstanding views. Bring a lunch and your camera. The top is very rocky but there are lots of places to sit and enjoy the scenery before going back the way you came. The entire hike should take between 6 and 8 hours.
When to go: I went in May and there was still lots of snow, so bring an ice axe and crampons. All of the snow usually melts by late June, and the fall colors are also beautiful. The first snow usually comes in early November.
Access: Take a Togakushi bound bus from Nagano station and get off at Togokushikyampujo (戸隠キャンプ場)The bus takes about an hour and the first one leaves Nagano at 7:00AM. (Nicely timed for the night buses from Osaka and Tokyo) Click here for the bus schedule.