Posted tagged ‘japan’

Mt. Tarumae (樽前山)

October 28, 2009

Mt. Tarumae is an active volcano located on the shores of Lake Shikotsu in Western Hokkaido. In addition to the outstanding views of the lake below, the mountain offers a rare chance to view an unstable lava dome.

tarumae1

The hike: There’s a toilet and a small hut at the trailhead, but no water to speak of, so make sure you fill up before leaving Lake Shikotsu. The trail immediately starts gaining altitude, but the going is made easier with an endless array of wooden steps. You’ll reach a small clearing after 10 minutes or so, where the views will start to open up. You’ll see Lake Shikotsu directly behind you and Mt. Fuppushi rising steeply on your right. Directly in front of you lies the conical peak of Mt. Tarumae. The trail cuts a beeline directly across the eastern flank of the volcano, similar to what occurs on the trail up Mt. Asama in Nagano Prefecture. The trail is well-maintained and is suffering a bit from overuse, so it’s almost impossible to get lost. You’ll reach the crater rim in about a half an hour or so, where you’ll find a junction. Turn right for Higashi-dake (東岳), the high point of the crater. The views towards the lake below are spectacular, and on a clear day you can see Mt. Yotei rising gracefully in the distance. If you’ve got time, then you can circumnavigate the entire crater rim in about 2 hours or so. Just follow the trail around towards Nishi-dake (西岳). Whatever you do, don’t enter the caldera to get a look at the gigantic smoldering lava dome, as the gases will likely kill you. The lava dome has been growing steadily since 1909 and is now taller than the crater itself. This is an extremely active volcano with a long history of powerful eruptions and is currently under 24 hour surveillance by the Japan Meteorological Agency. When you’ve seen enough then you can simply retrace your steps back to the parking lot. If you’re looking for a more challenging hike away from the crowds, then you can consider climbing neighboring Mt. Fuppushi. There’s a trail to the summit on the other side of the parking lot. It should take about 3 to 4 hours to reach the top, where the views are outstanding. Make sure you bring a bear bell and/or bear repellent as the col between Tarumae and Fuppushi is a popular hangout for brown bears.

When to go: This hike can be done from mid April to late November, when most of the snow is gone. A mid-winter ascent is also possible for those with winter mountaineering experience and equipment, but you’ve got a much longer approach since the road to the trailhead will be closed.

Access: The start of the hike is only accessible by private transport. You can get as far as Shikotsu-kohan by bus, from where you can hire a taxi for the 3000 yen journey to the trailhead. Click here for the bus schedule from Sapporo to Lake Shikotsu. The number for the taxi company is 0123-25-2111. Just tell them you want to go to Tarumae-tozanguchi. You can also try your luck hitching by walking out to the main road just above the parking lot at Shikotsu-kohan.

Map: Click here

Live web cam: Click here

Level of difficulty: 1 out of 5 (elevation change 363m).

Mt. Mikuma (三熊山)

July 26, 2009

Mt. Mikuma is a small hill overlooking the coastal resort town of Sumoto on Awaji Island. The small elevation change and outstanding panoramic views make it the perfect afternoon stroll after a morning on the beach.

mikuma1

The hike: There’s a tourist information center at the bus terminal if you’d like to get a basic map or inquire about accomodation options. Walk out the main entrance of the terminal and turn right, heading for the large supermarket just in front of you. This is an excellent place to pick up supplies. You can also marvel at the grass parking spaces! Anyway, continue walking past the supermarket on the main road into town. If you want a little more scenic and quieter approach to the beach, then walk a few blocks towards the sea, where you’ll find a wonderful wooden boardwalk. Cross over the bridge and decent to the beach. This is actually one of nicest beaches in the Kansai area (sans Shirahama), but beware that there are no coin lockers here. (There are a few at the bus station if you’d like to save some money). Otherwise, you can pay 1000 yen at any of the shops on the beach and they’ll keep your stuff and let you have a warm shower. If you want to do the hike first, then walk all the way along the beach until reaching a rather large, modern hotel called the Hotel New Awaji. The hiking path starts just beyond the hotel, on a steep paved driveway. Follow the road to the top of the hill, where you’ll see signs pointing towards Mt. Mikuma. Turn left and follow the paved path as it winds its way through a spectacular forest. Despite the fact that it’s a completely concrete path, the beauty of the flora really makes you forget about this unfortunate truth. If you’re walking in sandals, then you might actually appreciate the grip the path has to offer. Continue climbing and turn left at the first major junction you see. Again, there’s a signpost here, so it’s difficult to get lost. After another couple of switchbacks you’ll arrive at the top of the ridge. Turn left again and the castle will come into view directly in front of you. There’s a hidden parking lot for people who are lazy and want to drive up, but I guarantee that you’ll pretty much have the place to yourself during the summer, as the hot and humid weather will keep most in their fancy hotels below. There’s a shop just below the summit that sells shaved ice and soft drinks. Make your way towards the castle, where you’ll be rewarded with stunning views of the beach below. The castle itself is a concrete reproduction built in 1928, but the castle walls date from the 6th century. The castle is free to enter and has outstanding vistas all the way over towards Wakayama city. If you’re keen to do a little more walking, then you can retrace your steps back towards the paved path, where you’ll find a loop trail over to nishi-no-maru (西の丸). There aren’t any views on that side of the mountain, but it looks like a good place to escape if there are any big crowds near the castle (which there could be in autumn.) Anyway, retreat back to the beach and reward yourself with a refreshing swim. In addition, Hotel New Awaji has two amazing hot spring baths that can be yours for a measly 1800 yen (surely the steepest day-use fee for any hot spring in Japan). There’s plenty of free camping on the beach, or you can shell out the big bucks for the hotel. There’s also a hostel-eque place right on the beach that gets very crowded with groups in the summer.

When to go: This hike can easily be done year round, but the best time is probably the summer, where you can combine the hike with a lovely swim on the beach. In addition, it can be easily done in sandals, eliminating the need to carry an extra pair of walking shoes.

Access: From the Hankyu bus terminal in Umeda, take a bus bound for Sumoto bus center (洲本バスセンター). The bus takes 2 hours and costs 2300 yen (one-way). Click here for the schedule. There are also JR buses leaving from the JR highway bus center (also in Umeda) which cost the same price and take about the same amount of time. Alternatively, you can also take a bus from Sannomiya station in Kobe. Click here for the schedule (click on the PDF file on that page).

Level of difficulty: 1 out of 5 (elevation change 133m)

This slideshow requires JavaScript.


Interview with Craig Mclachlan

May 10, 2009

Here is a recent interview I did with Lonely Planet author Craig Mclachlan for Kansai Scene magazine.

Craig

Mt. Fuji (富士山)

April 27, 2009

Mt. Fuji now has a climbing fee for all hikers regardless of trailhead or approach. Be prepared to pay to climb the mountain in 2025 if hiking during the summer season.

Interested in climbing Japan’s tallest mountain?  Our guidebook will show you everything you need to know for a successful climb.

IMG_7352.jpg

Mt. Kurobegoro (黒部五郎岳)

April 21, 2009

This blog post was written back in 2009. For the latest information about this hike (including color photos and maps), please consider purchasing my guidebook to the Japan Alps. 

Mt. Kurobegoro is on the main Kamikochi-Tateyama trekking route, and one of the most unspoilt peaks in the Kita Alps. The huge col below the summit traps snow until late in the year, providing numerous photo ops when the weather is cooperating.

kurobegoro

The hike: Please note that the trail from Utsubo towards the first big junction is upkept and is becoming less and less popular. If you’ve got your own transport, then it’s better to start at Hietsu Tunnel (飛越トンネル), which is just up the road from Utsubo. Anyway, walk on the forest road that continues past the bus stop to its terminus. It’s about 5km or so, and it should take about an hour. Once you reach the end, the trail will branch off towards the left, climbing a somewhat steep spur before flattening out into some marshlands. There’s a water source here, and the mizubasho (skunk cabbage) bloom from early to mid June. Stay on the trail for another 30 minutes or so, and you’ll reach a trail junction, and considerably more foot traffic. This is where the path meets up with the main trail coming from Hietsu tunnel, so turn right and follow the signs to Mt. Teraji (寺地山), which should take another hour or so to reach. Again, the trail is well trodden and easy to follow. The views will start to open up the higher you climb: Mt. Yakushi towers to your left and Mt. Kasa keeps a watchful eye on your right, while Mt. Kurobegoro rises directly in front of you. Continue climbing up for another hour or so, and you’ll find a trail junction on your right, which leads down to Kitanomata Emergency Hut (北ノ俣非難小屋), your home for the night. The triangular hut is small but well kept, with plenty of water flowing out front. If you’ve gotten an early start, then you can consider climbing up and over Mt. Kurobegoro, but keep in mind that you’ve got 4-1/2 to 5 hours of tough hiking before reaching the next hut, so plan accordingly. The next morning, retrace your steps back to the junction, turning right towards Mt. Kitanomata (北ノ俣岳). Soon you’ll rise above the tree line, and if the cloud isn’t in you can see your destination. After an hour or so, you’ll reach a large trail junction, where you’ll finally be on the main ridgeline of the Kita Alps. Turn left if you want to go to Tateyama, or right if Kamikochi is your destination. If you just want to do a quick up-and-back of Mt. Kurobegoro, then leave your pack at the junction. At any rate, it’s a steady 2 hour climb through stunning alpine terrain. Keep your eyes out for ptarmigan and take in the scenery if the weather is good. Unfortunately, when I did this hike in the pouring rain and I couldn’t see a thing. so you bet I’ll be back here to get revenge. Carry on climbing slowly and steadily, and before long you’ll be sitting on top of the target peak. The trail splits in two on the summit, but you can take either fork, since they both meet up again at the bottom. If there’s still a lot of snow, then the left fork is probably a better option. Descend through the spectacular col, and after 90 minutes or so, you’ll arrive at Kurobegoro hut and campground. Set up camp here, or continue along the ridge to Sugoroku if it’s still early in the day. Alternatively. you can turn left at the next trail junction and head north towards Mt. Washiba or Kumo-no-daira. Take your time and enjoy exploring one of the best sections of the Japan Alps.

When to go: This hike can be done from mid-July to early October, when most of the snow is gone. If you’ve got crampons and winter hiking experience, then you can go earlier in the season. Click here for an unbelievable account of a Japanese guy who skied 35km up and over the peak and down to Shin-hotaka hot spring during Golden Week!

Access: Access is really difficult without a car, but it can be done with a little time and patience. From the bus terminal next to Takayama (高山) station, take a bus bound for Nouhi-basu Kamioka Eigyousho (濃飛バス営業所) and get off at that stop. From there, change to the Yama-no-mura bus (山之村バス) bound for Wasafu (和佐府) and get off at Utsubobashi (打保橋). There are only 2 buses a day to Wasafu (only 1 during the winter season), so make sure you time your approach accordingly. If you take the 9:40am bus from Takayama, then the transfer is timed, so you can arrive at the Utsubo trailhead at 12:16pm. Click here to download the bus schedule from Takayama to Kamioka and here to download the schedule for the Yama-no-mura bus.

Level of difficulty: 4 out of 5 (elevation change ~1800m)

Mt. Ryōzen (霊仙山)

March 30, 2009

Last updated: Sept. 07, 2019

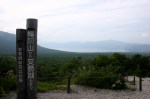
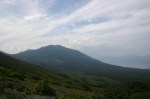
Mt. Ryōzen (pronounced in Japanese as ‘ryouzen zan’), is a spectacular peak located on the eastern shores of Lake Biwa, across the valley from Mt. Ibuki. Despite being only 1000m in height, the mountain is known throughout Japan for its stunning collection of alpine flowers, excellent panoramic views, and broad grasslands reminiscent of the hills of Scotland.

ryouzen1

Warning: The leeches on Ryouzen are brutal, so you should definitely avoid hiking during the rainy season and most of the summer. Perhaps this one is best left for an autumn or spring hike. Also, the waterfall route is currently closed, so use the alternative approach described below.


The hike (waterfall route): (currently closed to hikers)From Samegai station, head out the front door and walk straight for about 20 meters, where a street will branch off diagonally towards the right. You’ll pass a small grocery store on your left side, which is a good place to pick up supplies. Continue walking on the paved road for about 3km or so, following the signs towards the trout farm (養鱒場). It’s an easy, flat walk that should take about 30 minutes or so. Just after passing the bus stop at Kaminyuu (上丹生), the road will curve towards the right, crossing a bridge over the river. Instead of crossing the bridge, turn left and follow a small paved road next to the river, following the sign that says 霊仙登山道. The water is really clean and you’ll find lots of bridges crossing over to houses on your right. Continue walking straight another 1/2 km or so until reaching what appears to be a water treatment plant. Turn right on the forest road just in front of the facility and follow the road to its terminus, where you’ll find the trailhead. The trail starts off gentle, and soon follows a huge dry riverbed. There may be water flowing during the rainy season, but it was bone-dry during my hike in late March. Follow the paint marks on the rocks and the red tape on the trees. After about 20 minutes or so, you’ll see a huge gully coming in from the right, as well as your first signs of running water. This place is called Ichi-no-tani (一の谷). There’s an alternate trail that climbs the gully to the right, but you’ll want to continue hiking straight, along the river. The path will meander through the river, but there’ll be plenty of places to cross if it hasn’t rained lately. Continue past the area marked ni-no-tani (二の谷) and after a short time, the path will start climbing on your right, away from the river. Don’t worry – you haven’t made a wrong turn, as the steep path will rejoin the river a little further along. Soon you’ll reach a trail junction. If the river is swollen, then take the path to the right. Otherwise, take the signpost marked うるしが滝. You’ll immediately pass under a huge boulder, and then follow the river for another 10 minutes or so until arriving at the base of the falls. Drop your pack at the junction, and cross the river towards the left and you can actually go to the base of the falls. This is one of the more impressive waterfalls in the Kansai area, and in old times mountain priests used to pray under its waters. Retrace your steps back to the junction, and take the trail marked 頂上. The path will climb up and over the falls, following the river for a few hundred meters before branching off towards a gully on your right. The trail will become much steeper now, but there are plenty of ropes tied into the mountain to assist you on the ascent. If it’s been raining then the trail will become one ugly, muddy mess, so consider bringing gaiters. There are lots of red tape marks tied to the trees, so it’s easy to find your way. After about 20 minutes, you’ll reach yet another trail junction. Don’t turn right, as it’ll take you back down the mountain. The signpost has 頂上 pointed towards the left, but the actual trail is straight ahead, so don’t get confused. The trail will branch off to the right, following another small gully before popping out on the ridgeline. Turn right once you reach the junction, and you’ll start climbing through bamboo grass. The views will start to open up significantly, as you’ll rise above the tree line. Mt. Ibuki will be on your right, with Hakusan rising just to the right of it. Behind you, you’ll see Ondake, Mt. Norikura, the Chuo Alps, Yatsugatake, and the Minami Alps (if it’s a clear day). Keep climbing straight ahead, where you’ll reach an emergency hut in about 10 minutes. The hut is unstaffed and free to stay in, but there’s no water source or toilets. Continue climbing on the well worn path towards the first rocky peak directly in front of you. At the summit, there’s a trail branching off to your right, but ignore it and continue straight, towards the top. You’ll descent to a huge col and climb up the other side. Once on top, ignore a trail on the left that heads to the high point (最高点) and head to the summit, where the views towards lake Biwa are superb. Retrace your steps back to the junction and turn right to head to the high point. From here, you’ve got a few options, but the best would be to continue on the same trail towards Sasa-tōge (笹峠), which will take about an hour to reach. Another 30 minutes beyond that, you’ll descend to a river and junction. Turn right and make your way along the river to Asefuki-tōge (汗拭峠) and down to the parking lot at Kura-ga-hata (榑ヶ畑). You can try hitchhiking from here, or you can walk down the road for about an hour before reaching the bus stop at the trout farm. All in all, the entire loop should take anywhere from 6 to 8 hours, so be sure to get an early start.

The hike (trout farm route): From Samegai station, take the bus bound for yōsonjō (養鱒場) and get off at the final stop. Follow the paved road that hugs the left bank of the stream, with a large trout farm across the water on your right. It’s a long walk on the paved road for 3.8km to reach the start of the hike. There are a couple of smaller forest roads that branch off the main one, but stay on the main road as it follows the river upstream. After passing by a small parking lot the road turns to gravel and you’ll see a small hand-painted signpost that reads 登山口 just before a bend in the road. Take this route as it leaves the main road and continues following the narrow stream past an area dotted with moss-covered platforms. There used to be a small village here that was abandoned during World War II but now all you’ll find is a small, creepy-looking mountain hut. Pass by the hut and cross the small stream, where you’ll find some cold drinks for sale. There’s an honesty box where you can deposit your money if you’d like to purchase a refreshing (but not necessarily fresh) beverage. The trail climbs steeply from this point, switchbacking a couple of times until reaching Asefuki-tōge (汗拭峠). Turn left here at the signpost marked for summit (山頂). The path continues its steep climb towards the summit ridge, through a magnificent forest that really comes to life in the autumn. The route is very clearly marked and is divided into 7 stagepoints. The views really start to open up when you reach the 5th stagepoint (五合目), and the rock formations here make a great place for a break. If you look above you, you can see the summit ridgeline peeking out above the treeline. Continue straight on and you will soon leave the treeline and switchback through the grasslands to the summit of the first peak on the vast plateau. This is the 7th stagepoint (七合目). The path gradient eases up nicely here, and it’s a wonderful but long stroll through the grasslands to the summit. Keep an eye on time, as the final bus from the trout farm back to Samegai station leaves at 5pm. If you miss this bus, then you need to walk an extra 4km back to the station. Anyway, continue straight on and you will soon pass by a small pond marked by a large wooden shrine gate. From here it’s a steady climb up and towards the right to the crest of the ridge, where the views towards Mt. Ibuki and the Japan Alps really start to open up. Turn right here at this junction for a long drop to a saddle, followed by an even longer climb to the high point (最高点). If you want to save a bit of time on the return, then there’s an unmarked deer trail at the bottom of the saddle. Retrace your steps to the saddle and turn left, continuing left at every unmarked junction. You will eventually reach a small pond, so veer right here and climb back up to the 7th stagepoint (七合目). Retrace your steps back to the trout farm. All in all, it’s a strenuous hike that should take about 6 or 7 hours, depending on your speed.

When to go: This hike can be done year round, but you’ll want to be prepared for winter climbing conditions between December and April. The busiest times are during the summer months when the alpine flowers are in bloom, but you’ll have to fight with the leeches. Autumn and spring offer the most favorable hiking conditions. Be sure to bring a headlamp or flashlight if you happen to get caught out after dark, as the hike is quite long.

Access: From Kyoto (京都) station, take the JR Shin-kaisoku (新快速) on the Tokaido line bound for either Maibara (米原) or Nagahama (長浜) and get off at Maibara. Change to either a local or kaisoku train bound for either Ogaki or Toyohashi and get off at Samegai (醒ケ井) station, which is only one stop from Maibara. It’s a 4km walk to the trailhead, or you can take one of the infrequent buses, which now require advanced booking. Click here for more information.

Level of difficulty: 4 out of 5 (elevation change ~900m)

Total round-trip distance: 15km (6 to 8 hours)

This slideshow requires JavaScript.

Guidebook update

March 22, 2009

Yes, the rumors are true. Lonely Planet is finally updating their Hiking in Japan guidebook.

lp-guide

This time around, Craig McLachlan has teamed up with Richard Ryall and David Joll for a comprehensive overhaul of the 1st edition. Unfortunately, there are no new hikes in the updated 2nd edition, but I still think it’s worth adding to your collection. Also, if you’re thinking about buying the 1st edition, you might want to wait a month and buy the new one. The release date will be July 2009 (pushed back from an original release date in May). Although Lonely Planet has not officially announced the update, the information gathered here comes from two reliable sources: 1) Amazon.com (do a search for Hiking in Japan 2nd edition) 2) Personal communication with the lead author. (By the way, I don’t work for Lonely Planet and I’m not receiving any royalties from the sales of this guidebook).

Mt. Warusawa (悪沢岳)

March 22, 2009

This blog post was written back in 2009. For the latest information about this hike (including color photos and maps), please consider purchasing my guidebook to the Japan Alps. 

Mt. Warusawa is the 6th tallest peak in Japan and the gateway to the southern portion of the Minami Alps. Its remote location and huge elevation gain make it a must-climb for burgeoning alpinists. The peak is also goes by the name of Mt. Arakawa (荒川岳) so don’t be confused – they are the same mountain.

warusawa1

The hike: Most people start and finish this hike at Sawara-jima, knocking off both Mt. Warusawa and Mt. Akaishi in the process. Allow 3 days to complete this tough but scenic route. From the bus stop at Sawara-jima, continue hiking north along the paved forest road for about 10 minutes until reaching a large, green, steel bridge. The trailhead is on the left, just before you cross the bridge. The path is relatively flat for the first few minutes or so, until crossing a large suspension bridge over the river. The bridge is really narrow and not for those with acrophobia. After crossing the river, the trail winds its way through a scenic forest for about an hour and a half or so, before meeting up with a gravel forest road. Cross this road and head up a metal staircase built into the hillside, marked with a 千枚小屋 signpost. This is where the true climb begins, as you’ll start climbing making some significant gains in altitude on a well-worn trail through a beautiful virgin forest. Unfortunately, you’ll cross the forest road again after about 45 minutes and will actually be running parallel to the road for most of the way (though it is out of sight). Keep climbing steadily another hour or so and you’ll reach a flat area called Shimizu-daira (清水平), which has a water source. Fill up on water here, as you’ve still got a few hours of hiking left before reaching your home for the night. There’s only one way to go, which is up, up and then up again. About a half hour after leaving the water source, you’ll pass through another marshland, where the views will start to open up. If the weather is clear then you can see both Mt. Akaishi and Mt. Warusawa rising high across the vast valley to your left. You’ll be about 2100m above sea level, but you’ve still got another 500m or so before reaching the hut. Your next landmark will be a small pond on your right, and you’ll soon cross over a set of cables running overhead, which are used to haul supplies to the nearby mountain hut. Continue hiking through the primeval silver fir forest and eventually you’ll arrive at Senmai hut (千枚小屋) and campsite. The hut is open from mid-July to mid-October and costs 8000 yen with 2 meals or 5000 yen without. Camping runs 600 yen per person. Additionally, the 2nd floor of the hut is open out of season and won’t cost you a thing (but you’ll need your own sleeping gear and food). According to the map, it should take about 7 hours for the 10km, 1500m vertical ascent from Sawara-jima to the hut, but you can do it in less time if you’re fit and traveling light. The next day continue on the same trail to the top of Mt. Senmai (千枚岳). Soon after leaving the hut, you’ll pop out of the tree line, and will be there the rest of the day. The trail will become quite rocky, and the views are nothing short of spectacular. From this vantage point, you’ve got an unobstructed view of the entire Minami Alps, which is rare since the towering peaks usually conceal the larger ones behind. Anyway, stay on the ride line for about 45 minutes, and you’ll reach your first 3000m peak of the day, called Mt. Maru (丸山). A short up-and-down traverse later, and you’ll be sitting on top of Mt. Warusawa, the target peak. From here, you can retrace your steps back to Sawara-jima, but I really recommend staying on the ridge line a few more days. Get ready for a huge drop down to a saddle on the other side of Warusawa and a strenuous climb up to Nakadake (中岳), where you’ll find an emergency hut. There are a lot of ptarmigan in the saddle between the two peaks – I was luck enough to see a family with recently hatched chicks. The emergency hut at Nakadake is another possible place to stay, but be warned that it’ll cost you a jaw-dropping 4500 yen to stay in a place with no water or food! This hut is shut tight in the off season, and camping is prohibited in the vicinity. The astronomical costs are due to a monopoly by the Tokai Forest corporation, which owns every single hut on the route. Just behind the hut, you’ll find the summit of Mae-dake (前岳), where you’ll have to make a decision. Turn left to descend to Arakawa hut (荒川小屋) and the gargantuan climb up to Mt. Akaishi. Turn right if you’d like to head towards Mt. Shiomi, which will take another 2 days to reach. Click here for some great photos of the entire Warusawa/Akaishi loop.

When to go: This hike can be done from mid-July to the end of August, when the bus to Hatanagi dam is running. If you’ve got your own transport then you can attempt much earlier or later in the season. A winter ascent may able be possible with the right equipment and experience.

Access: From Shizuoka station (静岡駅), take a bus bound for Hatanagi-daiichi Dam (畑薙第一ダム) and get off at the dam. Change to a shuttle bus bound for Sawara-jima Lodge (椹島ロッジ). Please note that the bus to Hatanagi-daiichi has been discontinued as of May 31st, 2008, and has been replaced by a seasonal bus running only from July 19th to August 31st. Click here for the bus schedule for the bus from Shizuoka to the dam and here for the shuttle bus schedule from the dam to the lodge.

Level of difficulty: 5 out of 5 (elevation change ~2000m)

Mt. Tomuraushi (トムラウシ)

March 9, 2009

Home of the endangered Japanese pika, Mt. Tomuraushi is a wonderful rocky peak located at roughly the halfway point on the Daisetsuzan trekking route. The scenery and views will certainly make you believe you’ve left Japan.

tomuraushi1

The hike: First of all, I would like to thank Julian for this hike description, as I climbed this peak while doing the full Asahi-dake to Tokachi-dake traverse. From the bus stop, head to the end of the road and the trailhead. After about 5 minutes of hiking, you’ll cross a forest road, where you’ll find the lovely Higashi Daisetsu hut, which looks like a great place to stay. Click here for the website in Japanese. Continue hiking on the trail for about 90 minutes or so, until reaching a trail junction marked 温泉コース分岐 (Onsen kousu bunki). This is where foot traffic will increase signficantly, as the trail to the right leads down to a parking lot. Most people with cars just drive up here rather than hiking from the hot spring, so if you’ve got your own wheels you might consider doing the same (especially if doing this hike as a day trip, which I don’t recommend). Turn left at the junction for a moderate climb up a well-worn path. If it’s raining then the path will become a nasty mixture of water and mud, so bring gaiters if you’ve got them. After about 45 minutes or so, you’ll reach an unmarked junction, which is where the old path joins the new. The old path is closed, so stay towards the left and climb through an area of thick bamboo grass. This grass is trimmed during the summer hiking season, but may not be maintained out of season, so exercise caution. The next hour or so is relatively gentle until dropping steeply to a the ‘Robin’ stream (こまどり沢). Be sure to boil and filter any water from the stream, because it could be contaminated with the echinococcus parasite. Cross the stream and stay on the right bank (following the paint marks on the rocks if the weather is bad). If hiking before August then you’ll have to cross a rather large snowfield before reaching 前トム平 (Mae-tomu-dai), a great place for a break. The trail will start to become quite rocky now, passing through areas of wildflowers before reaching a small pond at トムラウシ公園 (Tomuraushi-koen). Be sure to follow the paint marks, since it’s easy to get lost if the cloud is in. The scenery is spectacular, and you’ll reach a junction in about an hour or so. To the left there is a small campsite with a water source (again, be sure to boil) but no toilet. Turn right for the steep, 20-minute climb to the summit. It should have taken anywhere from 6 to 8 hours to reach the summit, so be sure to bring plenty of supplies and consider breaking this up into a 2-day hike. You can either retrace your steps to the campsite, or consider traversing over to Hisago-numa hut (ヒサゴ沼小屋), which will take another 2 or 3 hours of ridge hiking. Alternatively, you could consider heading all the way back to Tomuraushi Onsen, but that’d be over 30km of hiking in one day! Click here for some nice photos of the route.

When to go: This hike can only been done in the summer, when the bus to the trailhead is running. If you’ve got your own transport, however, you can go a little earlier or later in the season. Alternatively, the peak is on the main Daisetsuzan trekking route, and can be approached from the north via Chuubetsu-dake. Be prepared for a lot of snow if attempting before July.

Access: From Obihiro (帯広) station, take a local train on the JR Nemuro line and get off at Shintoku (新得) station. You can also take a limited express train, but it’ll cost twice the amount. From Shintoku, take a bus bound for Tomuraushi Onsen (トムラウシ温泉) and get off at the final stop. As of 2011, the bus is by reservation only and runs between July 16th and August 14th. Click here for the schedule.

Level of difficulty: 4 out of 5 (elevation change 1176m)

Mt. Shirouma (白馬岳)

February 17, 2009

This blog post was written back in 2009. For the latest information about this hike (including color photos and maps), please consider purchasing my guidebook to the Japan Alps. 

Mt. Shirouma is the highest peak in the Hakuba section of the Kita Alps and on the top of most Japanese hikers ‘to climb’ list. It also happens to be one of the few peaks in Japan with year-round snow fields.

shirouma1

The hike: From the bus stop, the trail starts between the large mountain hut and the toilet. If you don’t have crampons then you can usually buy simple 2-pointers from the hut which should be sufficient (unless climbing early in the season). The trail initially follows a gravel forest road, passing by a gargantuan concrete waterfall – easily the tallest artificial fall in Japan. The road eventually turns into a hiking trail proper, and you’ll reach a pair of huts and campground, just below the start of the Daisekkei (great snow field). Take a break and inquire at the hut about current snow conditions/avalanche risk. The Daisekkei is not to be taken lightly, as a landslide in July 2008 killed two people and rockfalls are very common. Bring a helmet just in case if you’ve got one. Put on your crampons before stepping out into the snowfield and please wear some eye protection if the sun is out. You’ll be hiking in the snow for most of the way, so just follow the crowds/footprints. Overall it’s not too bad of a slog, and you should reach the ridge line in anywhere from 2-1/2 to 4 hours, depending on conditions. There’s a huge hut staring at you at the junction, as well as a modest campground. Turn right and pass another hut, and you’ll be on the summit of Mt. Shirouma in another 10 minutes or so. The views are outstanding if the weather is good (consider yourself very lucky if it is – Hakuba is notorious for cloudy weather in the Alpine backcountry). From the summit, you’ve got 4 options. You can either retrace your steps all the way back to Sarukura, or continue on the same ridge line over to Mt. Yukigura (雪倉岳) or down to Mt. Norikura (乗鞍岳). Alternatively, you can head down the back side of the mountain towards Keyaki-daira (欅平). This trail is not used very much, so I can’t attest for the condition. A better option might be to stay on top overnight, catch the sunrise, and then hike along the ridge over to Mt. Yari (鎗ヶ岳) and down to Yari Hot Spring (鎗温泉). Take a left at the first junction on the other side of Mt. Yari, and you’ll arrive at the hot spring in another hour. This trail actually ends up back at Sarukura, making a great 3-day loop hike.

When to go: This hike can be done from early June to early October, when the buses to Sarukura are running. You could also go earlier if you’ve got crampons and an ice axe. Avalanches are common in the Daisekkei until the end of May, so be careful if hiking in the spring. Click here if you don’t believe me.

Access: From Matsumoto (松本) station, take the JR Ooito line to Hakuba (白馬) station. From there, take a bus bound for Sarukura (猿倉) and get off at the final stop. Click here for the bus schedule. There are also overnight Alpico Group buses from Shinjuku station in Tokyo directly to Hakuba

Live web cam: Click here

Level of difficulty: 5 out of 5 (elevation change 1702m)